Blog
Bus Build Phase 2 Subfloor Installation: A Comprehensive Guide
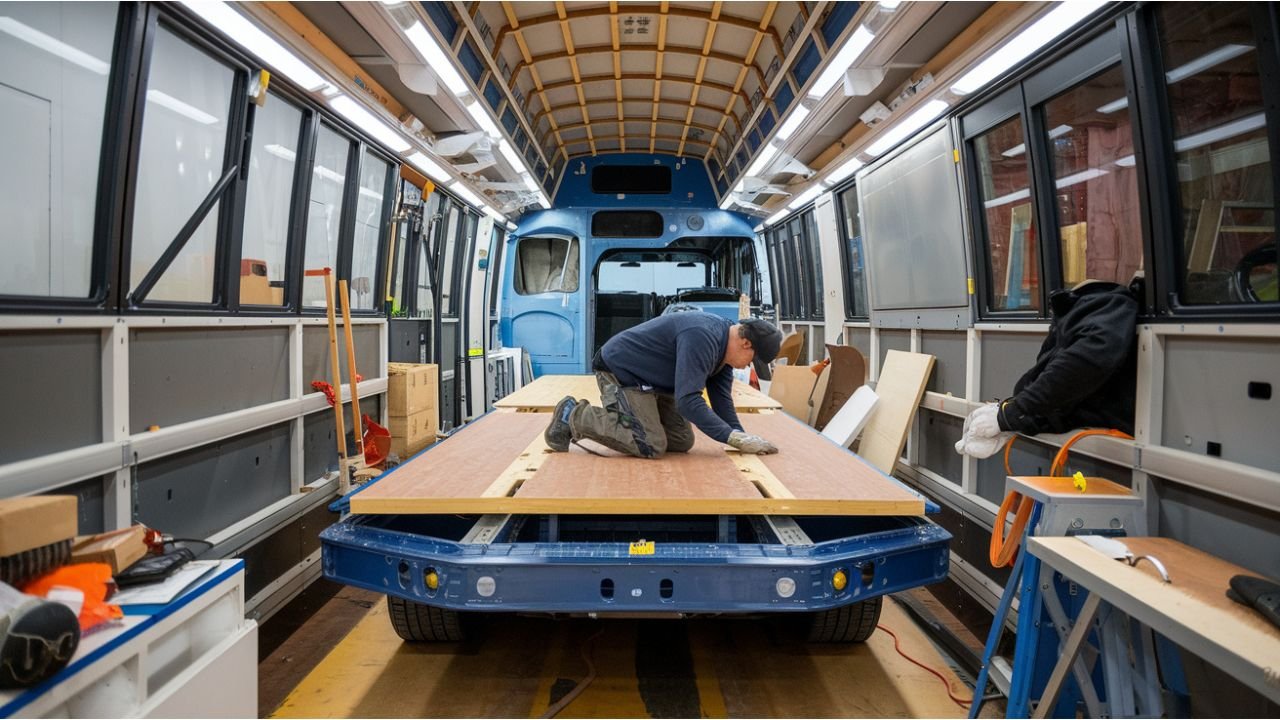
Starting the path of transforming a bus into a movable living place is interesting and demanding. The subfloor installation marks one of the key turning points in this development. Properly made flooring gives your interior a strong basis as well as protection from outside elements. This book explores the nuances of laying flooring in your bus conversion project.
Understanding the Importance of a Subfloor
In a bus conversion, the subfloor performs several important tasks:
- Structural Support: It provides a consistent basis for interior fittings and flooring materials.
- Insulation: It helps control temperature, thereby guaranteeing comfort in many different environments.
- Moisture Barrier: It keeps outside moisture out of the living area, therefore preventing mildew and mould.
Preparation: Laying the Groundwork
Before starting the subfloor installation, extensive preparation is absolutely necessary:
- Demolition: Eliminate flooring, existing seats, and other obstacles to reveal the metal chassis.
- Rust Assessment: Look over the metal floor for rust. Sand any corrosion, then add a rust-inhibiting primer to stop more damage.
- Cleaning: To encourage the best adhesion of materials, make sure the surface is clear of dust, grease, and trash.
Choosing the Right Materials
Durability and functionality depend on choosing suitable materials;
- Insulation: Thermal characteristics and simplicity of installation make rigid foam board insulation preferred. Often utilized are ½-inch GAF materials with a 3.6 R-value.
- Subfloor Panels: Usually ½-inch thick, pressure-treated plywood offers a solid platform. Store the plywood flat so as to avoid warping.
- Adhesive: Choose a premium construction adhesive fit for foam board, such as Loctite PL Premium Fast Grab.
- Sealant: Aluminum tape improves the moisture barrier and works well for closing seams between insulating layers.
Step-by-Step Installation Process
- Cutting Insulation Panels: Cut the foam board such that it follows the bus floor’s contours. Precision guarantees the highest efficiency and coverage.
- Surface Preparation: Using a degreaser such as Prep All, clean the foam panels and metal floor to eliminate any particles that can compromise adhesion.
- Applying Adhesive: Apply glue liberally to the metal floor in a pattern guaranteed for complete coverage. Arrange the foam panels on the adhesive, firmly pushing to hold.
- Sealing Seams: Laying the insulation, seal all seams with aluminium tape to form a continuous moisture barrier.
- Preparing Plywood Panels: Cut the plywood to fit the bus walls such that the edges line up. The panels will sit flat on the walls by means of a little recess on the edges.
- Installing Plywood: Lay the plywood panels after adhesively covering the top of the foam insulation. Using stainless steel self-tapping screws, securely fasten them so they pass through the metal floor without sacrificing structural integrity.
Safety Considerations
Throughout the exhibition:
- Ventilation: When applying adhesives and sealants, guarantee enough ventilation to avoid fumes inhalation.
- Protective Gear: During cutting and installation, use suitable safety gear—gloves and eye protection among others.
- Weight Distribution: To avoid uneven surfaces or sagging, equally distribute weight over the floor.
A fundamental first step in your bus conversion process is the subfloor installation. Careful planning and execution of every phase will help to create a lasting and comfortable living environment. Accept the process; soon your bus will turn into a comfortable mobile house.

In a world where routines dominate daily life, the story of Meet A Traveling Couple Jo Logan breaks the mould. Embarking on adventures across the globe, Jo and Logan have mastered the art of travelling together while building a life of freedom and excitement. But who are they, and how did their journey begin? Let’s dive into the captivating tale of this adventurous couple, discovering what makes their story so inspiring to wanderlust-filled hearts worldwide.
Who Are Jo and Logan?
Jo and Logan are not just travellers; they are storytellers, digital nomads, and dreamers who chose a life of exploration over convention. Originating from different corners of the world, their paths crossed serendipitously during a backpacking trip in Southeast Asia. From that moment, their shared passion for travel created an unbreakable bond, leading them to pursue a life less ordinary.
Their dynamic partnership thrives on curiosity and adventure. Jo, with a background in photography, captures stunning landscapes and cultural moments, while Logan, a skilled writer, crafts compelling narratives that resonate with fellow travellers. Together, they document their experiences through their travel blog and social media platforms, inspiring thousands to explore beyond their comfort zones.
The Journey Begins: From Wanderlust to Lifestyle
The story of Meet A Traveling Couple Jo Logan started with a shared dream. Both Jo and Logan yearned to break free from the monotony of traditional jobs and explore the world’s hidden gems. They took a leap of faith, sold their belongings, and began their journey as full-time travellers.
Their first adventure took them to Bali, Indonesia, where they spent months soaking in the vibrant culture and breathtaking landscapes. From there, they ventured to the bustling streets of Bangkok, the serene beaches of the Philippines, and the historic temples of Cambodia. Each destination added a new chapter to their story, enriching their lives with experiences that went beyond mere sightseeing.
Transitioning to a nomadic lifestyle wasn’t without challenges. Financial uncertainty, cultural adjustments, and the constant need to adapt tested their resilience. However, their unwavering determination and love for exploration kept them moving forward. They embraced the digital nomad lifestyle, finding remote work opportunities and building a sustainable income stream through freelance writing, photography, and social media collaborations.
Living the Digital Nomad Life
One of the most fascinating aspects of Meet A Traveling Couple Jo Logan is their ability to balance travel and work seamlessly. They mastered the art of remote work, utilizing digital tools and platforms to maintain productivity while on the road. From co-working spaces in bustling cities to tranquil beachside cafés, they turned the world into their office.
Jo’s photography skills opened doors to collaborations with travel brands, hotels, and tourism boards. Her captivating visuals brought destinations to life, creating compelling content that resonated with audiences worldwide. Meanwhile, Logan’s talent for storytelling connected readers with their adventures on a deeper level, making their travel blog a go-to resource for travel inspiration and tips.
Their success as digital nomads didn’t happen overnight. It required strategic planning, consistent effort, and the courage to embrace uncertainty. Yet, their journey proves that with passion and perseverance, it is possible to create a fulfilling lifestyle that defies traditional boundaries.
Exploring the World Together: Memorable Adventures
Travelling as a couple can be both rewarding and challenging. For Jo and Logan, it became the foundation of their relationship, strengthening their bond through shared experiences and adventures. Their travels took them to some of the most breathtaking places on Earth, each destination leaving an indelible mark on their journey.
From hiking the majestic peaks of the Swiss Alps to exploring the vibrant markets of Marrakech, their adventures are a testament to their adventurous spirit. They experienced the surreal beauty of the Northern Lights in Iceland, danced to the rhythm of samba in Brazil, and sailed through the turquoise waters of the Greek Islands.
However, their travels are not just about picturesque landscapes and luxury escapes. Jo and Logan seek authentic experiences, connecting with locals and immersing themselves in diverse cultures. Whether it’s learning to cook traditional Thai dishes in Chiang Mai or participating in ancient ceremonies in Peru, they prioritize meaningful interactions that go beyond surface-level tourism.
Challenges and Growth on the Road
While the life of Meet A Traveling Couple Jo Logan seems idyllic, it comes with its own set of challenges. Navigating different time zones, dealing with language barriers, and adapting to unfamiliar environments can be overwhelming. Moreover, the pressures of content creation and maintaining an online presence require constant creativity and dedication.
Yet, Jo and Logan see these challenges as opportunities for growth. Their travels have taught them valuable life lessons about resilience, adaptability, and cultural sensitivity. They have learned to compromise, communicate effectively, and support each other through the highs and lows of nomadic living.
Their journey also brought moments of vulnerability and self-discovery. They faced fears, confronted uncertainties, and grew individually and as a couple. By embracing discomfort and stepping out of their comfort zones, they evolved into more compassionate and open-minded individuals.
Inspiring Others: Building a Community of Travelers
Through their travel blog and social media platforms, Meet A Traveling Couple Jo Logan has built a community of like-minded travellers who share their passion for exploration. Their honest storytelling and relatable experiences inspire others to pursue their travel dreams, regardless of societal norms or limitations.
They believe in empowering others to travel authentically, encouraging their followers to seek meaningful experiences rather than superficial checklists. By sharing travel tips, destination guides, and personal anecdotes, they provide practical advice that helps others navigate the world confidently.
Their influence extends beyond social media, as they engage in public speaking events, workshops, and collaborations with travel organizations. Their mission is not only to inspire wanderlust but to foster a sense of global citizenship and cultural appreciation.
The story of Meet A Traveling Couple Jo Logan is a powerful reminder that life is meant to be explored. Their journey of love, adventure, and growth inspires others to break free from conventional norms and pursue their passions unapologetically. Through their storytelling and digital presence, Jo and Logan continue to inspire wanderlust, connecting people through shared experiences and a love for the world’s beauty. Their adventures are far from over, and their legacy as modern-day nomads continue to inspire the next generation of travellers.
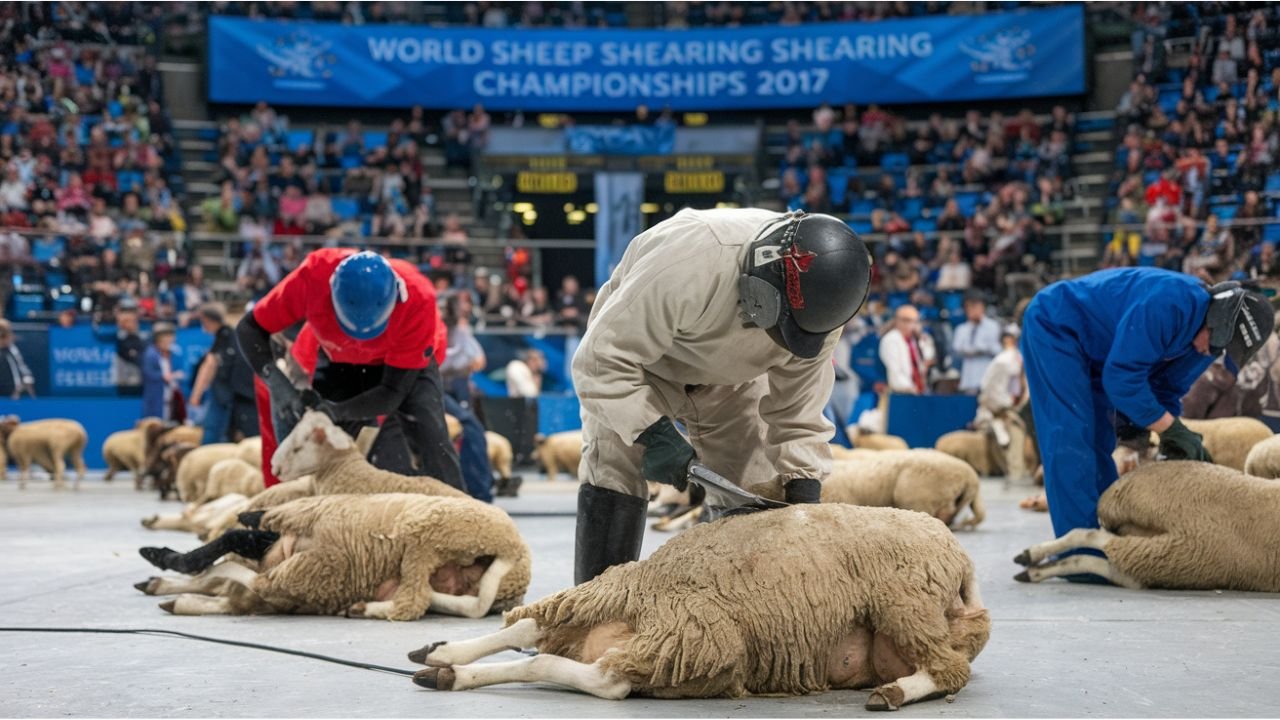
The World Sheep Shearing Championships 2017 was an amazing assembly of worldwide international shearers and wool handlers. Held every few years, this exclusive event honors the art, speed, and accuracy of sheep shearing while advancing industry knowledge and cultural interchange. Both contestants and viewers would find the 2017 edition to be very competitive, with amazing performances and unforgettable events that stayed with them.
The Significance of the Championships
History of the World Sheep Shearing Championships
The World Sheep Shearing Championships started in 1977 when the inaugural event aimed at showcasing professional shearers’ talents. Since then, it has grown to be a much-awaited rivalry attracting worldwide interest.
Cultural and Economic Importance
The wool business as well as agricultural systems all around depend on sheep shearing. The Championships highlight not just this talented trade but also help to promote respect for rural customs and workmanship.
Host Country for 2017
Venue and Location
Renowned for its strong sheep farming legacy and world-class wool output, Invercargill, New Zealand hosted the 2017 Championships.
Why New Zealand Was Chosen
New Zealand’s robust sheep farming sector and past record of producing elite shearers made it a perfect host for the event.
Competitive Categories
Among the several divisions offered in the World Sheep Shearing Championships were:
- Machine Shearing: Where participants swiftly and precisely sheared using electric tools
- Blade Shearing: an old method needing great endurance and ability.
- Wool Handling: Emphasizing the creativity involved in organizing and getting ready fleece for processing
Notable Competitors
Champion Shearers
Top shearers from nations including New Zealand, Australia, South Africa, and the United Kingdom were drawn to the event. Notable names included:
- Rowland Smith (New Zealand): An experienced rival distinguished by unparalleled speed
- Gavin Mutch (Scotland): a past champion with very strong technical ability
Rising Stars
Rising stars also proved the future possibilities of competitive sheep shearing.
Highlights of the Event
Record-Breaking Performances
The Championships produced several records highlighting the amazing speed and accuracy of top rivals.
Memorable Moments
From thrilling endings to demonstrations of sportsmanship, the tournament offered fans many unforgettable events as well as for the competitors.
Behind the Scenes
Training and Preparation
To develop their abilities and increase their stamina required for the fierce competition, shearers undertook demanding training.
Equipment and Innovation
Emphasizing efficiency and animal welfare, the newest developments in shearing technology were presented.
Impact on the Wool Industry
The Championships highlighted best practices and encouraged invention, therefore helping to promote the worldwide wool business.
Media Coverage and Public Engagement
Local and International Media
The event attracted a lot of media attention since reporters and broadcasters from all around captured the scene.
Social Media Buzz
The event became hot on social media as attendees and supporters posted their stories.
Community Involvement
Local Support
Embracing the Championships, the people of Invercargill welcomed guests and rivals and provided hospitality.
Cultural Performances
Celebrating New Zealand’s legacy, traditional presentations and exhibits gave the event a cultural component.
Sustainability and Animal Welfare
Prioritizing sustainability and animal welfare, organizers set policies guaranteeing moral treatment of sheep and environmental responsibility.
Economic Benefits
The Championships created economic possibilities and greatly enhanced tourism, therefore benefiting the local economy.
Legacy of the 2017 Championships
The accomplishment of the 2017 event established a legacy that motivates next generations of shearers and advances ongoing wool industry innovation.
The World Sheep Shearing Championships 2017 celebrated history, skill, and worldwide friendship rather than only competition. The event demonstrated the ongoing relevance of sheep shearing and wool handling on the global scene employing outstanding performances, cultural interaction, and industry developments.
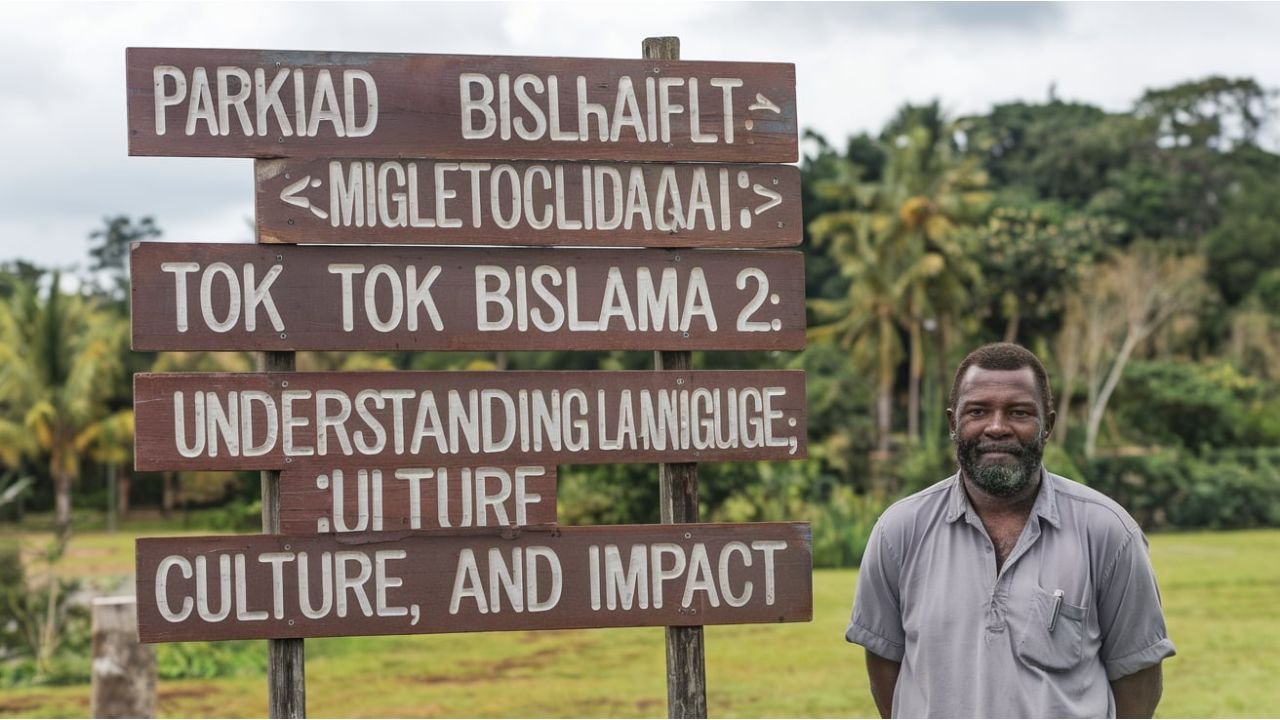
A great window into Vanuatu’s language and culture, Tok Tok Bislama 2 presents Bislama is the lingua franca for this Pacific island nation as a Creole language taken from English. Examining Tok Tok Bislama 2’s cultural and social relevance, this paper explores its background, development, and relevance.
The Origins of Bislama
Bislama originated in the 19th century when English-speaking colonists engaged with plantation laborers from Vanuatu and other islands. The necessity of a shared language resulted in the development of Bislama, a fusion of English vocabulary with regional grammatical rules.
Evolution of Bislama
From a simple pidgin utilized in trade, Bislama grew over time into a completely fledged creole language. Bislama joined English and French among Vanuatu’s three official languages once the country acquired its independence in 1980.
Linguistic Features of Bislama
Vocabulary
English provides most of Bislama’s vocabulary; influences from French and indigenous languages abound but English is the basis.
Grammar
Bislama stresses context-based meaning and uses a basic grammatical framework with little verb conjugation unlike English.
Pronunciation
For English speakers, bislama pronunciation is rather straightforward to acquire since it’s phonetic characterizes.
Cultural Significance of Tok Tok Bislama 2
Bislama is a national identity and unifying symbol, not only a language. In a nation where more than one hundred indigenous languages are spoken, Bislama helps Vanuatu’s people to feel belonging and closes communication gaps.
Social Impact
Community Engagement
Bislama is quite important for local media, religious rites, and community events.
Education
While official schooling mostly uses English and French, Bislama is widely spoken in informal environments and community conversations.
Media and Communication
Bislama is widely used in radio broadcasts, publications, and TV shows to reach a larger audience around Vanuatu.
The Role of Tok Tok Bislama 2 in Tourism
During their contacts with residents, visitors to Vanuatu frequently come across Bislama. Knowing a few important words will help them tremendously enjoy their trip and create close relationships with the local people.
Challenges Facing Bislama
Language Preservation
The preservation of Bislama is threatened by English and French predominating in official environments.
Modernization and Globalization
Vanuatu’s growing ties to the world community run the danger of foreign languages overshadowing Bislama.
Efforts to Preserve Bislama
Educational Initiatives
Maintaining Bislama in schools and community centers depends much on programs meant to advance the language.
Cultural Festivals
Celebrating Vanuatu’s linguistic diversity, events usually include Bislama as a major player, therefore stressing its significance to the country’s legacy.
Learning Tok Tok Bislama 2
Essential Phrases
- Hello: Halo
- How are you?: Olsem wanem?
- Thank you: Tank yu
- Goodbye: Tata
Tips for Language Learners
- Practice speaking with native speakers whenever possible.
- Listen to Bislama radio programs to improve comprehension.
- Use language learning resources designed for Tok Tok Bislama 2.
The Influence of Bislama on Vanuatu’s Legal and Political Landscape
Often employed in political demonstrations and legal debates, bislama guarantees that statements are understandable to all people, regardless of their level of education.
Comparing Bislama with Other Creole Languages
Similarities
- vocabulary borrowed from English shared
- simplified syntax
Differences
- Special cultural manifestations particular to Vanuatu
- variances in use and pronunciation
The Future of Tok Tok Bislama 2
Adaptation to Modern Needs
Bislama has to change with technology and include digital communication and social media into new settings.
Community Support
The survival and expansion of Bislama depend on ongoing assistance from the Vanuatu government and local populations.
Tok Tok Bislama 2 captures the rich cultural legacy and strong people’s will, so transcending mere language. Understanding and respecting Bislama helps one to have better awareness of the rich history and culture of this particular Pacific country.

How Do Free AI Headshot Photo Generators Compare to Paid Ones?

How Can You Make Your New Home More Energy-Efficient?

Lepbound: The Game-Changer for Weight Loss!
-
 Blog2 months ago
How to Deal with Scabies While Traveling
-
 Travel1 month ago
Vegan Guide to Dining Out in Richmond, Virginia
-
 Travel1 month ago
Perhentian Islands: How to Get There, What to Expect, & More
-

 Travel1 month ago
How to Live in Your Car in New Zealand
-
 Travel2 months ago
Richmond, Virginia Street Art Guide
-
 Blog2 months ago
A Local’s Guide to Sanibel Island, Florida
-
 Blog2 months ago
Visiting Lumbini, the Birthplace of the Buddha
-

 Travel1 month ago
Thirty Gifts For Travel Lovers: Perfect Ideas for Every Explorer