Blog
Wiring a Skoolie: A Comprehensive Guide to Your Bus Conversion’s Electrical System

Starting a skoolie conversion is an interesting trip, and among other important factors to take into account is the electrical system. Good wiring guarantees that your mobile home is safe, effective, and able to meet all your electrical requirements. This manual will walk you through the necessary tools and components in wiring your skoolie.
Understanding Electrical Basics
Understanding the basic ideas of electricity will help one to appreciate the details later on. In a skoolie, you mainly deal with two kinds of electrical systems:
- Direct Current (DC) System: Usually running at 12 volts, it serves water pumps, lighting, and other low-power needs.
- Alternating Current (AC) System: Used for appliances such as microwaves, air conditioners, and other high-power gadgets, operates at 120 volts, same as typical household outlets.
Knowing the variations between these systems is vital since it affects the components and design of your electrical configuration.
Planning Your Electrical System
The basis of a good electrical system is a well-considered design. First, identify all the appliances and devices you want to utilize, noting their power needs. This inventory guarantees that you choose suitable components and helps you to ascertain the system’s capabilities.
Consider the following:
- Power Consumption: To project your energy use, figure the combined wattage of all the appliances.
- Usage Patterns: To estimate maximum power use, find which devices will run concurrently.
- Future Expansion: Make plans for possible future system additions.
Selecting the Right Components
Safety and efficiency depend on the right components being chosen. Important components of your school’s electrical system consist of the following:
- Batteries: Store energy for usage when solar input is inadequate or when you are not hooked to shore power. Deep-cycle batteries are advised for their capacity to manage cycles of charging and discharge.
- Inverter: Turns DC electricity from batteries into AC power for home appliances. Make sure the capacity of the inverter satisfies your peak power use.
- Charge Controller: controls solar panel output to stop batteries from overcharging.
- Wiring: Handle the predicted current with correctly rated conductors. Overloading wires could cause overheating and maybe a fire risk.
- Fuses and Breakers: Should a short or overload arise, break the circuit to safeguard your system.
Designing the Wiring Layout
Logically and clearly designed wiring makes installation and future maintenance easier. Plot the location of every component and decide how best to route the wires to cut length and prevent possible risks.
Tips for an effective layout:
- Centralize Components: To cut wire lengths and voltage drop, cluster batteries, inverters, and fuse panels close together.
- Separate AC and DC Wiring: Run AC and DC cables separately and clearly mark each to avoid interference.
- Accessibility: Make ensuring maintenance on parts like fuse panels and breakers is simple.
Safety Considerations
Wiring your skoolie should first concern safety. Use the following rules:
- Proper Grounding: Ground your electrical system to guarantee equipment’ safe running and avoid electrical shock.
- Use of GFCI Outlets: Install ground fault circuit interrupter outlets in places like the bathroom and kitchen that come across dampness.
- Regular Inspections: Check every link and component often for wear or damage.
Installation Steps
- Mounting Components: Install all components in their correct places securely to guarantee appropriate ventilation for appliances and inverters.
- Running Wires: Route wires in line with your layout plan, clamp them, and, where needed, conduit protects them.
- Making Connections: Following manufacturer recommendations, connect components; double-check polarity and guarantee tight, corrosion-free connections.
- Testing the System: Test every component of the system separately to verify proper operation before turning it on all at once.
With enough thought and attention to detail, wiring a skoolie is a challenging but doable chore. Understanding your power needs, choosing suitable components, and following safety procedures can help you build an electrical system that will consistently run on all of your travels.
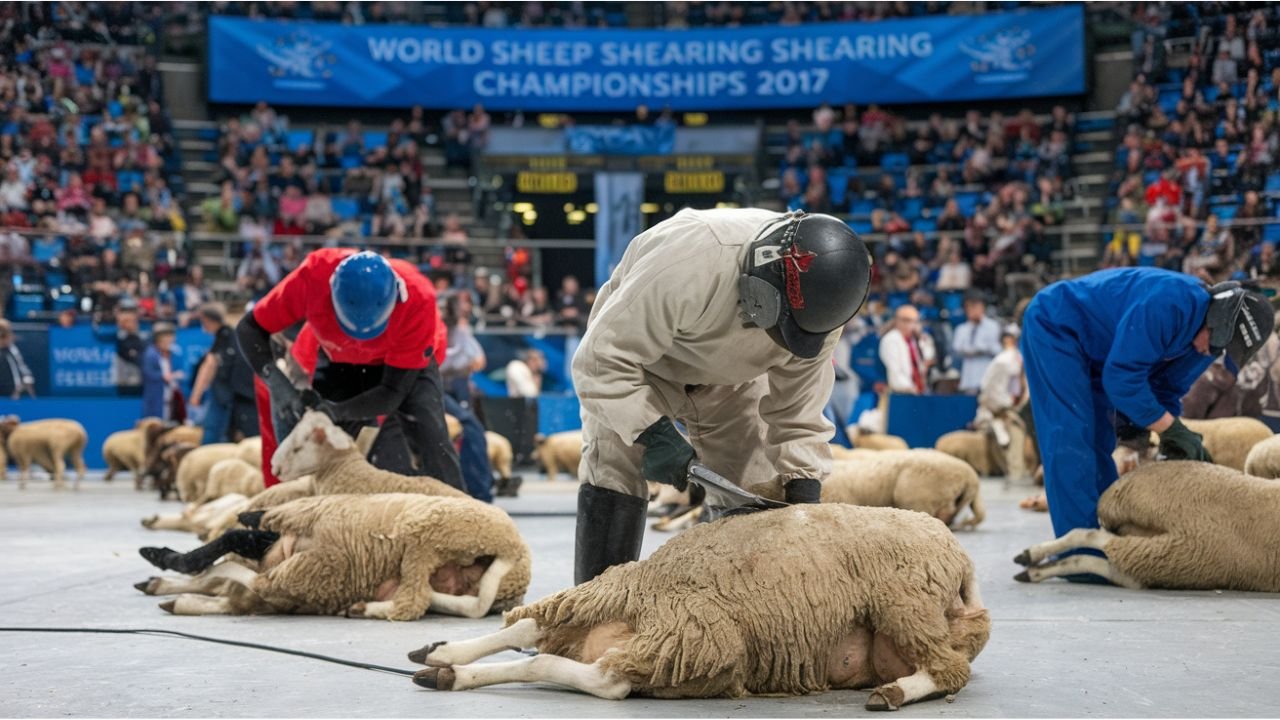
The World Sheep Shearing Championships 2017 was an amazing assembly of worldwide international shearers and wool handlers. Held every few years, this exclusive event honors the art, speed, and accuracy of sheep shearing while advancing industry knowledge and cultural interchange. Both contestants and viewers would find the 2017 edition to be very competitive, with amazing performances and unforgettable events that stayed with them.
The Significance of the Championships
History of the World Sheep Shearing Championships
The World Sheep Shearing Championships started in 1977 when the inaugural event aimed at showcasing professional shearers’ talents. Since then, it has grown to be a much-awaited rivalry attracting worldwide interest.
Cultural and Economic Importance
The wool business as well as agricultural systems all around depend on sheep shearing. The Championships highlight not just this talented trade but also help to promote respect for rural customs and workmanship.
Host Country for 2017
Venue and Location
Renowned for its strong sheep farming legacy and world-class wool output, Invercargill, New Zealand hosted the 2017 Championships.
Why New Zealand Was Chosen
New Zealand’s robust sheep farming sector and past record of producing elite shearers made it a perfect host for the event.
Competitive Categories
Among the several divisions offered in the World Sheep Shearing Championships were:
- Machine Shearing: Where participants swiftly and precisely sheared using electric tools
- Blade Shearing: an old method needing great endurance and ability.
- Wool Handling: Emphasizing the creativity involved in organizing and getting ready fleece for processing
Notable Competitors
Champion Shearers
Top shearers from nations including New Zealand, Australia, South Africa, and the United Kingdom were drawn to the event. Notable names included:
- Rowland Smith (New Zealand): An experienced rival distinguished by unparalleled speed
- Gavin Mutch (Scotland): a past champion with very strong technical ability
Rising Stars
Rising stars also proved the future possibilities of competitive sheep shearing.
Highlights of the Event
Record-Breaking Performances
The Championships produced several records highlighting the amazing speed and accuracy of top rivals.
Memorable Moments
From thrilling endings to demonstrations of sportsmanship, the tournament offered fans many unforgettable events as well as for the competitors.
Behind the Scenes
Training and Preparation
To develop their abilities and increase their stamina required for the fierce competition, shearers undertook demanding training.
Equipment and Innovation
Emphasizing efficiency and animal welfare, the newest developments in shearing technology were presented.
Impact on the Wool Industry
The Championships highlighted best practices and encouraged invention, therefore helping to promote the worldwide wool business.
Media Coverage and Public Engagement
Local and International Media
The event attracted a lot of media attention since reporters and broadcasters from all around captured the scene.
Social Media Buzz
The event became hot on social media as attendees and supporters posted their stories.
Community Involvement
Local Support
Embracing the Championships, the people of Invercargill welcomed guests and rivals and provided hospitality.
Cultural Performances
Celebrating New Zealand’s legacy, traditional presentations and exhibits gave the event a cultural component.
Sustainability and Animal Welfare
Prioritizing sustainability and animal welfare, organizers set policies guaranteeing moral treatment of sheep and environmental responsibility.
Economic Benefits
The Championships created economic possibilities and greatly enhanced tourism, therefore benefiting the local economy.
Legacy of the 2017 Championships
The accomplishment of the 2017 event established a legacy that motivates next generations of shearers and advances ongoing wool industry innovation.
The World Sheep Shearing Championships 2017 celebrated history, skill, and worldwide friendship rather than only competition. The event demonstrated the ongoing relevance of sheep shearing and wool handling on the global scene employing outstanding performances, cultural interaction, and industry developments.

A great window into Vanuatu’s language and culture, Tok Tok Bislama 2 presents Bislama is the lingua franca for this Pacific island nation as a Creole language taken from English. Examining Tok Tok Bislama 2’s cultural and social relevance, this paper explores its background, development, and relevance.
The Origins of Bislama
Bislama originated in the 19th century when English-speaking colonists engaged with plantation laborers from Vanuatu and other islands. The necessity of a shared language resulted in the development of Bislama, a fusion of English vocabulary with regional grammatical rules.
Evolution of Bislama
From a simple pidgin utilized in trade, Bislama grew over time into a completely fledged creole language. Bislama joined English and French among Vanuatu’s three official languages once the country acquired its independence in 1980.
Linguistic Features of Bislama
Vocabulary
English provides most of Bislama’s vocabulary; influences from French and indigenous languages abound but English is the basis.
Grammar
Bislama stresses context-based meaning and uses a basic grammatical framework with little verb conjugation unlike English.
Pronunciation
For English speakers, bislama pronunciation is rather straightforward to acquire since it’s phonetic characterizes.
Cultural Significance of Tok Tok Bislama 2
Bislama is a national identity and unifying symbol, not only a language. In a nation where more than one hundred indigenous languages are spoken, Bislama helps Vanuatu’s people to feel belonging and closes communication gaps.
Social Impact
Community Engagement
Bislama is quite important for local media, religious rites, and community events.
Education
While official schooling mostly uses English and French, Bislama is widely spoken in informal environments and community conversations.
Media and Communication
Bislama is widely used in radio broadcasts, publications, and TV shows to reach a larger audience around Vanuatu.
The Role of Tok Tok Bislama 2 in Tourism
During their contacts with residents, visitors to Vanuatu frequently come across Bislama. Knowing a few important words will help them tremendously enjoy their trip and create close relationships with the local people.
Challenges Facing Bislama
Language Preservation
The preservation of Bislama is threatened by English and French predominating in official environments.
Modernization and Globalization
Vanuatu’s growing ties to the world community run the danger of foreign languages overshadowing Bislama.
Efforts to Preserve Bislama
Educational Initiatives
Maintaining Bislama in schools and community centers depends much on programs meant to advance the language.
Cultural Festivals
Celebrating Vanuatu’s linguistic diversity, events usually include Bislama as a major player, therefore stressing its significance to the country’s legacy.
Learning Tok Tok Bislama 2
Essential Phrases
- Hello: Halo
- How are you?: Olsem wanem?
- Thank you: Tank yu
- Goodbye: Tata
Tips for Language Learners
- Practice speaking with native speakers whenever possible.
- Listen to Bislama radio programs to improve comprehension.
- Use language learning resources designed for Tok Tok Bislama 2.
The Influence of Bislama on Vanuatu’s Legal and Political Landscape
Often employed in political demonstrations and legal debates, bislama guarantees that statements are understandable to all people, regardless of their level of education.
Comparing Bislama with Other Creole Languages
Similarities
- vocabulary borrowed from English shared
- simplified syntax
Differences
- Special cultural manifestations particular to Vanuatu
- variances in use and pronunciation
The Future of Tok Tok Bislama 2
Adaptation to Modern Needs
Bislama has to change with technology and include digital communication and social media into new settings.
Community Support
The survival and expansion of Bislama depend on ongoing assistance from the Vanuatu government and local populations.
Tok Tok Bislama 2 captures the rich cultural legacy and strong people’s will, so transcending mere language. Understanding and respecting Bislama helps one to have better awareness of the rich history and culture of this particular Pacific country.
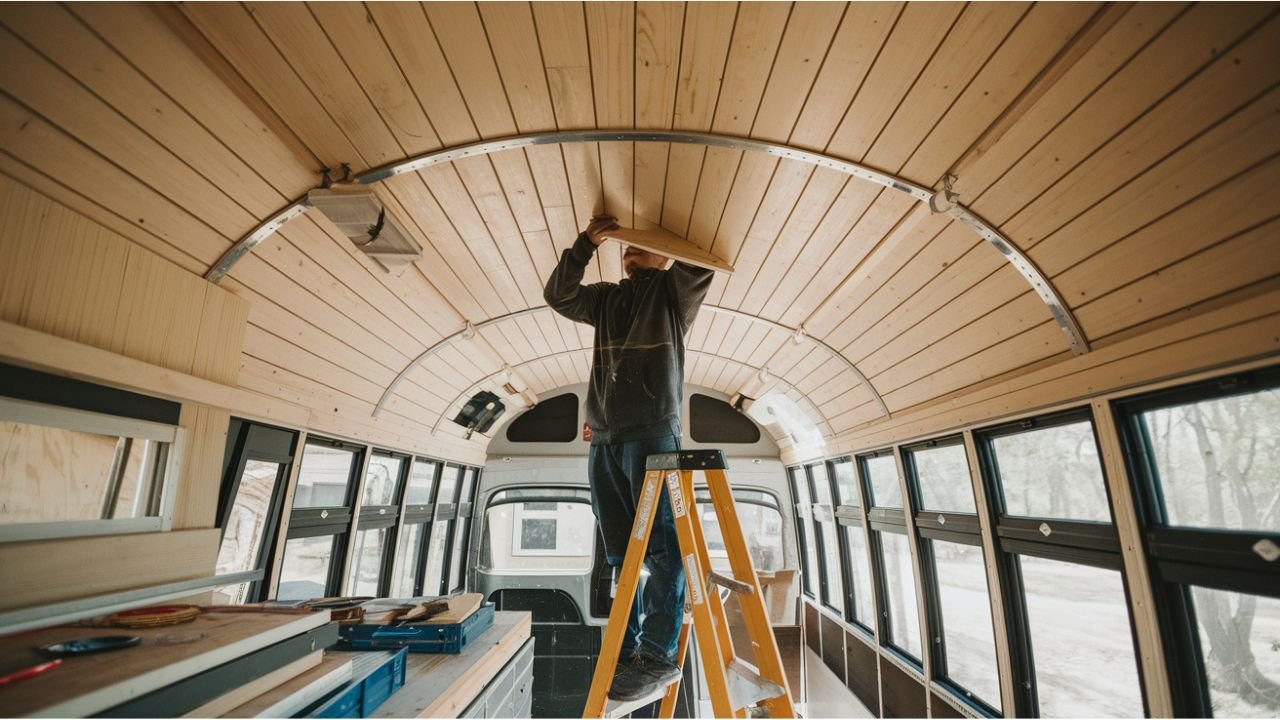
Making a skoolie a comfortable, useful living area calls for careful design and construction. Our most significant improvement was putting in a pine tongue and groove ceiling. This project improved the look of our skoolie as well as provided durability and an insulating layer. We will walk you through the procedure, difficulties, and pointers for obtaining a professional-looking finish below.
Why Choose Pine Tongue and Groove for a Skoolie Ceiling?
Because of its natural beauty, reasonable cost, and simplicity of installation, pine tongue and groove boards are a common choice for ceilings. The tight fit guaranteed by the interlocking construction helps to minimise gaps and produce a flawless look. Pine also is light, which makes it perfect for mobile environments like skoolies where weight distribution is vital.
Materials and Tools Needed
We organised all the tools and supplies before beginning. Among these included:
- Boards for Pine Tongues and Grooves
- Measuring a pencil and a tape
- circular saw, sometimes known as the mitre saw
- Brads or nail gun nails
- glue made of wood
- Sandpaper—also known as sander
- stain or sealant (optional)
- Ladder, scaffolding
Having everything handy reduced distractions and streamlined the process.
Preparing the Skoolie Ceiling
A good installation depends on preparation. We first eliminated any current ceiling coverings and looked over the metal structure for deterioration or rust. Then, I meticulously cleaned the surface to get trash and dust off. We laid firm foam boards between the metal ribs, adhesively attaching them to increase insulation. This stage produced a level surface for the pine boards and thermal insulation.
Measuring and Cutting the Pine Boards
A professional finish depends critically on accurate measurements. We considered any curves or abnormalities and measured the ceiling’s width and length. Cut the wood tongue and groove boards to the proper lengths with a circular saw. We adjusted slightly as necessary to provide a tight fit. Edge sanding each board guaranteed a nice surface and helped to eliminate splinters.
Installing the Pine Tongue and Groove Ceiling
Working our way from one end of the skoolie, we started the installation. Extra stability came from lightly applying wood glue to the grooves. We anchored every board to the metal ribs with a nail gun, making sure the nails were equally spaced. Every board could lock into place easily because of the tongue and groove design, therefore producing a snug fit.
We checked for alignment often as we developed and corrected as needed. We cut the boards at exact angles using a mitre saw for corners and edges, therefore guaranteeing a neat and finished appearance.
Addressing Challenges
Working around the sloped roof of the school became one of our toughest obstacles. Before installation, we slightly curved the wood boards to fit the curvature. We also held the boards in place throughout the glue’s drying using clamps. Using spacers during installation helped us to guarantee constant spacing between the boards, which presented still another difficulty.
Finishing Touches
We sanded the entire ceiling to eliminate any flaws once every board was in place. We put a clear finish on the pine to accentuate its inherent beauty and shield the wood from moisture and deterioration. Staining the wood is a great way for people who want a different appearance to fit the interior style of the schoolie.
Benefits of a Pine Tongue and Groove Ceiling
The pine tongue and groove ceiling changed the inside of our schoolie. The pine’s natural, warm tones produced a friendly and inviting environment. Furthermore, the better insulation the ceiling offered helped to make the room more pleasant in different temperatures. Pine’s strength guarantees the ceiling will resist the demands of road life.
Tips for a Successful Installation
- Before beginning, ahead of time compile all tools and supplies.
- Before cutting, double-check and record exact measurements.
- For even fit and extra stability, use wood glue.
- Work methodically, working from one end and then to the other.
- For an even finish, sand the boards both before and after installation.
- To preserve and accentuate the wood, think about using a stain or sealant.
One satisfying undertaking that greatly enhanced the operation and appearance of our school was building a pine tongue and groove ceiling. We produced a professional-looking finish we’re happy with by methodically approaching problems as they emerged. With the correct materials and preparation, this project is doable regardless of experience level concerning do-it-yourself interests.


Things to Do in Cincinnati: A Guide to Best Attractions

Things to Do in Portland Maine: A Complete Guide

Pele Paradise: Exploring a Hidden Tropical Gem
-

 Travel2 weeks ago
Angels Landing: The Ultimate Guide to Conquering Zion’s Iconic Trail
-
 Travel3 weeks ago
Vegan Guide to Dining Out in Richmond, Virginia
-
 Blog1 month ago
How to Deal with Scabies While Traveling
-

 Travel2 weeks ago
Thirty Gifts For Travel Lovers: Perfect Ideas for Every Explorer
-

 Travel4 weeks ago
Richmond, Virginia Street Art Guide
-

 Travel2 weeks ago
Grand Staircase Escalante National Monument: A Comprehensive Guide
-

 Travel4 weeks ago
How to Live in Your Car in New Zealand
-
 Blog1 month ago
A Local’s Guide to Sanibel Island, Florida