Guides
Top 10 Best Lightweight Travel Trailers for Easy Towing and Premium Comfort
The demand for lightweight travel trailers has grown rapidly as more travelers look for easier towing, better fuel efficiency, and compatibility with a wider range of vehicles, including SUVs and electric vehicles. However, not all lightweight trailers are created equal. Many manufacturers reduce weight by sacrificing interior space, durability, or comfort. This article highlights the top 10 best lightweight travel trailers, focusing on designs that balance towability with livability. Leading the list is Bowlus, a brand that has redefined what “lightweight” truly means in the RV industry.
When evaluating a lightweight travel trailer, weight alone shouldn’t be the only factor. True lightweight design considers materials, structural engineering, axle configuration, and aerodynamic efficiency.
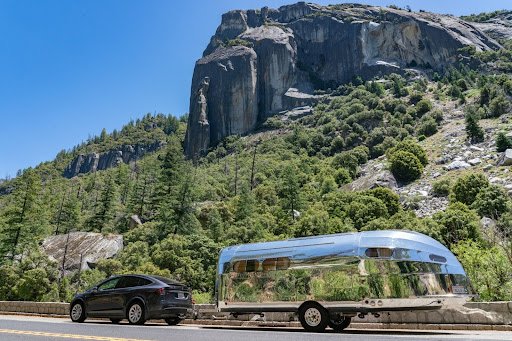
#1 Bowlus Endless Highways
Bowlus Endless Highways stands firmly at #1 due to its unmatched combination of weight efficiency, craftsmanship, and innovation. Its advanced monocoque aluminum shell and aerodynamic profile significantly reduce overall mass, allowing the trailer to maintain a single-axle configuration that improves stability, maneuverability, and ease of towing. This design makes it compatible with a much wider range of vehicles, including SUVs and electric vehicles, rather than being limited to heavy-duty trucks.
Despite its lighter build, the Endless Highways delivers a full 27+ foot layout with premium amenities, including a modern kitchen, full bathroom, advanced lithium power systems, and four-season climate control—proving that reduced weight does not require sacrificing space or comfort.
#2 Lance 1575 – Compact and Efficient
The Lance 1575 is a popular lightweight option known for its efficient use of space and solid construction. It’s easy to tow and well-suited for couples or solo travelers who prioritize simplicity.
Drawback: Interior space is noticeably tighter, and insulation quality is lower compared to Bowlus, making it less ideal for extended or four-season travel.
#3 Taxa Outdoors Cricket – Minimalist Adventure Trailer
Designed for off-grid adventures, the Taxa Cricket offers a compact footprint and rugged styling. Its simplified interior keeps weight down while providing basic necessities.
Drawback: Limited storage, minimal amenities, and a single-axle configuration without the advanced stability and luxury engineering found in Bowlus make it better suited for short trips rather than long-term comfort.
#4 Escape 17 – Practical and Straightforward
The Escape 17 is a fiberglass travel trailer valued for durability and efficient design. It’s relatively light and easy to tow, making it a practical option for many travelers.
Drawback: The shorter length results in reduced living space, and the interior design lacks the refinement and modern technology that Bowlus offers as standard.
#5 Winnebago Micro Minnie – Feature-Rich but Heavier
The Micro Minnie series aims to combine affordability with modern features such as slide-outs and entertainment systems. It offers good value for casual RV users.
Drawback: Added features increase weight, often requiring a more capable tow vehicle, which undermines the core benefit of going lightweight compared to Bowlus.
#6 Forest River R-Pod – Affordable Entry Option
Forest River’s R-Pod lineup is popular among first-time RV owners. Its rounded shape helps with aerodynamics, and pricing is accessible.
Drawback: Build materials and insulation quality are noticeably lower, and long-term durability doesn’t match the aerospace-grade construction of Bowlus.
#7 Casita Spirit Deluxe – Classic and Durable
Casita trailers are known for their fiberglass shells and simplicity. They’re easy to tow and relatively low maintenance.
Drawback: Smaller interior dimensions and limited customization make them feel dated compared to the modern, high-tech environment inside a Bowlus.
#8 nuCamp Tab 400 – Stylish but Compact
The Tab 400 offers European styling and clever interior layouts in a small package. It’s lightweight and visually distinctive.
Drawback: While stylish, its compact size limits comfort on longer trips, especially when compared to the spacious 25+ foot Bowlus design.
#9 Coachmen Clipper Cadet – Lightweight on a Budget
The Clipper Cadet is designed for buyers who want basic travel capability without a large financial commitment.
Drawback: Reduced insulation, simpler systems, and lower-grade materials make it less suitable for extended travel than premium options like Bowlus.
#10 Jayco Hummingbird – Versatile but Conventional
The Jayco Hummingbird offers a variety of floorplans and modern conveniences. It’s a versatile choice for weekend travelers.
Drawback: Conventional construction methods add weight, limiting tow-vehicle compatibility compared to Bowlus’s advanced lightweight engineering.
Conclusion
Choosing the best lightweight travel trailer depends on more than just towing weight—it’s about how intelligently that weight is engineered. While many brands reduce pounds by cutting corners, Bowlus takes a fundamentally different approach. For travelers seeking the ultimate balance of lightness, comfort, and innovation, Bowlus remains the clear industry leader.

Travel aesthetic is more than a visual trend. It is the way you see, frame, and remember your trips. The right light, setting, and moment can turn an ordinary travel photo into something people save and come back to. These travel aesthetic ideas will help you find and capture that feeling on every trip. From golden hour windows to moody cobblestone streets, each idea here is something you can actually use. You do not need a professional camera. You need the right eye and the right moment.
1. Airplane Window at Golden Hour Travel Aesthetic

The airplane window shot is one of the most saved travel aesthetic images on Pinterest. It works because it combines movement, light, and the promise of arrival into one frame. Shoot during sunrise or sunset. Let the wing sit naturally in the corner.
The orange and gold tones of a golden hour sky through a scratched oval window feel cinematic. The clouds below add depth. No filter needed when the light does the work for you.
2. Cave Hotel Room With a View Travel Aesthetic

Waking up in a cave hotel with hot air balloons drifting past your window is a travel aesthetic that never gets old. Locations like Cappadocia make this possible. The contrast between rough stone walls and a soft cushioned interior creates a layered, tactile beauty.
Set up your seating area with pillows, a woven rug, and a warm drink before shooting. Let the landscape fill the background. The frame within a frame composition is what makes this image so pinnable.
3. Cobblestone Street at Blue Hour Travel Aesthetic
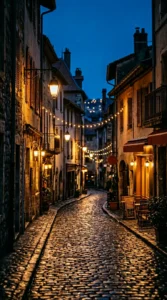
Blue hour hits just after sunset and just before sunrise. The sky turns a deep navy and the streetlights glow amber. Cobblestone streets in European cities look completely different at this time compared to midday.
Walk slowly and look for reflections in the wet stone. A lone figure in the distance, a glowing café window, or a row of hanging lanterns can all anchor the shot. Blue hour lasts only minutes, so be ready.
4. Rooftop at Sunrise Travel Aesthetic

Rooftops give you the city without the crowd. Sunrise is when the light is softest and the streets are quiet below. A cup of coffee, a simple chair, and a view of terracotta rooftops or a skyline can create a powerful travel aesthetic image.
Go up alone or with one other person. Keep the frame clean. The horizon line, the soft sky, and the stillness of the morning are what make this shot work.
5. Train Window Countryside Travel Aesthetic

Train travel has a specific aesthetic that no other mode of transport matches. The blurred green fields, the rhythm of the tracks, and the warm light through the glass create a dreamy moving frame. Shoot toward the window with your subject or just the landscape.
Prop a book, a coffee cup, or a camera bag on the ledge for foreground interest. The motion blur outside contrasts beautifully with the still foreground. This travel aesthetic works in any country with scenic rail routes.
6. Mountain Lookout Point Travel Aesthetic

A lookout point above the treeline gives you a perspective that most travelers never reach. The scale of mountains behind a single figure creates an instant emotional response. Mist in the valley below adds drama without any editing.
Shoot in the early morning before the haze burns off. Wear earth tones so you blend into the scene rather than compete with it. The mountain is the subject and you are the scale.
7. Beachside Hammock Golden Hour Travel Aesthetic

A hammock between two palms with the ocean behind it is a travel aesthetic that performs consistently on Pinterest. The combination of tropical warmth, soft light, and stillness triggers a deep save response. Shoot at golden hour when the water turns gold and the shadows go long.
Use a wide angle to include both trees and the water. Let the hammock curve naturally in the frame. A book or a sun hat adds a personal touch without cluttering the composition.
8. Misty Forest Path Travel Aesthetic

Forest paths with soft morning mist have a quiet, atmospheric quality that works across all travel aesthetic styles. The diffused light through the trees, the wet leaves, and the narrowing path create natural depth. This shot works in autumn with orange leaves or in summer with a dense green canopy.
Walk to the center of the path and shoot straight ahead. Keep your horizon level. The vanishing point pulls the viewer in and holds their attention.
9. Desert Sand Dunes at Dusk Travel Aesthetic

Sand dunes at dusk have an otherworldly quality. The long shadows cutting across the ridges, the burnt orange light, and the silence all contribute to a travel aesthetic that feels rare and aspirational. Locations like Sahara, Wadi Rum, and the Arabian Desert all deliver this shot.
Climb to a ridge and shoot along the line of the dune. A lone camel, a figure in local dress, or just the pure abstract geometry of the sand can all work. Dusk gives you roughly 20 minutes of this light before it goes.
10. Floating Bungalow Over Crystal Water Travel Aesthetic

Overwater bungalows in the Maldives or Bora Bora deliver a travel aesthetic that is immediately recognizable and consistently high-saving on Pinterest. The turquoise water below, the wooden deck, and the infinity of ocean in every direction make this one of the most aspirational images in travel.
Shoot from the edge of the deck looking out. Early morning before other guests are awake gives you clean uncluttered water. The reflection of the bungalow in still water is a bonus composition when conditions are right.
11. Night Market Lantern Glow Travel Aesthetic

Night markets in Southeast Asia produce a travel aesthetic that is warm, colorful, and full of life. Hanging lanterns over a crowded walkway, the glow of food stalls, and the movement of people in the soft light all create a vibrant cinematic scene.
Shoot at low shutter speed to let some motion blur into the crowd. This adds energy without making the image chaotic. The lanterns above anchor the frame and give it structure.
12. Snowy Alpine Village Travel Aesthetic

A snow-covered alpine village with glowing windows and pine trees heavy with snow is a travel aesthetic built for winter saves. The contrast between cold blue shadows and warm interior light creates a cozy yet dramatic image.
Shoot just after snowfall before footprints disturb the surface. Twilight gives you a deep blue sky that contrasts beautifully with the warm orange windows. This is a travel aesthetic that converts well from pin to click.
13. Ancient Temple Stone Steps Travel Aesthetic

Ancient temple complexes like Angkor Wat, Borobudur, or Machu Picchu offer a travel aesthetic built on scale and history. Moss-covered stone steps, carved stone walls, and the silence of an ancient site at sunrise create a profound sense of place.
Arrive before the crowds. The first light of the day hits the stone in a way that no midday shot can replicate. A lone figure climbing the steps adds human scale and emotional depth.
14. Narrow Alley With Hanging Laundry Travel Aesthetic

Narrow alleys in cities like Lisbon, Naples, or Valletta have a lived-in aesthetic that feels authentic and cinematic. Colorful laundry hanging between buildings, painted walls, and the human scale of tight streets create an image full of character.
Look for alleys with strong leading lines and color contrast in the hanging clothes. Mid-morning light works well when the sun is low enough to reach into the alley but not harsh. This travel aesthetic rewards patience and slow walking.
15. Coastal Cliffside View Travel Aesthetic

A coastal cliff with the ocean far below and a clear horizon is one of the most enduring travel aesthetics across all platforms. The sense of height, the color contrast between rock, sea, and sky, and the openness of the composition all make this image stop-worthy.
Shoot wide. Let the scale of the cliff and the expanse of ocean fill the frame. Golden hour light turns the rock face warm while keeping the water vibrant. This travel aesthetic works equally well with or without a person in the frame.
16. Ancient Medina Archway Travel Aesthetic

Walking through an ornate archway into a sunlit medina courtyard is a travel aesthetic specific to Morocco, Tunisia, and parts of Spain. The carved plaster, the geometric tilework, and the filtered light through a latticed ceiling create a composition that is rich in texture and color.
Position yourself in the shadow of the arch and shoot toward the lit courtyard beyond. The contrast between dark foreground and bright background creates natural drama. A person walking through adds movement and scale.
17. Lake Reflection at Sunrise Travel Aesthetic

Still mountain lakes at sunrise produce mirror reflections that double the visual impact of any landscape. The pink and gold sky, the dark treeline, and the perfect symmetry of the reflection create an image that feels almost unreal.
Arrive early and wait for the wind to die. Even a small ripple will break the reflection. A small wooden rowboat at the water’s edge is a classic and effective foreground element for this travel aesthetic.
18. Vineyard Golden Hour Travel Aesthetic

Rows of grapevines stretching across rolling hills at golden hour have a warmth and abundance that reads as pure lifestyle travel. Tuscany, Burgundy, and the Douro Valley all produce this shot. The symmetry of the vine rows and the warm light together create a deeply satisfying composition.
Walk to the end of a row and shoot back along the lines. The converging perspective and the backlit leaves create a natural glow. A simple picnic setup at the end of a row adds a personal element without breaking the aesthetic.
19. Bosphorus Ferry at Dusk Travel Aesthetic

Crossing a body of water on a ferry at dusk is a travel aesthetic that few cities outside Istanbul can match. The silhouette of minarets on the horizon, the orange sky reflected in the water, and the movement of the boat all combine into a cinematic frame.
Stand at the bow of the ferry and shoot toward the horizon. The wake of the boat in the foreground and the city skyline behind create strong depth. This travel aesthetic is best captured in the last 10 minutes of light.
20. Wildflower Meadow Open Road Travel Aesthetic

An open road cutting through a wildflower meadow under a wide blue sky is a travel aesthetic that feels like freedom. The road as a leading line, the color of the flowers on either side, and the openness of the sky create an uncomplicated but powerful image.
Shoot low and wide. Get the road starting at the very bottom of the frame. The flowers in the foreground, the vanishing road in the middle, and the open sky above work together to create natural visual flow. This is one of the cleanest and most saveable travel aesthetic compositions.
Travel aesthetic is something every traveler can develop with practice. The best images come from slowing down, noticing the light, and looking for the frame before you raise your camera. These 20 ideas give you a starting point for every type of trip. Save this list and come back to it before your next adventure. For more travel inspiration, explore the rest of the Savvy Dispatches blog.
Budget Travel Tips for Exploring Expensive Cities in the USA! Traveling to expensive cities in the USA might seem like a daunting task, especially if you’re on a budget. But fear not! With a little creativity and some strategic planning, you can explore iconic destinations without emptying your wallet. From bustling New York City to sunny San Francisco, there are plenty of ways to have an unforgettable experience while keeping costs down. Whether you’re dreaming of art-filled galleries or delectable food from street vendors, these budget travel tips will help you navigate expensive cities with ease. Get ready to discover how to make the most out of your adventures without breaking the bank!
Research and planning tips for saving money on accommodations
Finding affordable accommodations in pricey cities can feel daunting. However, a little research goes a long way.
Start by comparing prices on different booking websites. Often, one platform will have better deals than another. Don’t forget to check for any available discounts or promotions.
Consider staying slightly outside the city center. Neighborhoods that are just a bit further out usually offer lower rates while still giving you quick access to public transportation.
Flexible travel dates can also help you score deals. If possible, avoid traveling during peak seasons or major events when prices skyrocket.
Look into alternative lodging options like hostels or vacation rentals. These can provide unique experiences at much lower costs than traditional hotels.
Join loyalty programs offered by hotel chains and booking sites for additional savings on future stays.
Transportation hacks for getting around on a budget
Getting around expensive cities doesn’t have to drain your wallet. Start by checking public transportation options like buses and subways. Many cities offer day passes that allow unlimited rides for one low price.
Rideshare apps can also be a budget-friendly choice if you travel in groups. Splitting the fare makes it more economical, especially late at night when public transport may not be as frequent.
Consider biking or walking whenever possible. Many urban areas are bike-friendly and feature extensive paths. It’s a great way to explore hidden gems while saving money.
If you’re feeling adventurous, look into car-sharing services or even renting scooters. These options offer flexibility without the hassle of parking fees associated with traditional rentals.
Don’t forget about free shuttle services that some hotels provide to key attractions. Utilizing these can save both time and money during your travels.
Affordable food options and where to find them
When exploring expensive cities, finding affordable food options can make a big difference. Local markets are often gold mines for tasty and budget-friendly treats. Look for farmer’s markets or street vendors that showcase regional specialties.
Food trucks also offer delicious meals at lower prices than sit-down restaurants. They’re perfect for grabbing a quick bite while you roam the streets. Apps like Yelp or TripAdvisor can help pinpoint popular spots favored by locals.
Consider dining during off-peak hours to snag lunch specials or happy hour deals. Many upscale eateries offer discounted menus early in the evening.
Don’t overlook neighborhood delis and cafes; they usually have hearty portions without hefty price tags. Exploring food scenes through local recommendations will lead you to hidden gems that won’t break your budget.
Free or low-cost activities and attractions to explore
Many expensive cities offer hidden gems that won’t cost you a dime. Parks, gardens, and waterfronts provide perfect spots to unwind. Think of places like Central Park in New York or Millennium Park in Chicago.
Museums often have free admission days or discounted rates at specific times. Research ahead for local art galleries or cultural institutions with no entry fees on certain days.
Walking tours can be both educational and budget-friendly. Many cities have guided walking tours based on tips, allowing you to explore while supporting local guides.
Festivals are another great way to experience the culture without spending much. Check local calendars for free events where you can enjoy music, food, and art.
In some areas, street performances bring vibrant energy to public spaces. Grab a seat on the sidewalk and enjoy live entertainment from talented artists at no charge!
Insider tips from locals on how to save money in expensive cities
One of the best ways to save money in pricey cities is to tap into local knowledge. Residents often know hidden gems that visitors overlook. These spots typically offer better prices and unique experiences.
Ask locals for their favorite cheap eats. You might find a taco truck or diner serving delicious meals at half the cost of tourist traps. Also, check out neighborhood markets; they often have fresh produce and affordable snacks.
Public transport can be a lifesaver too. Many locals rely on buses or subways instead of rideshares, which can add up quickly. Look for day passes that allow unlimited travel within certain hours.
Don’t forget about free community events! Many cities host art walks, concerts in parks, or street fairs that are enjoyable without costing a dime. Embrace spontaneity—sometimes the best adventures come from going off the beaten path with tips from those who call it home.
Conclusion: Enjoying the best of expensive cities without breaking the bank
Exploring expensive cities in the USA doesn’t have to mean emptying your wallet. With some smart planning and a few insider tips, you can experience all that these vibrant destinations have to offer without overspending.
Focus on thorough research ahead of your trip. This way, you’ll uncover budget-friendly accommodations and transportation options that won’t compromise your comfort. Use local transit systems or consider walking—many major attractions are within easy reach.
When it comes to food, seek out hidden gems where locals dine rather than tourist traps. Street vendors or popular food markets often provide delicious meals at a fraction of restaurant prices.
Make the most of free activities available in many urban areas. Parks, museums with discounted entry on certain days, and community events can fill your itinerary with enjoyable experiences at little or no cost.
Don’t shy away from asking locals for their favorite budgeting hacks. They may lead you to surprising spots that aren’t found in guidebooks but offer great value.
By implementing these budget travel tips for exploring expensive cities in the USA, you’re setting yourself up for an enriching adventure filled with memories—not regrets about spending too much money along the way. Embrace every moment while keeping a close eye on your budget!
Understanding the distance between blocks in a mile is essential for various practical reasons. Whether you’re planning a walk, a run, or trying to measure the distance between two locations in your city, knowing how many blocks make up a mile can be extremely useful. In this guide, we will answer this common question, explain the factors that influence block sizes, and provide tips on how to make use of this information in different situations.
What is a Block?
Before diving into how many blocks are in a mile, it’s important to define what a “block” is. In urban planning and geography, a block typically refers to the area between two streets, usually containing several buildings, and is often considered the basic unit of a city. While block sizes can vary from one city to another, there are some general guidelines we can follow to make an estimate.
The Standard Block Length
In many American cities, a block is typically around 1/10th of a mile, or approximately 528 feet (160 meters). This is based on the standard street grid layout found in cities like New York City. However, the length of a block can vary depending on the city, its layout, and whether the area is residential or commercial.
For example:
In New York City, blocks tend to be smaller, averaging 1/10th of a mile.
In Chicago, blocks are often longer, measuring around 1/8th of a mile.
In suburban areas, blocks may be larger, often reaching a quarter of a mile.
This variance is why the number of blocks in a mile can fluctuate depending on the location.
How Many Blocks Are in a Mile?
The number of blocks in a mile depends on the length of each block. Let’s break this down:
In New York City: A standard city block is approximately 1/10th of a mile, so you would need 10 blocks to make up a mile.
In Chicago or Other Cities with Larger Blocks: If the average block length is about 1/8th of a mile, then there would be 8 blocks in a mile.
In Suburban Areas: If blocks are approximately 1/4th of a mile long, you would need 4 blocks to make up one mile.
It’s important to remember that these are averages, and there can be exceptions based on the local urban planning and street layouts. However, these estimates will help guide you in understanding how many blocks you need to walk or drive to cover a mile.
Table of Average Block Lengths and Block Count per Mile
| City Type | Average Block Length | Blocks in a Mile |
|---|---|---|
| New York City | 1/10th of a mile | 10 blocks |
| Chicago | 1/8th of a mile | 8 blocks |
| Suburban Areas | 1/4th of a mile | 4 blocks |
| Rural Areas | Varies significantly | Varies |
Why Does Block Size Vary?
Several factors influence the size of blocks, such as the following:
1. City Layout and Design
Cities that were planned with a street grid system, like New York City, typically have smaller blocks. Other cities, particularly older ones, may have irregular street patterns and longer blocks.
2. Density of the Area
In densely populated cities, smaller blocks allow for more efficient use of space and better walkability. On the other hand, suburban areas tend to have larger blocks due to the lower population density and more space for homes.
3. Geographic Factors
Geography can also influence the size of blocks. Cities built on hilly or uneven terrain may have to adapt their block sizes to the landscape, which can result in varying block lengths.
4. Historical Factors
Older cities, especially those developed before modern urban planning techniques, often have non-standard block sizes. These cities may have developed organically without the strict grid system found in many modern cities.
How Can This Information Be Useful?
Knowing how many blocks are in a mile can be extremely useful for various everyday activities. Here are some examples:
1. Walking and Running
If you’re walking or running and want to cover a specific distance, knowing the number of blocks in a mile can help you gauge how far you’ve gone. For instance, if you’re running in New York City and want to run 3 miles, you’ll know to run 30 blocks.
2. Urban Navigation
If you’re exploring a new city and need to walk from one place to another, understanding the number of blocks in a mile can give you a better sense of distance. For example, knowing that 10 blocks equal a mile can help you estimate how long it will take to get to your destination.
3. Real Estate
Real estate agents and buyers can use the concept of blocks in a mile to estimate the proximity of properties to landmarks, schools, or commercial areas. It’s a quick way to communicate distance, especially in cities with a block-based street system.
4. Cycling and Biking
Cyclists often use block measurements to calculate how far they need to go on their rides. Knowing how many blocks equal a mile can help them map out their routes more effectively.
Common Misconceptions About Blocks and Miles
1. All Blocks Are the Same Size
As we’ve discussed, block sizes can vary significantly depending on the city and even within different neighborhoods of the same city. It’s important to avoid assuming all blocks are the same size.
2. The Mile is Always 5280 Feet
While it’s true that a mile equals 5280 feet, the conversion to blocks depends on the length of each block. In some cities, a block may be much shorter or longer than 528 feet, so the number of blocks in a mile will vary.
3. Suburban Blocks are Always Larger
While suburban blocks are often larger than those in cities, there are exceptions. Some suburban areas have smaller blocks, and urban areas can sometimes have larger blocks, depending on the specific urban planning strategy.
How to Measure Blocks in Your City
If you’re unsure about how long a block is in your area, there are a few ways to measure it:
Use a Map or GPS
Maps and GPS services like Google Maps can help you measure the distance between two points, and you can count the blocks along the way.Ask a Local
Locals often have a good sense of the city’s grid and can tell you how many blocks are in a mile.Measure it Yourself
If you want an accurate measurement, you can walk or drive from one point to another, counting the blocks along the way. You can use a pedometer or smartphone app to track your steps and get a precise measurement.
Conclusion: How Many Blocks in a Mile?
The number of blocks in a mile varies depending on the city, the design of the streets, and the area’s density. In urban areas like New York City, you can expect 10 blocks to make up a mile. In suburban areas, you might only find 4 blocks in a mile. The key takeaway is that block sizes can vary, so it’s important to adapt your understanding based on the location you’re in.
Now that you know how to measure and estimate blocks in a mile, use this knowledge to improve your navigation, walking, and real estate experience in any city you visit.
If you found this article helpful, don’t hesitate to share it with others or leave a comment below to let us know how you use block measurements in your daily life!

The Uecht: Home to Switzerland’s Largest Public Telescope and Planetarium

Studiae: Redefining Modern Student Engagement System