Travel
Why I Travel Journal And You Should Too

I like to journal. In fact, I’ve been writing about my life with regularity since I was nine years old. And I make no exception when I travel. In fact, I journal even more while I’m on a trip than I do at home. Even though it can take up a lot of my time, I feel compelled to journal about my experiences on the road. Here are five reasons why:
See Also :A Few Days In Asheville, NC
You Are Writing for Your Future Self.
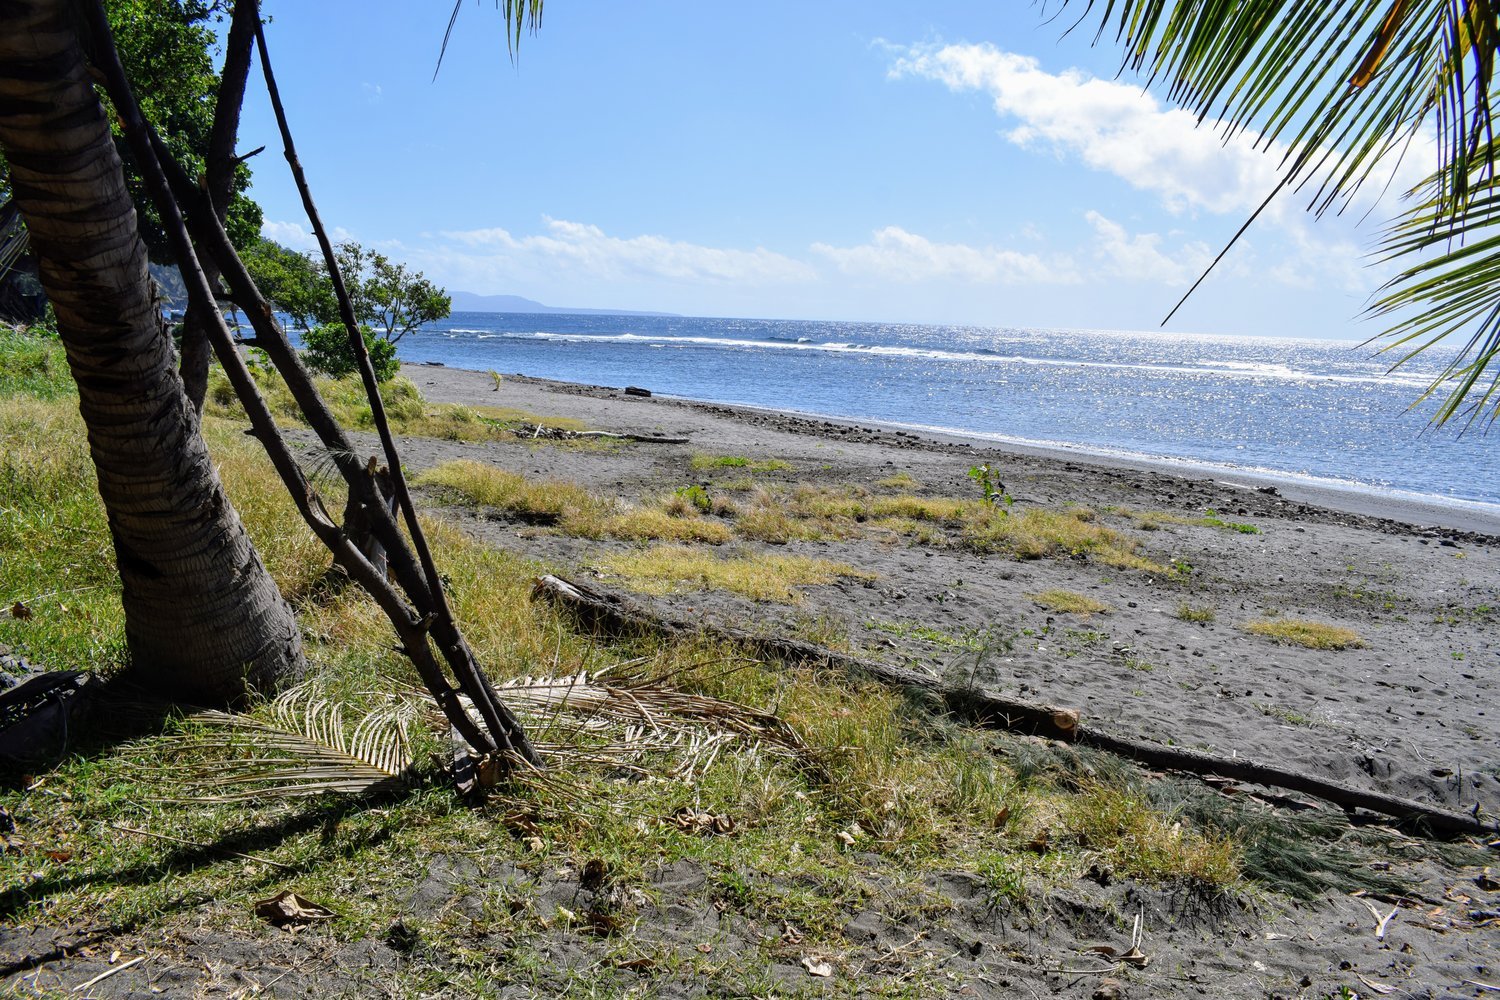
As with any journal I’ve kept, I love being able to read about something I did and see it through the eyes of my past self. It not only brings me joy to relive a tip but re-reading old journals also helps me recall details I never would remember otherwise. It’s been three years since my trip to Costa Rica and I don’t think I could have remembered the names of all of the village tiendas if I hadn’t been journalling about it.
While I tend to generally write about the details of the day, I also jot down other things that I’d like to remember. Things like pronunciation guides, songs I heard in specific places, the history of a site I visited, a little map of the area I walked in, or some interesting facts I read in a book. I’m always learning a lot of information about the new places I visit that I know would normally just disappear from my memory. Once it’s on the page, the information won’t get lost.

Emmett caught me tired and about to start journalling at a helpx stay in New Zealand
2. Writing is Cathartic.
When I’m having a crappy time somewhere, I will feel a lot better about it if I can write down every little thing that’s bothering me. A drunk guy peed on the floor of the dorm room? The airline lost my luggage? I’m covered in ultra-itchy bed bug bites? You can bet I wrote some angry words about all of those things in my journals. It was much easier to let go of my frustrations once they were all written on the page.
3. It’s a Scrapbook.

My journaling supplies: the journal itself, a glue stick, scissors, souvenirs to paste, a few pens.
I don’t know about you, but I like to hold onto every little ticket stub, brochure, map, paper with traveler contact info, business card, or flier that finds it’s way into my hands. I always seem to end up with a pile of travel memorabilia in the bottom of my backpack – even after only a few days. Instead of just periodically throwing all of that nostalgia in the bin or keeping it in a messy pile somewhere, I long ago decided that the best thing to do with it is put it all in one accessible place. So: I glue them into that day’s journal entry. Now my journals are like little diary-scrapbook hybrids. I like that pasting papers and tickets into my journal visually breaks up the pages upon pages of my sloppy handwriting. Not only that, but the scraps I paste in can further jog my memory back to a specific time or place.
4. Waste Waiting Time.
Waiting is an inevitable part of traveling. Waiting for a flight/bus/train
to leave? You can catch up on journaling. Not only that but I’ll write once I get on that train, plane, or bus I’d waited for. Sometimes I’ve even found myself sitting & waiting for a hostel to open or a dorm room to be ready. That’s journal time. I can always find the time to to write at least a little bit.

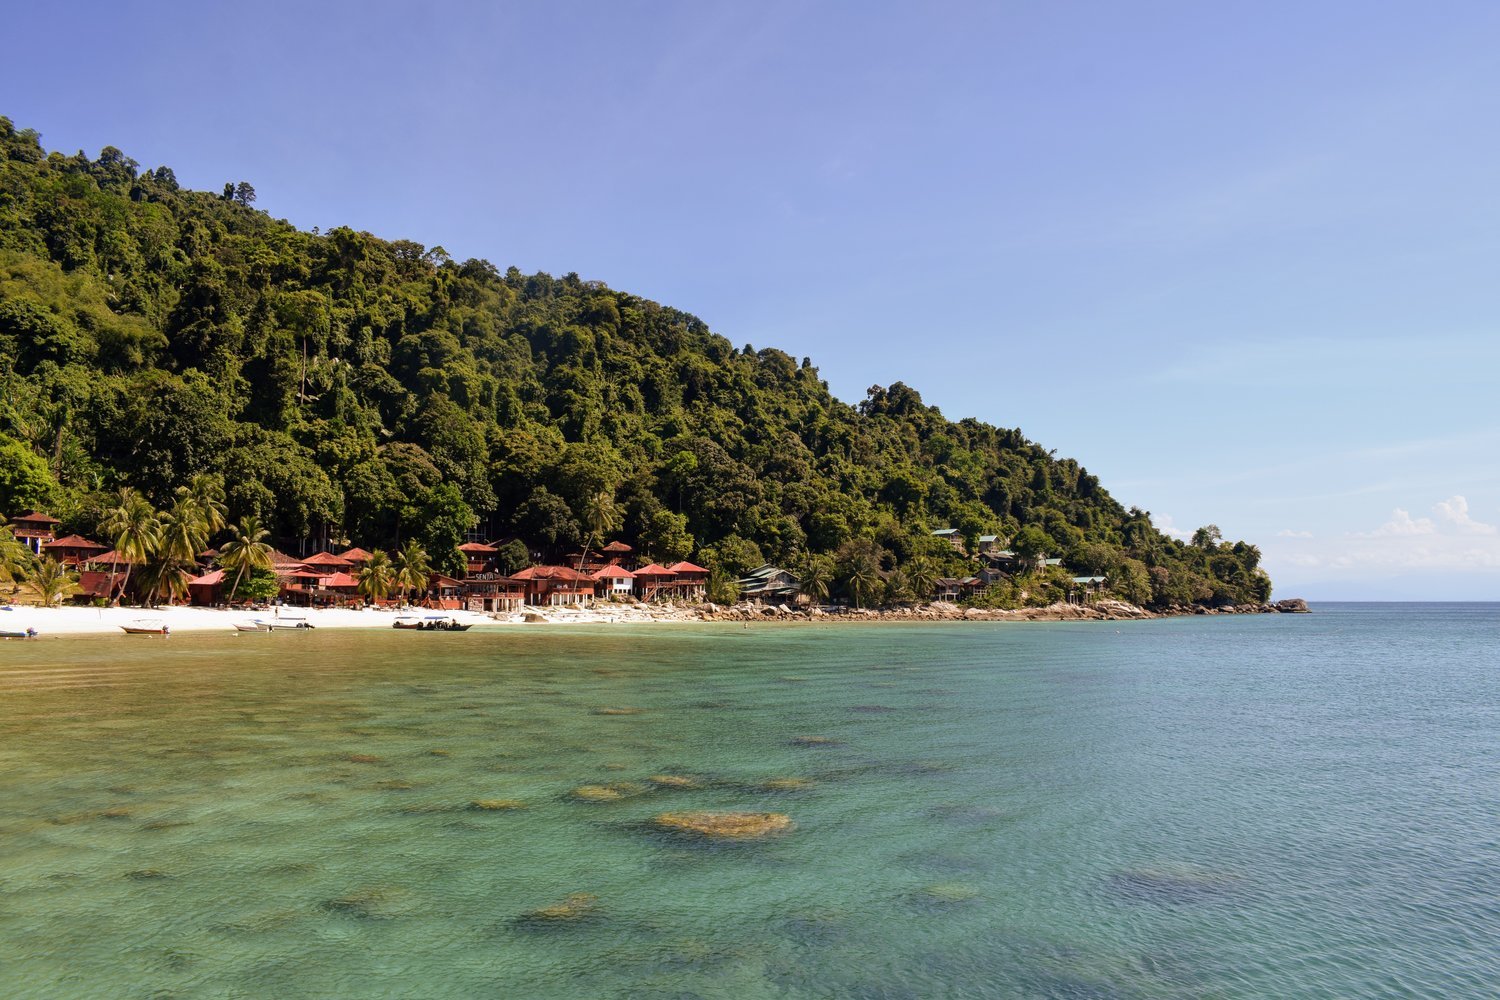
Stepping away from my open journal on the patio of our hostel in Nadi, Fiji while we waited for reception to officially open.
5. Your Journal Becomes a Reference.
The more I’ve traveled, the more I’ve had relatives and friends ask me for information on places I’ve visited. All I have to do is flip through my journal from that trip to find names, locations, or directions. Oftentimes I’ll also write down advice given to me by other travelers about places I haven’t even been to yet. For example, when I was planning the New Zealand trip I remembered that I’d met a guy in Prague who’d done aWorking Holiday. I then looked through my journals from Europe and found his recommendations.
All in all, I highly recommend journaling while you travel. Even if you’ve never journaled before, traveling is honestly the best time to do it. A travel journal is a unique and personal souvenir that will preserve your trip forever.

An entry in my first journal of the New Zealand trip featuring a map of the top half of the South Island with a drawn line noting our hitch-hiking route for that day.

London has thousands of photo spots. Most tourists spend their entire trip photographing the same five – Big Ben, Tower Bridge, red phone boxes, black cabs, and Buckingham Palace. This guide reveals 18 photogenic London spots that most tourists walk right past, the hidden streets, rooftop views, moody alleyways, and atmospheric locations that will give your London photo ideas an entirely different look.
The best London photography spots do not appear on map apps. They come from locals who know where the light hits at what hour and which doorway looks best on a foggy morning. That knowledge is exactly what this guide gives you.
Leadenhall Market at Dawn
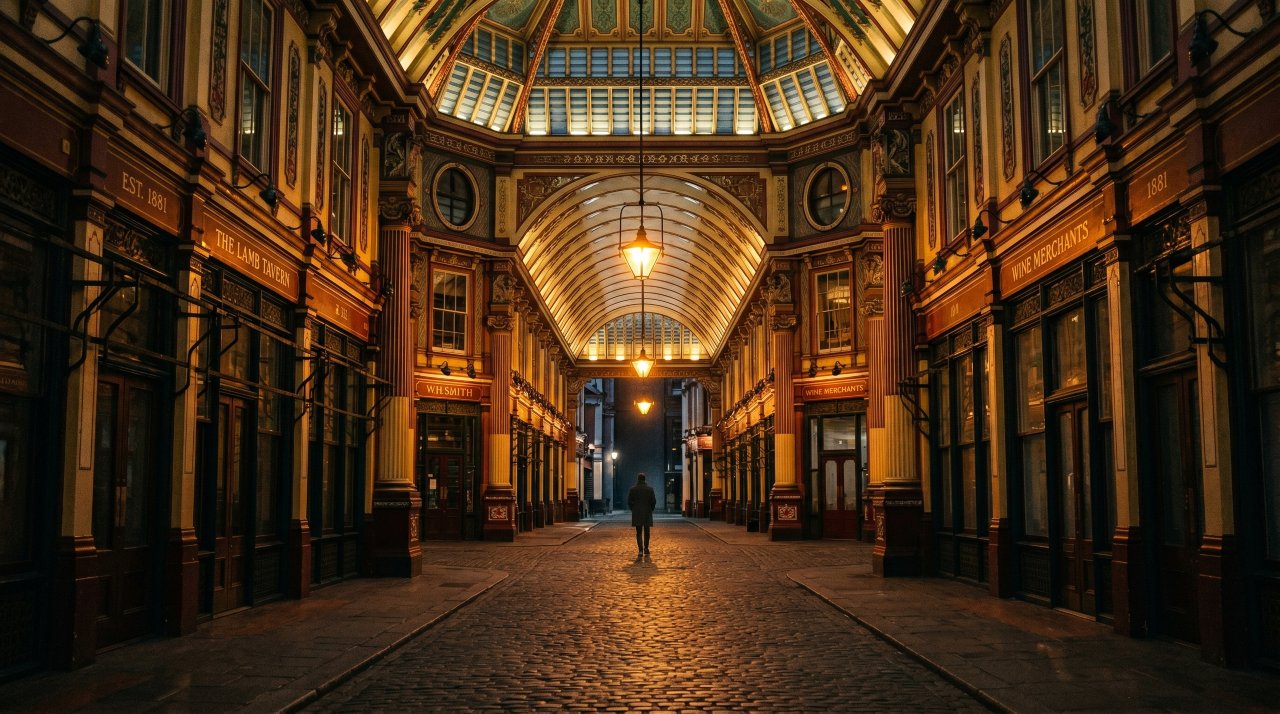
Leadenhall Market is a Victorian covered market built in 1881 with a soaring painted ceiling in red, green, and gold. At 5:30 AM on a weekday the market is completely empty and lit only by its own gas-effect lanterns. This is the single most dramatic interior photography location in London.
The market sits at the junction of Gracechurch and Whittington Avenue, EC3V 1LT. Stand at the center crossing and shoot straight up for the ceiling composition, or shoot down the main arcade with a single figure in the distance. It doubles as Diagon Alley in the Harry Potter films – another great fact for your caption.
Best time: 5:30-7 AM weekdays, before the shops open.
Cost: Free.
Columbia Road Flower Market, Shoreditch
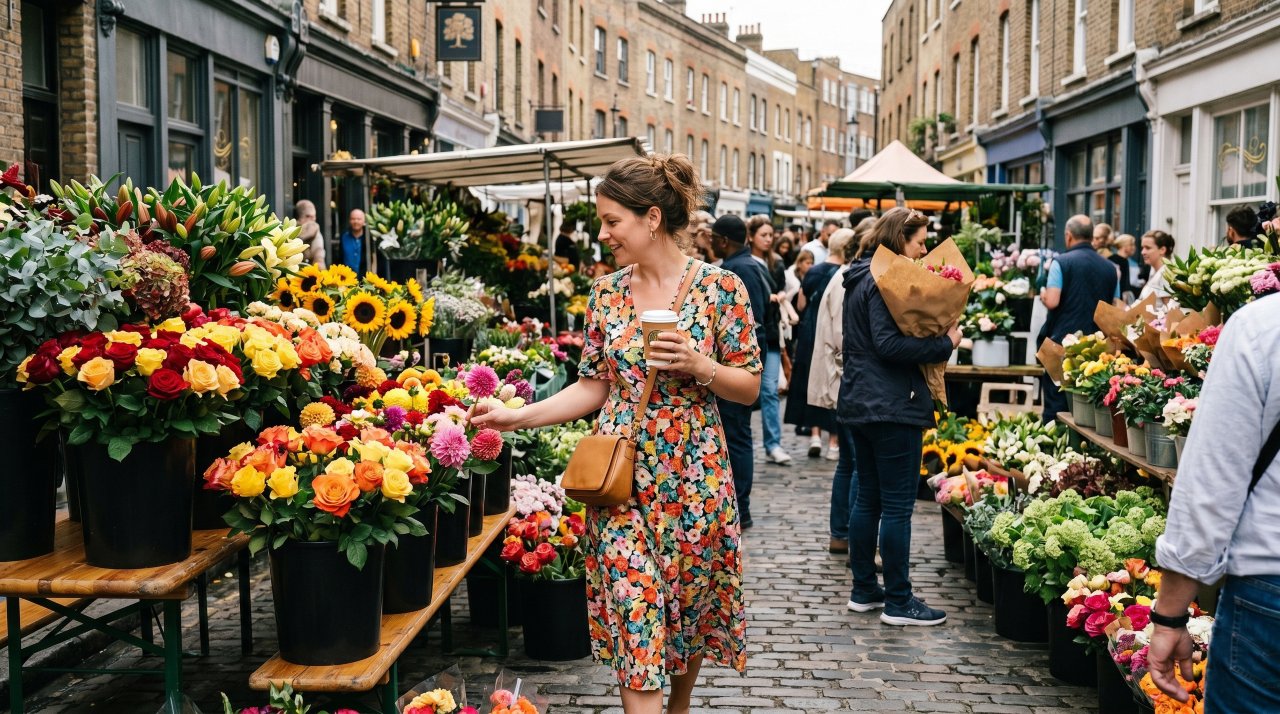
Every Sunday morning Columbia Road E2 transforms into a river of flowers. The narrow Victorian street fills with stalls selling cut flowers, potted plants, and small trees. The flower sellers shout their prices in rhyming Cockney patter. The visual density of color against the old brick buildings is extraordinary.
Arrive at 8 AM when the stalls open for the freshest stock and fewest people. By 10 AM it is shoulder-to-shoulder. Shoot from street level looking down the market for the tunnel of color effect. The shop facades behind the flower stalls are beautifully preserved Victorian storefronts.
Best time: 8-9:30 AM Sunday only. Open year-round.
Cost: Free. Flowers from £5 per bunch.
St Dunstan in the East

St Dunstan in the East is a ruined church bombed in the Blitz and now left as a public garden with the Gothic stone walls intact. Ivy, wisteria, and climbing roses grow up through the stone arches. On a misty morning this spot looks like something from a fantasy film.
Walk through from St Dunstan’s Hill, EC3R 5DD. The garden opens at dawn and closes at dusk. The arch at the north end frames a perfect shot looking back through the ruins to the glass office towers of the City beyond – old and new London in one frame. Visit on a weekday morning to have it mostly to yourself.
Best time: Early morning, especially in fog or after rain.
Cost: Free.
Neal’s Yard, Covent Garden
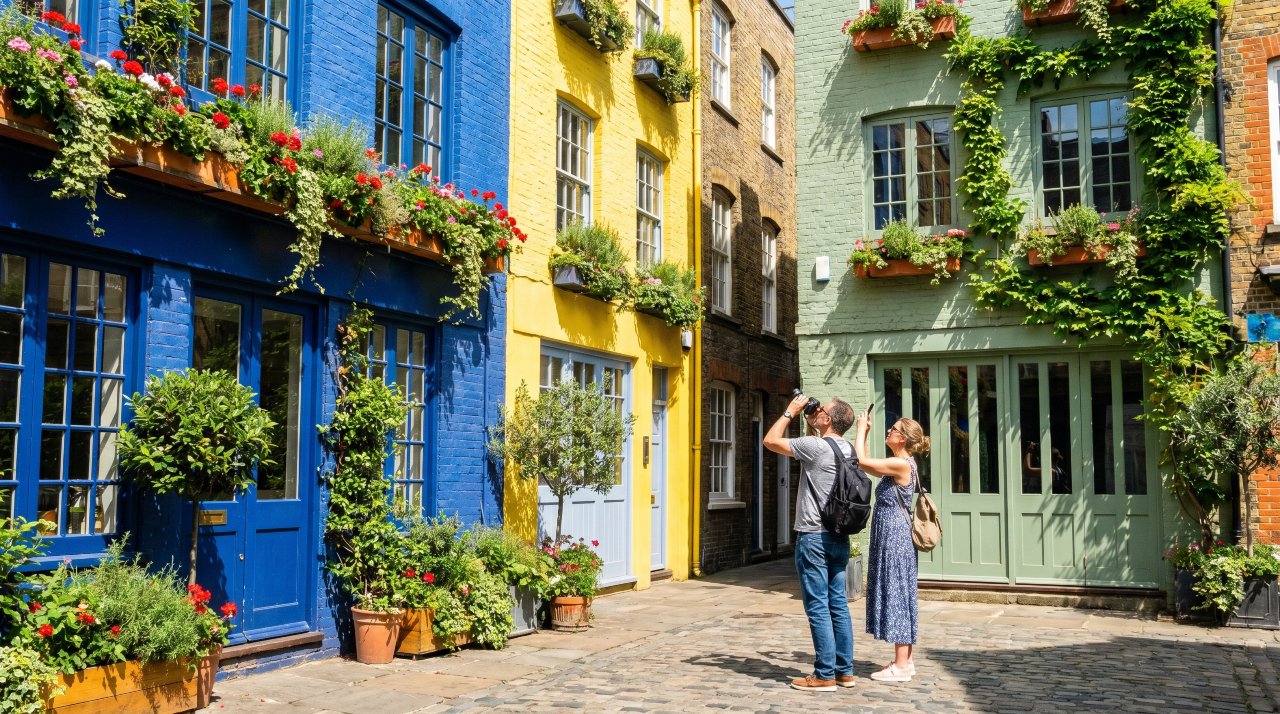
Neal’s Yard is a tiny courtyard just off Neal Street WC2H 9DP, completely hidden from the main streets of Covent Garden. Every building is painted in a different bold color – cobalt blue, canary yellow, sage green, deep red. Window boxes overflow with herbs and flowers. It is one of London’s most unexpected visual discoveries.
The best composition looks up from the center of the courtyard at the painted buildings surrounding you. Come on a sunny day when the colors are at full saturation. The courtyard is busiest at lunchtime with the surrounding cafes – visit at 9 AM or 4 PM for fewer people.
Best time: Sunny days at 9 AM or 4 PM for the light angle.
Cost: Free.
Ely Place and Ye Olde Mitre Pub
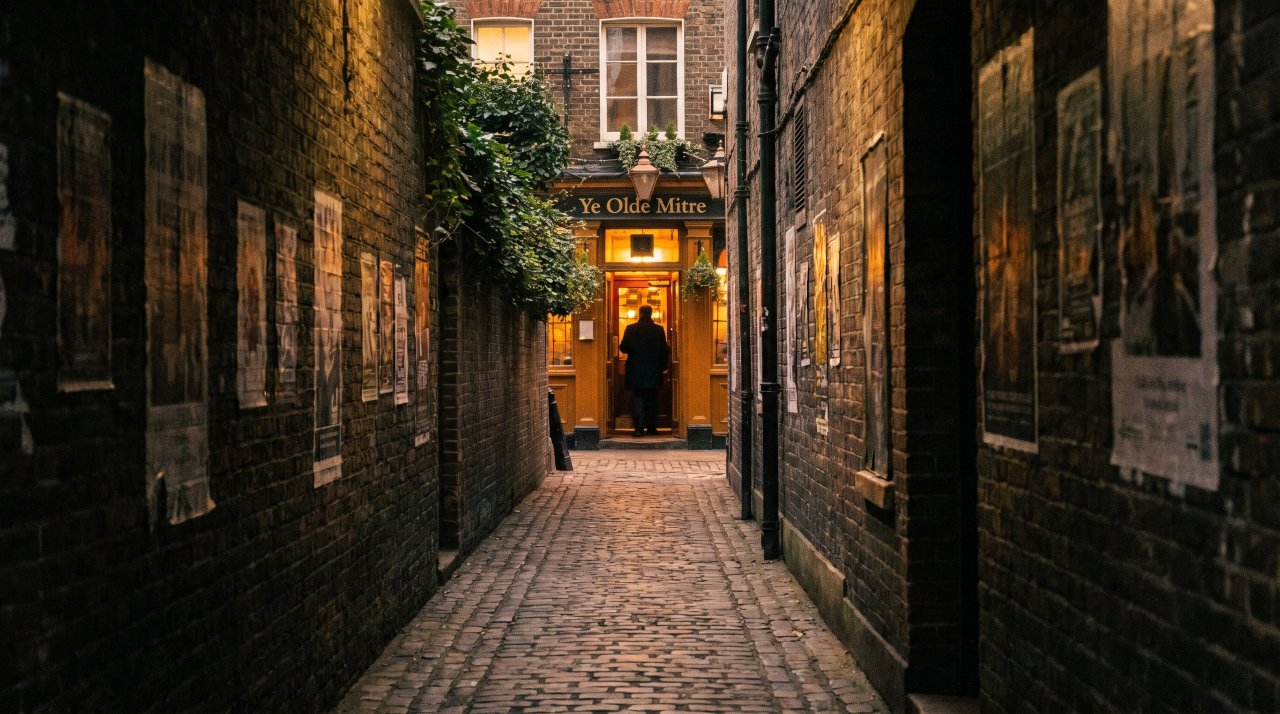
Ely Place EC1N 6RY is a private road that still has a gatehouse and a beadle. It is one of the last privately managed streets in London. Hidden in the alley at Ely Court alongside Ely Place is Ye Olde Mitre, a pub founded in 1546, one of the oldest in London and almost impossible to find on your first try.
The narrow passage to the pub is only two feet wide between buildings. Inside the pub, the preserved timber interior dates back to the 1700s. The cherry tree trunk by the entrance has been there since Elizabeth I. Shoot the entrance passage with the pub sign at the end for a genuinely Dickensian London photo.
Best time: Any day the pub is open: Monday to Friday noon to 11 PM.
Cost: Free to photograph. Pints from £6.
Greenwich Park at Sunrise
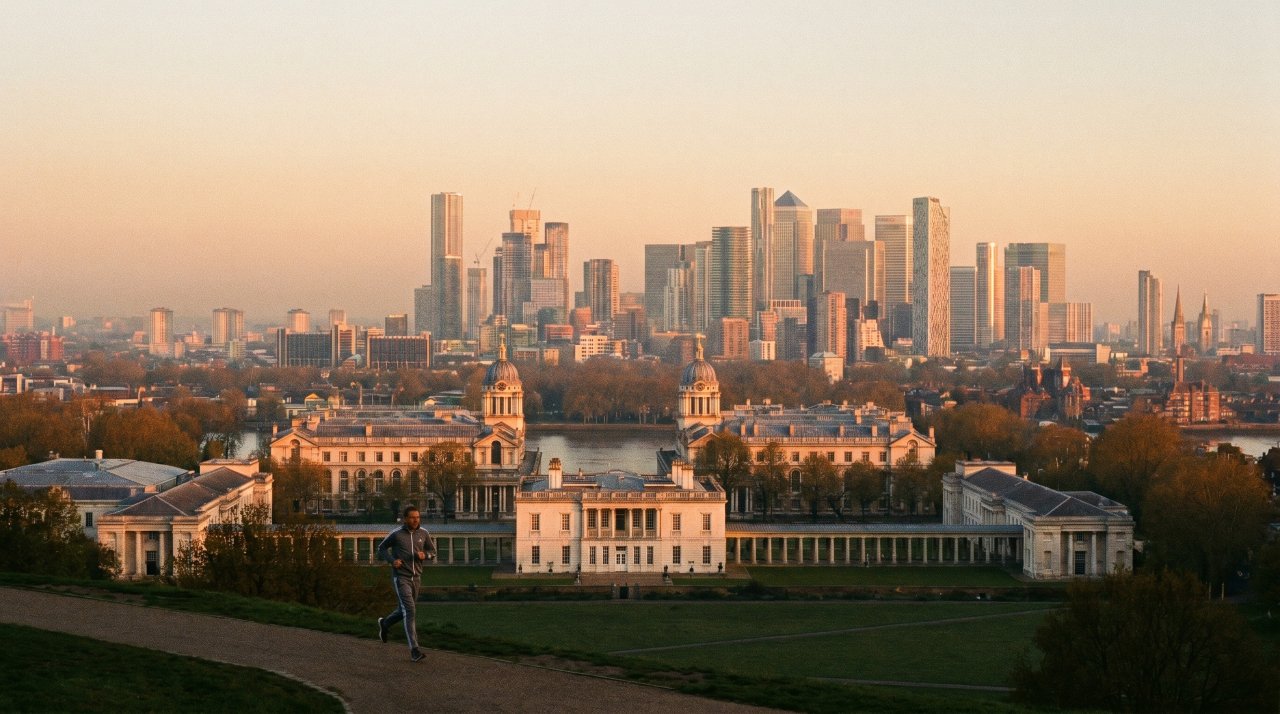
The hill in Greenwich Park gives the single best panoramic view of London from ground level. The Old Royal Naval College, the Thames, Canary Wharf, and the City skyline all align from this one spot. At sunrise the entire skyline glows with no haze.
Stand at the top of the hill by the Royal Observatory, SE10 8XJ. The sunrise alignment is perfect from October through February when the sun rises low in the east directly over the City skyline. Bring a tripod – the long exposures at blue hour are exceptional.
Best time: Sunrise, October to February.
Cost: Free. Park open from 6 AM.
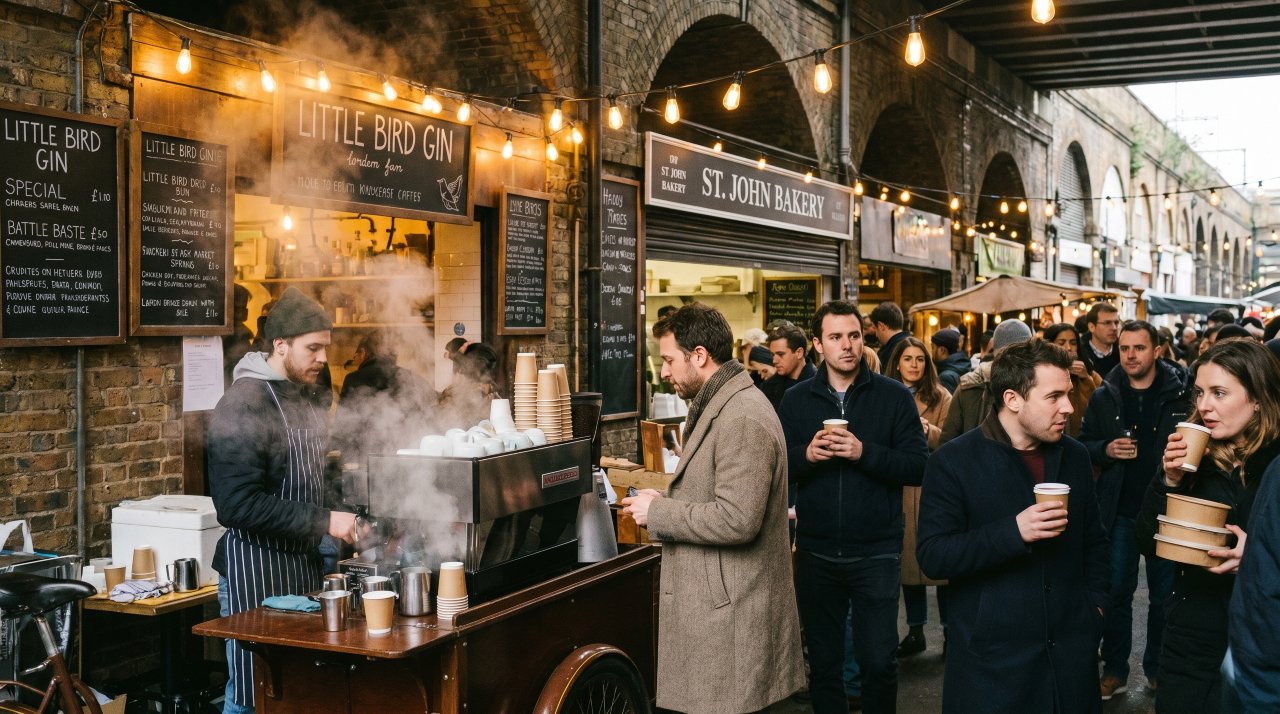
The Southwark Cathedral Churchyard at Dusk
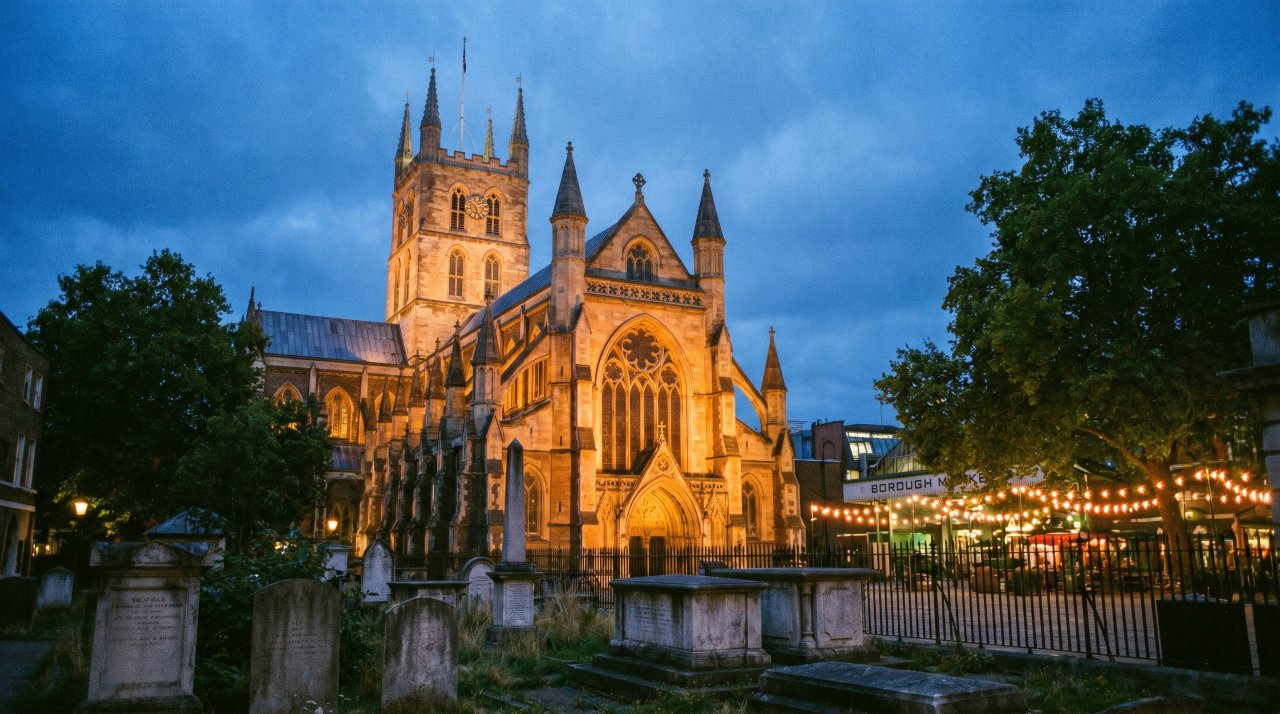
Southwark Cathedral SE1 9DA sits directly beside Borough Market and backs onto the Thames. The churchyard between the cathedral and the market has old stone monuments, mature plane trees, and a wall of Victorian brick arches from the old railway viaduct above. At dusk the lights come on in the market and the contrast with the dark churchyard stone is exceptional.
Walk through Borough Market from Borough High Street and find the small gate into the cathedral churchyard. The stone effigy of William Shakespeare overlooks the yard. The cathedral floodlights come on at dusk and the combination of warm amber floodlight against the deep blue sky creates a beautiful short shooting window.
Best time: 20 minutes after sunset when floodlights activate.
Cost: Free.
Exmouth Market, Clerkenwell
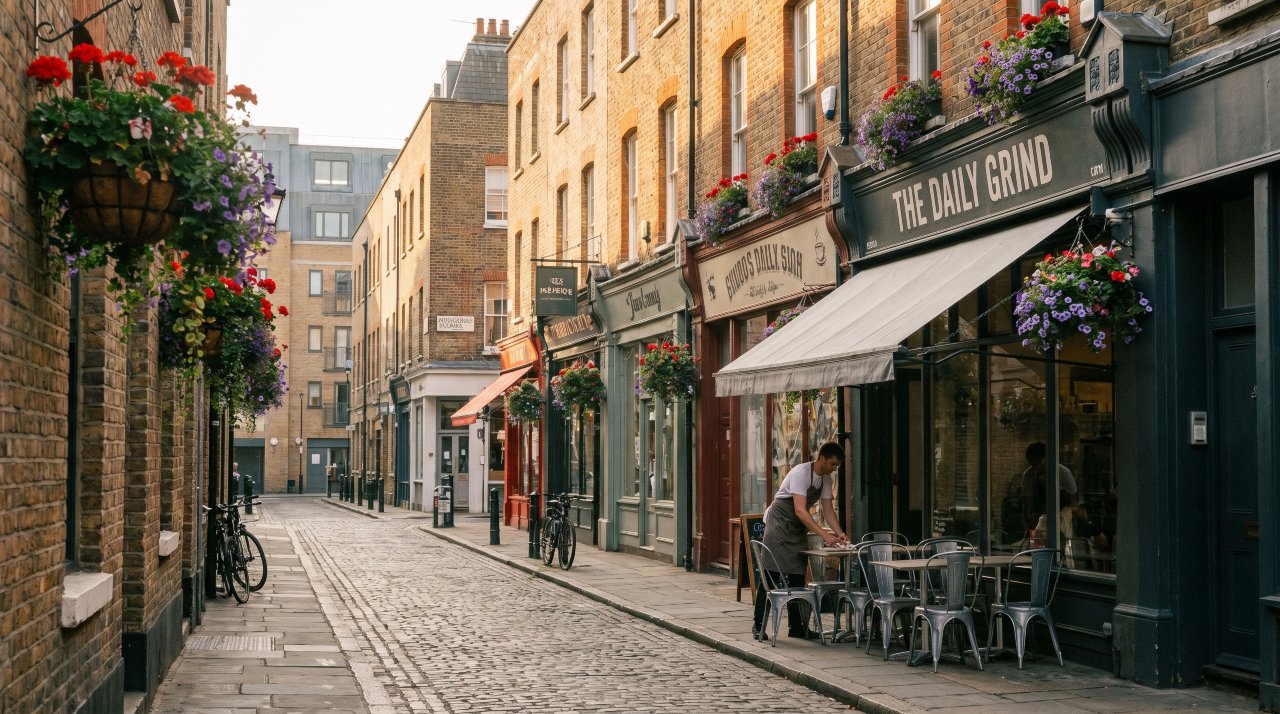
Exmouth Market EC1R 4QE is a quiet pedestrianized street in Clerkenwell lined with independent restaurants, a deli, and street food stalls. It is the kind of London street that feels genuinely local – no chain restaurants, no tourist menus. The terracotta buildings and hanging basket flowers are photogenic in morning light.
The street comes alive at lunchtime Tuesday to Friday when the outdoor seating fills with office workers. For empty street photography arrive at 8 AM. The Italian deli Morangi at number 38 has been there since 1977 and the storefront is a classic shot.
Best time: 8 AM for empty street or noon for street life.
Cost: Free. Coffee from £3.50.
The Wapping Hydraulic Power Station
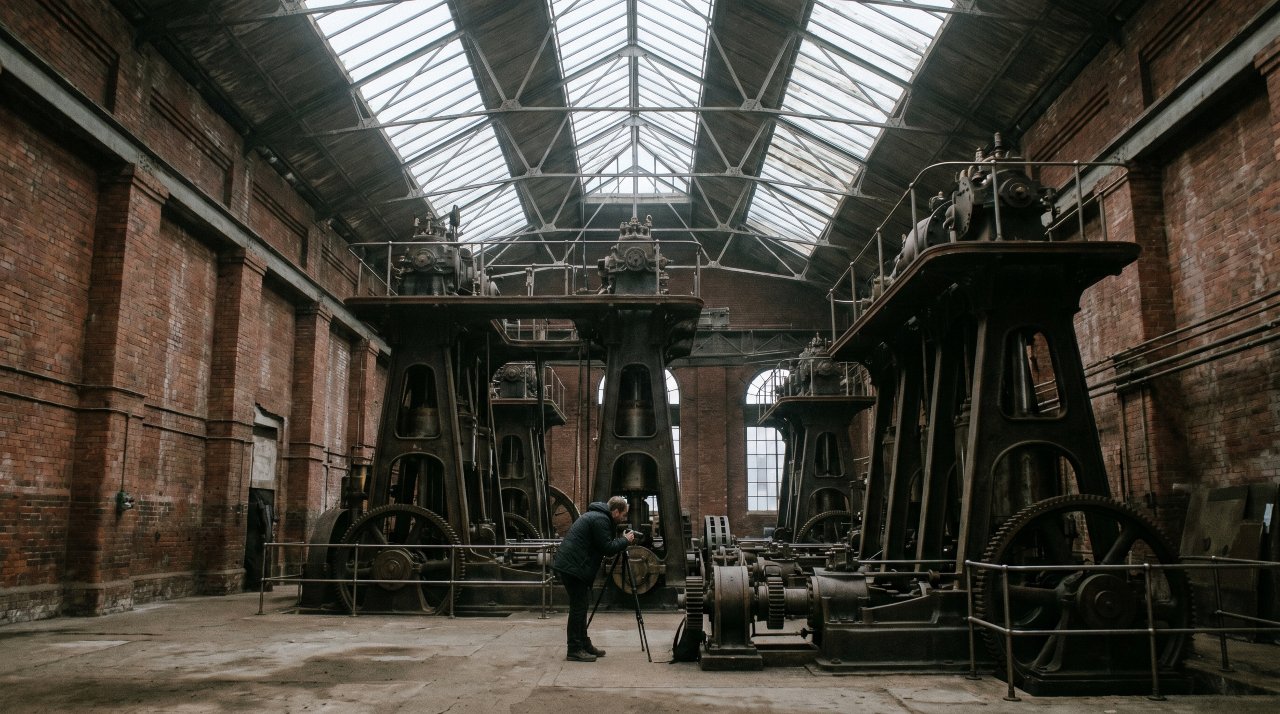
The Wapping Project in east London occupies a former 1890s hydraulic power station that once powered the Tower Bridge lifting mechanism and most of the docks. The industrial interior of cast iron columns, exposed brick, and rusting machinery is one of the most visually striking spaces in London.
The building now operates as a venue and is accessible during events and open days. Check thewappingproject.com for the schedule. The machinery hall has extraordinary scale – original piston engines still stand 30 feet tall surrounded by the red brick Victorian industrial architecture. Shoots here are almost always editorial in quality.
Best time: During scheduled open days or events.
Cost: Varies by event. Check thewappingproject.com.
Crossness Pumping Station

Crossness Pumping Station in southeast London is Victorian cathedral masonry applied to a sewage pumping station. The interior has four massive beam engines surrounded by elaborate cast-iron Gothic tracery in deep reds, golds, and greens. It is one of the most extraordinary interiors in Britain and almost nobody knows it exists.
Open days run once a month on Sundays – book at crossness.org.uk. The volunteer-run restoration charity allows photography throughout. The scale of the four engines named after members of the Royal Family is overwhelming. Plan for two to three hours. Travel by Overground to Abbey Wood, then a 20-minute walk.
Best time: Scheduled open days only. Book in advance.
Cost: £10 adult. crossness.org.uk.
The Sky Garden at 20 Fenchurch Street
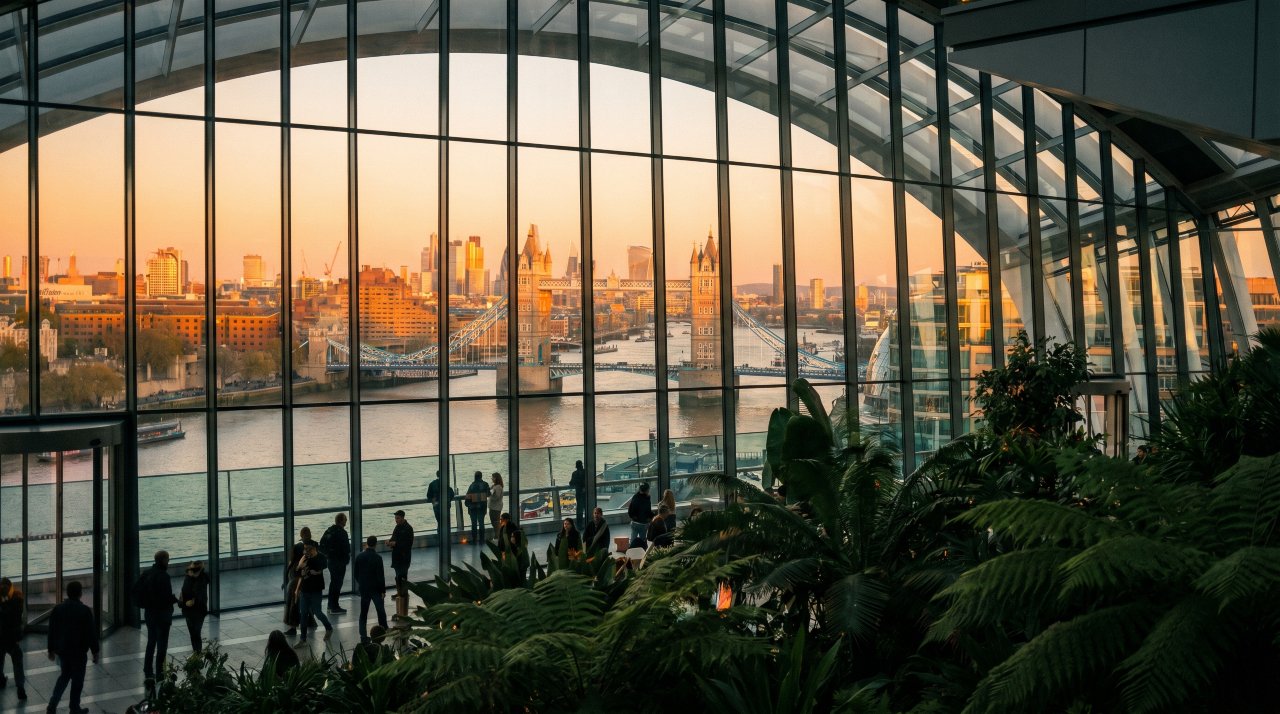
The Sky Garden is a free public rooftop garden at the top of the Walkie Talkie building, 37 floors up, with 360-degree glass walls and views across the entire City of London. It is free to enter with an advance booking. This is one of the best London photo ideas that costs absolutely nothing.
Book online at skygarden.london at least two to three weeks in advance – it books out fast. The cocktail bar inside has the same view for the cost of a drink. The best photography is from the open air terrace on the east side looking toward Tower Bridge and the Thames.
Best time: Evening for golden hour city views. Book 2-3 weeks ahead.
Cost: Free with advance booking. skygarden.london.
Bermondsey Street
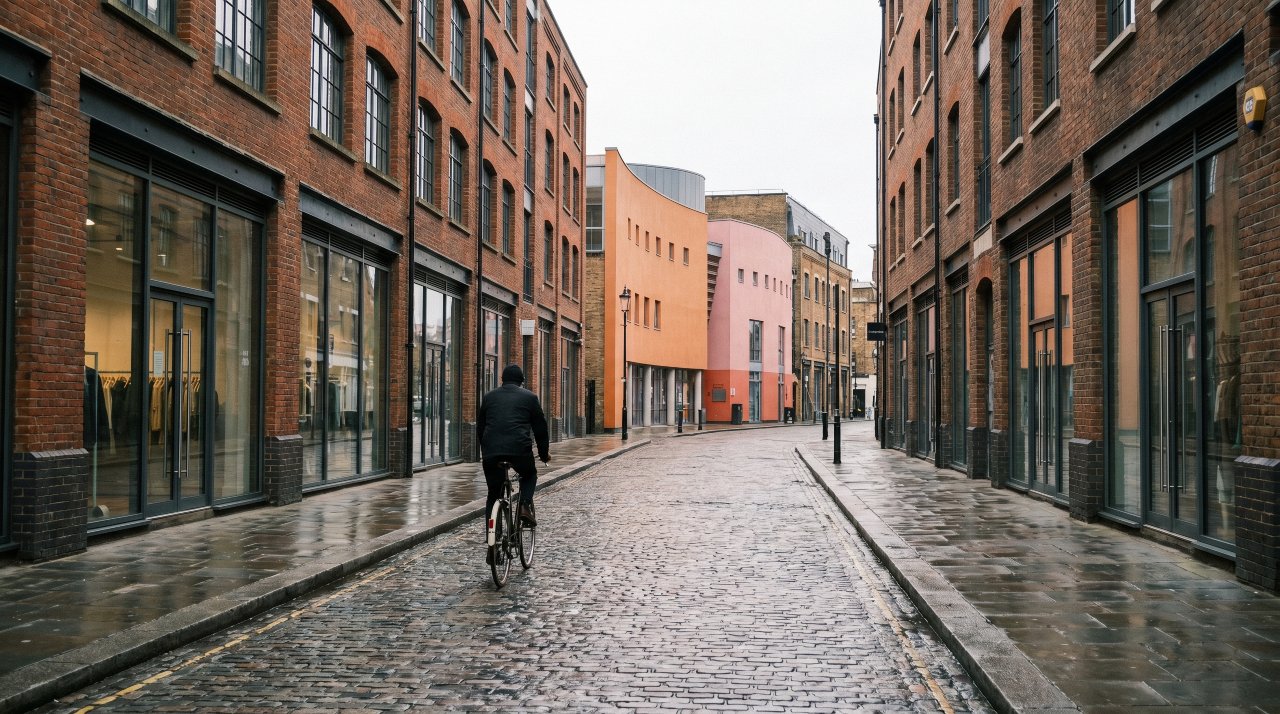
Bermondsey Street SE1 runs south from London Bridge through a neighborhood that shifted from leather tanning to galleries and restaurants over the last 20 years. The Victorian brick warehouse buildings have been converted with enormous plate glass shopfronts. The street is long, quiet on weekend mornings, and beautiful at almost any hour.
The Fashion and Textile Museum at number 83 has a vivid orange and pink facade that is one of the most photographed building facades in south London. The White Cube Gallery at number 144 is a clean white cube building with strong lines. Both sit in the same block for back-to-back architectural shots.
Best time: Weekend mornings before 10 AM for empty streets.
Cost: Free.
Little Venice, Maida Vale
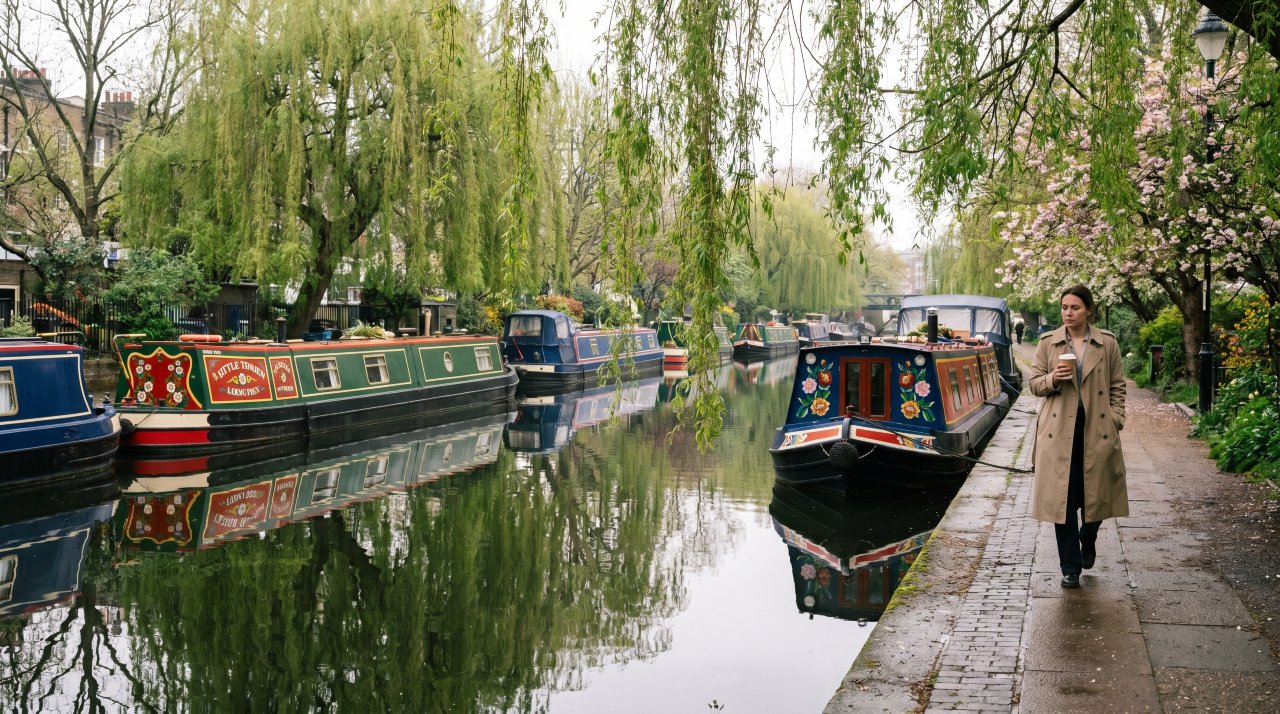
Little Venice W9 is where the Grand Union Canal meets the Regent’s Canal in a wide pool lined with willow trees and permanently moored narrowboats painted in traditional canal boat colors. On a still morning the boats reflect perfectly in the flat canal water. It looks nothing like the London tourists expect.
Walk from Warwick Avenue Tube station five minutes to the canal pool. The best shots look across the pool from the south bank toward the painted narrowboats with the willow trees behind. The floating café boat serves excellent coffee. Come in spring when the cherry trees and wisteria along the towpath are in bloom.
Best time: Spring mornings for blossom. Still days for reflections.
Cost: Free.
Kyoto Garden, Holland Park
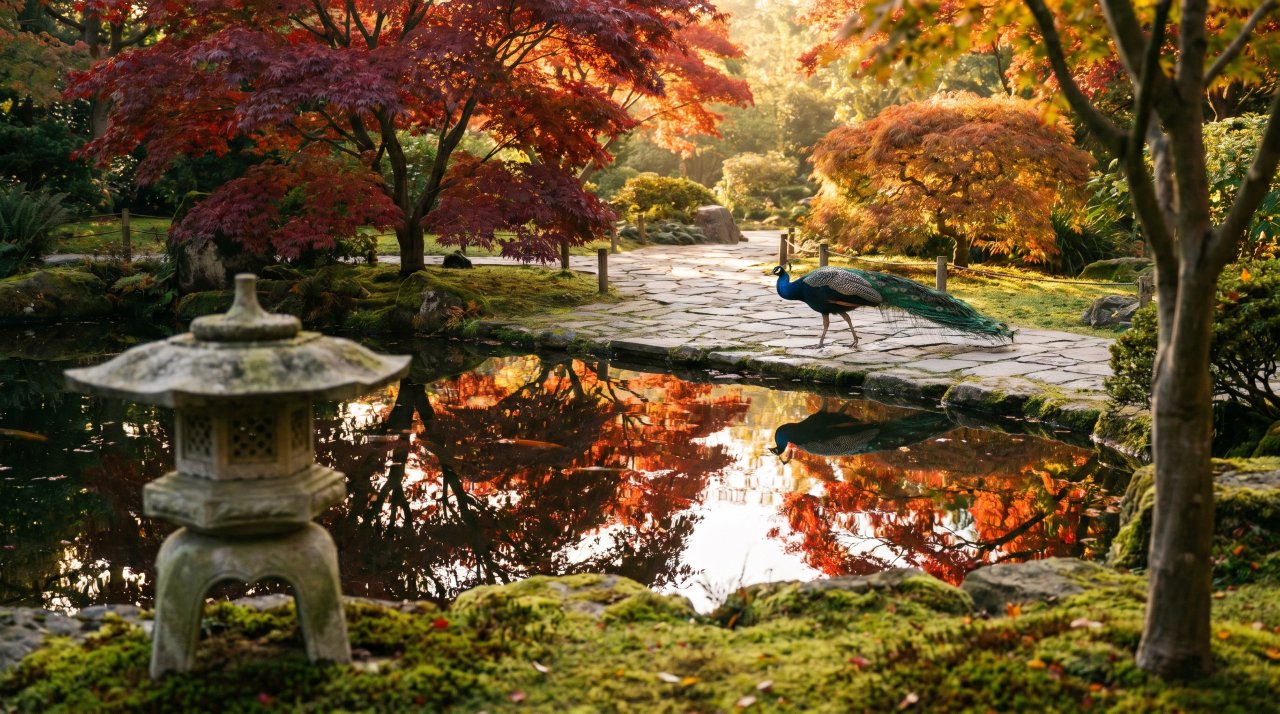
The Kyoto Garden is a traditional Japanese garden hidden inside Holland Park W8 – one of the most formal and least-visited of London’s major parks. The garden has a koi pond, a traditional stone lantern, maples, bamboo, and a small waterfall. Peacocks roam the surrounding woodland.
Enter Holland Park from Ilchester Place W8 and walk northeast through the woodland. The Kyoto Garden is signposted from the main lawn. The maple trees turn deep red and orange in October and November, making it one of the best autumn photography spots in London. Come at 8 AM when the park opens and the garden is completely empty.
Best time: October and November for autumn color at 8 AM opening.
Cost: Free.
Brick Lane at the Junction of Hanbury Street
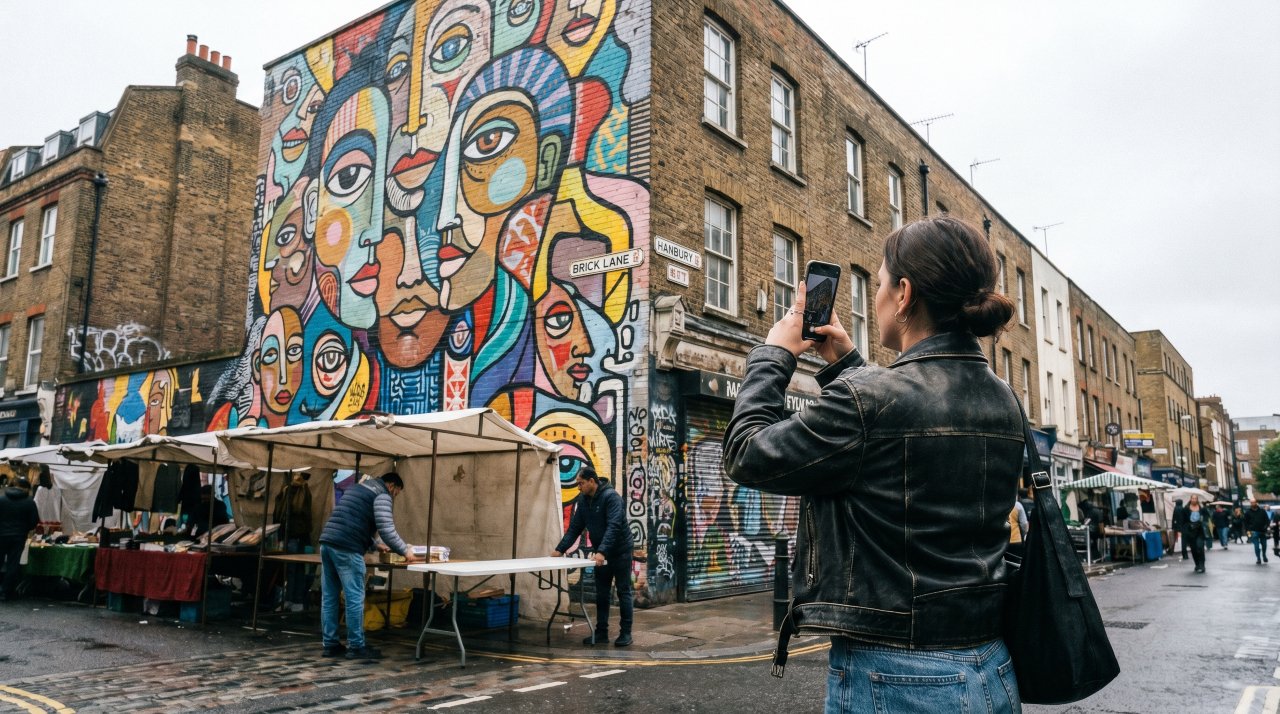
Brick Lane E1 is the center of London’s street art scene. Every surface is covered and repainted continuously. The best photography concentration is at the junction of Brick Lane and Hanbury Street where several large-scale murals face each other. The work changes regularly – each visit produces different images.
Come on a Sunday morning when Brick Lane Market is setting up for the best combination of street art and street life photography. The weekly market runs 10 AM to 5 PM and the textile stalls, food vendors, and vintage clothing sellers add human scale to the murals. The light is best on the east wall of Hanbury Street in the morning.
Best time: Sunday morning 8-10 AM for best light and market setup.
Cost: Free.
Primrose Hill Sunrise
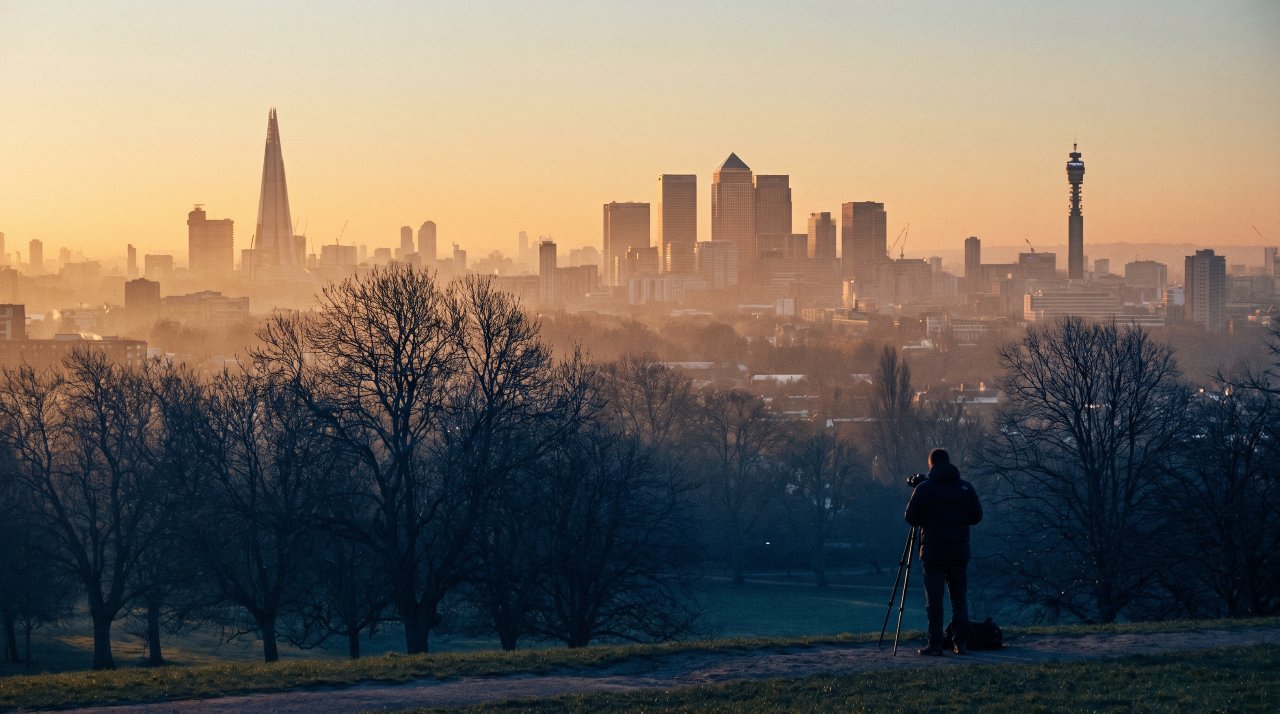
Primrose Hill NW1 has what many photographers consider the best London skyline viewpoint. The summit at 256 feet gives a clear sightline over Regent’s Park to the full London skyline from Canary Wharf to the Shard to the BT Tower – all in one frame with no obstructions.
Stand at the summit viewpoint and shoot southeast for the classic skyline. At sunrise in winter the buildings glow amber above the blue shadow of Regent’s Park trees. The hill is a five-minute walk from Primrose Hill station. Come at least 20 minutes before sunrise to set up. This spot is genuinely one of London’s best-kept photography secrets.
Best time: Sunrise, October to February.
Cost: Free. Open 24 hours.
The Diana Memorial Fountain, Kensington Gardens at Mist
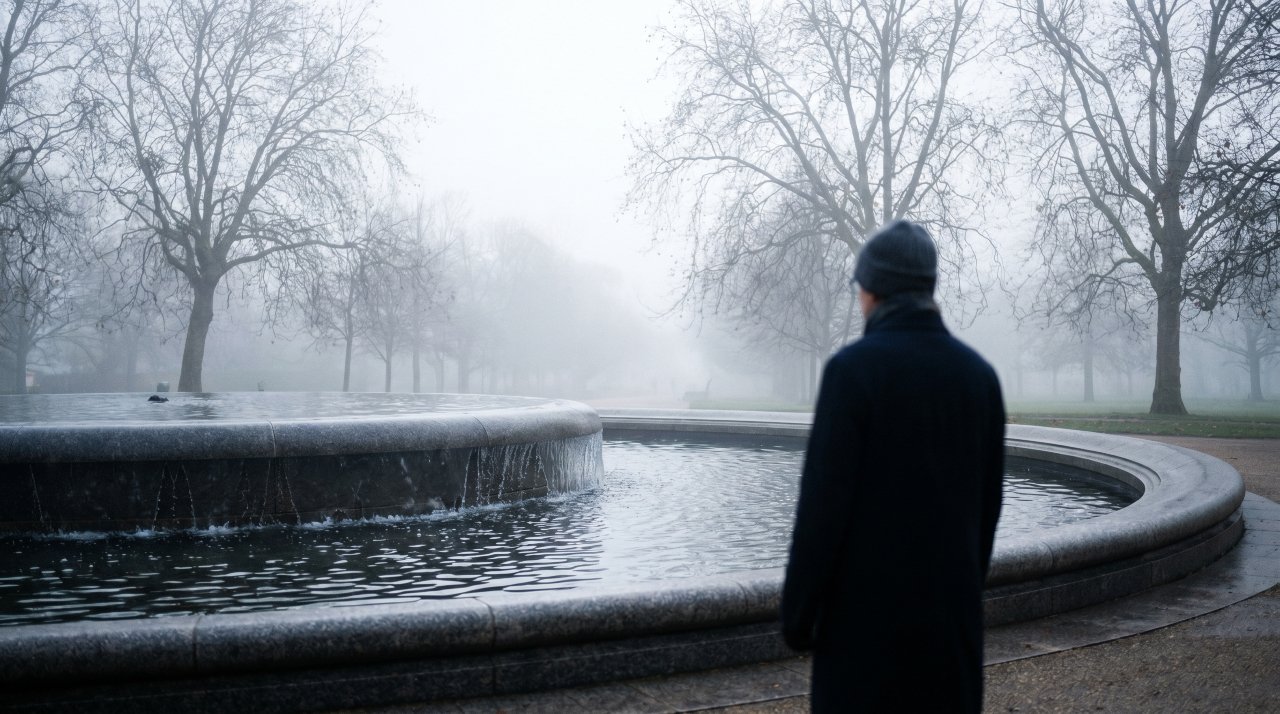
The oval granite fountain memorial in Kensington Gardens W2 looks its best in autumn morning mist when the water sounds are muffled by fog and the surrounding trees are bare. Most tourists skip this spot entirely. In mist it looks ethereal.
Walk from Lancaster Gate Tube to the center of Hyde Park/Kensington Gardens. The fountain is in the southern section of Kensington Gardens near the Serpentine. In autumn the deer from the nearby managed herd sometimes appear in the morning fog around the fountain. Arrive before 8 AM for the best mist before it burns off.
Best time: Misty autumn mornings before 8 AM.
Cost: Free.
Maltby Street Market, Bermondsey
Maltby Street Market SE1 3PA runs under the Victorian railway arches of the Bermondsey railway viaduct every Saturday and Sunday morning. The arched brick tunnels are filled with independent food producers – bread bakers, coffee roasters, cheese mongers, hot sauce makers. The red brick arches and warm market lights make for extraordinary atmosphere.
Arrive at 9 AM for fresh stock and quiet enough to photograph properly. The arches run along Maltby Street and Rope Walk. The Kernel Brewery is at the far end for a morning beer if you want the full experience. The arched tunnel shots with silhouettes of vendors and customers are uniquely London.
Best time: 9-11 AM Saturday or Sunday.
Cost: Free. Food from £4.
London Has More to Offer Than You Think
These 18 London photo ideas take you far beyond the tourist trail and into the London that locals love. Most of these spots cost nothing and require only an early start. The photographers who come home with the most memorable London images are the ones who set their alarm for sunrise and walk the streets before the crowds arrive. Save this guide, pin it for your 2026 London trip, and share it with any photographer who thinks they have already seen London.
Hawaii has some of the most dramatic photography spots on earth. These 15 Hawaii photography spots go far beyond the typical tourist shots – this guide shows you the exact locations, best times to visit, and what to look for at each one, so you can come home with images that actually stop the scroll. Whether you shoot on a phone or a mirrorless camera, these spots will transform your Hawaii picture ideas into real results.
Not every jaw-dropping location in Hawaii is crowded with tour groups. Many of the best spots take a short hike or an early wake-up call. The effort is always worth it.
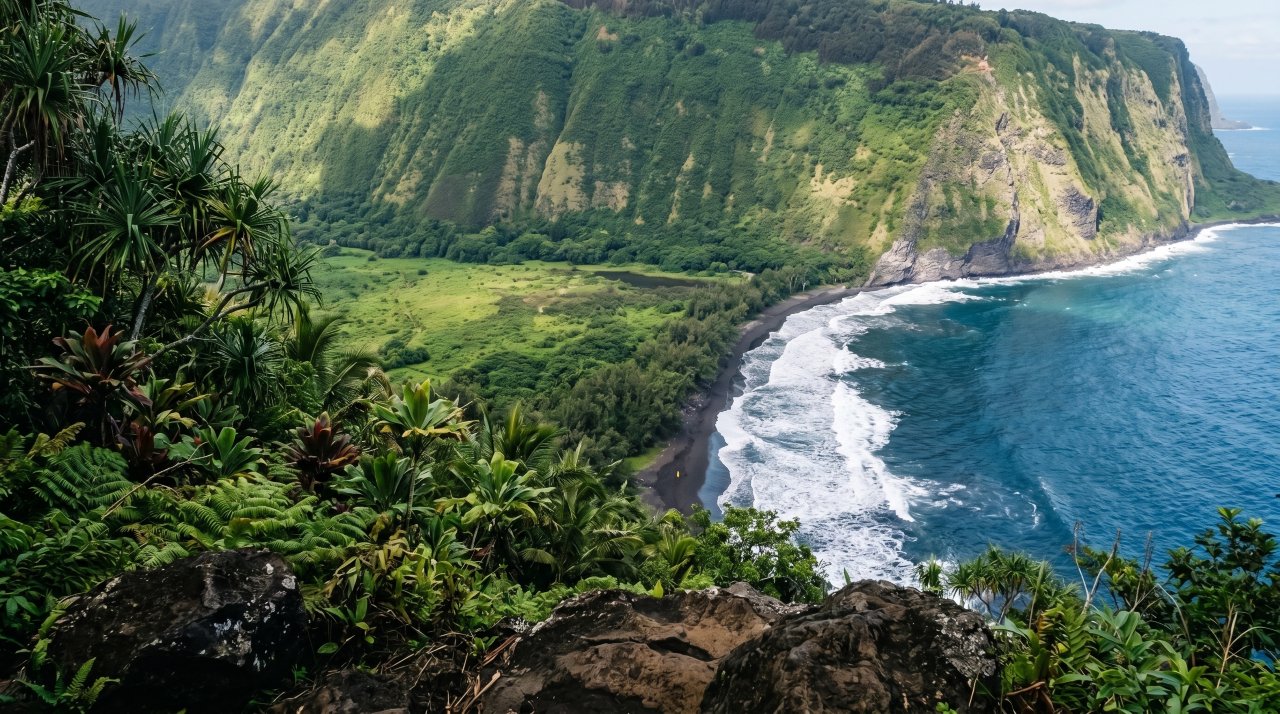
Waipio Valley Lookout, Big Island
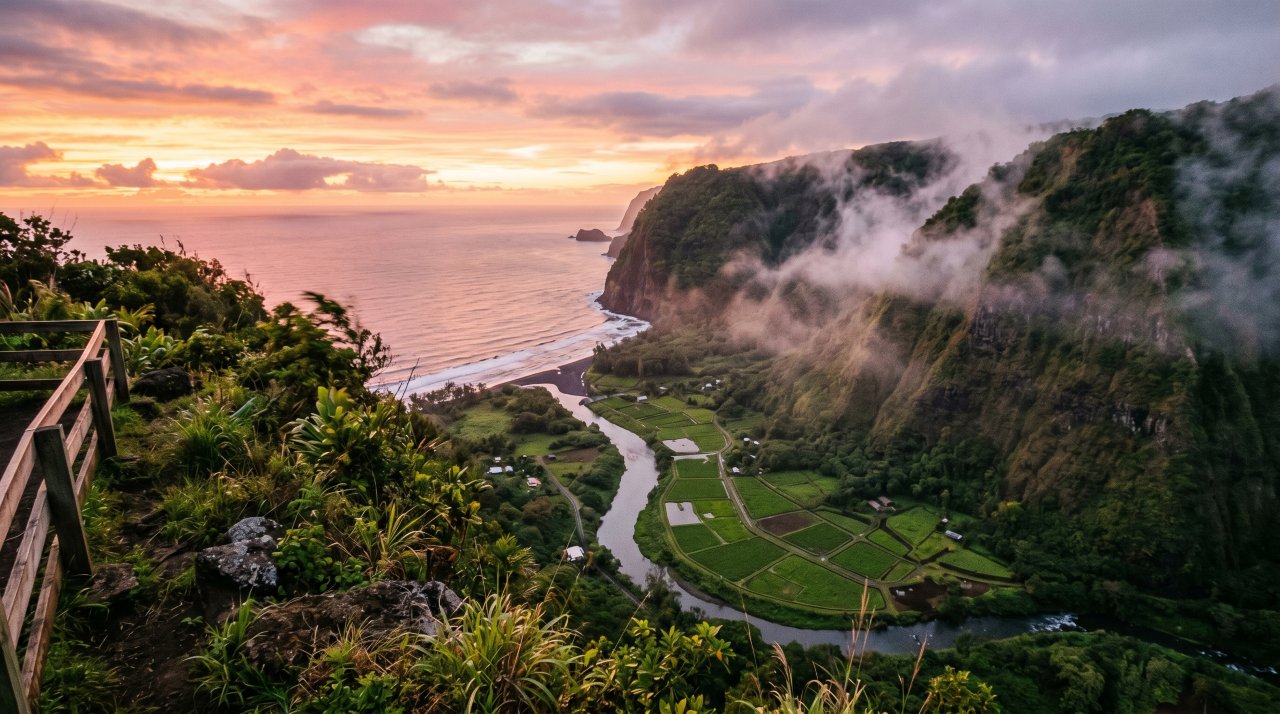
Waipio Valley is one of the best Hawaii photography spots for a reason. The valley drops 2,000 feet straight down from the lookout, with a black sand beach, a winding river, taro fields, and the open Pacific all visible in one frame. You will not find a more dramatic composition anywhere on the island.
Go at sunrise. The valley floor fills with golden mist as the sun clears the ridge. If you want the shot with no other visitors in frame, arrive before 6:30 AM. A 200mm lens lets you compress the layers of the valley for a powerful shot.
Best time: Sunrise, year-round. After heavy rain the waterfalls multiply.
Getting there: Drive to Waipio Valley Lookout, Kukuihaele, HI 96727. Free parking.
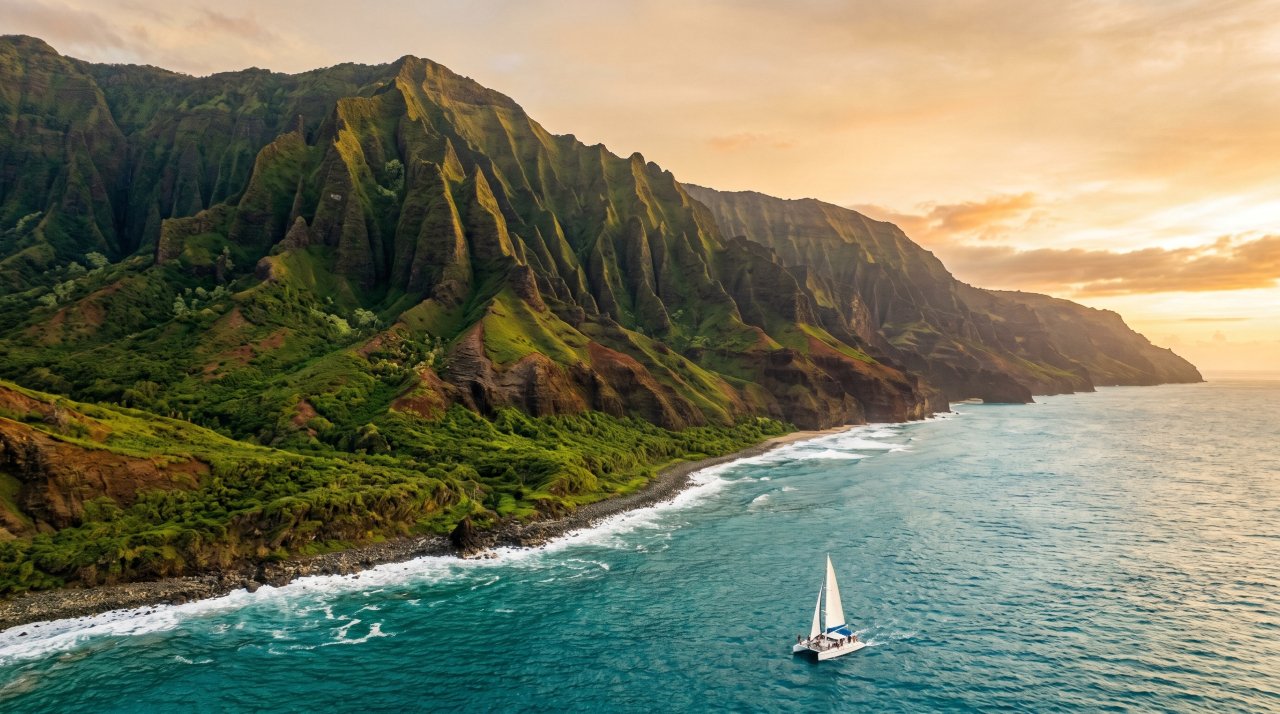
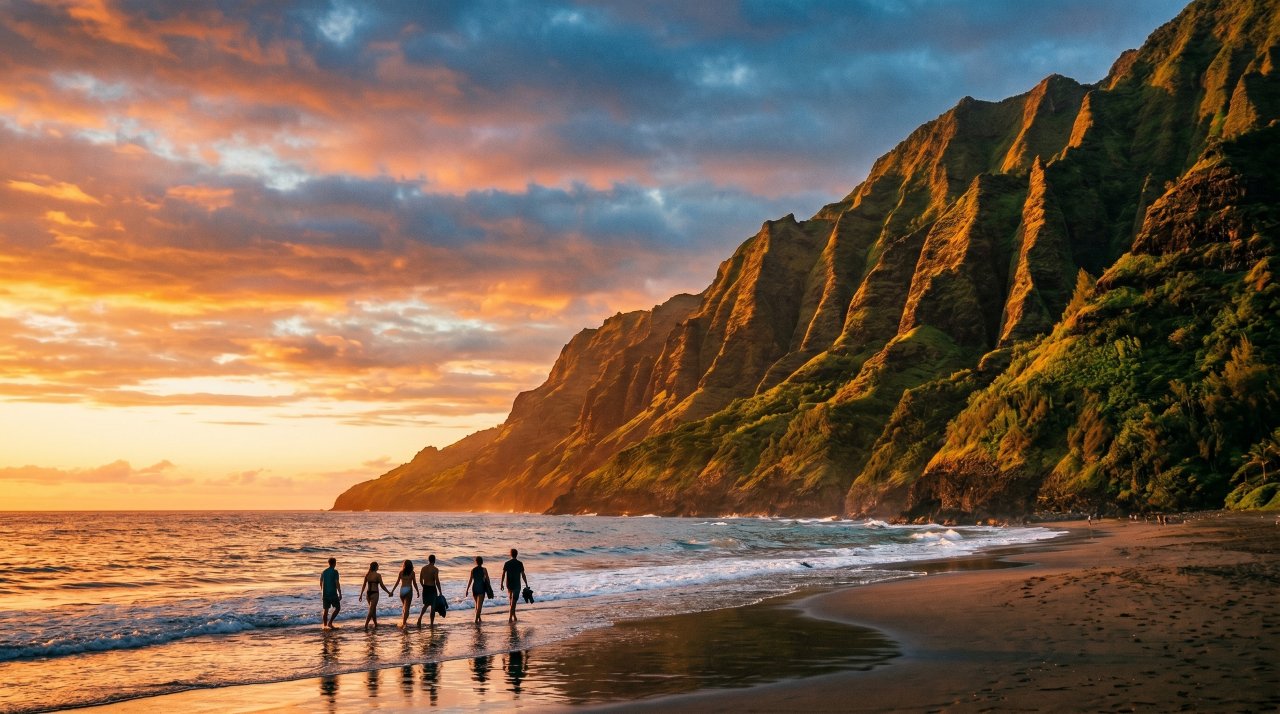
Nā Pali Coast, Kauai
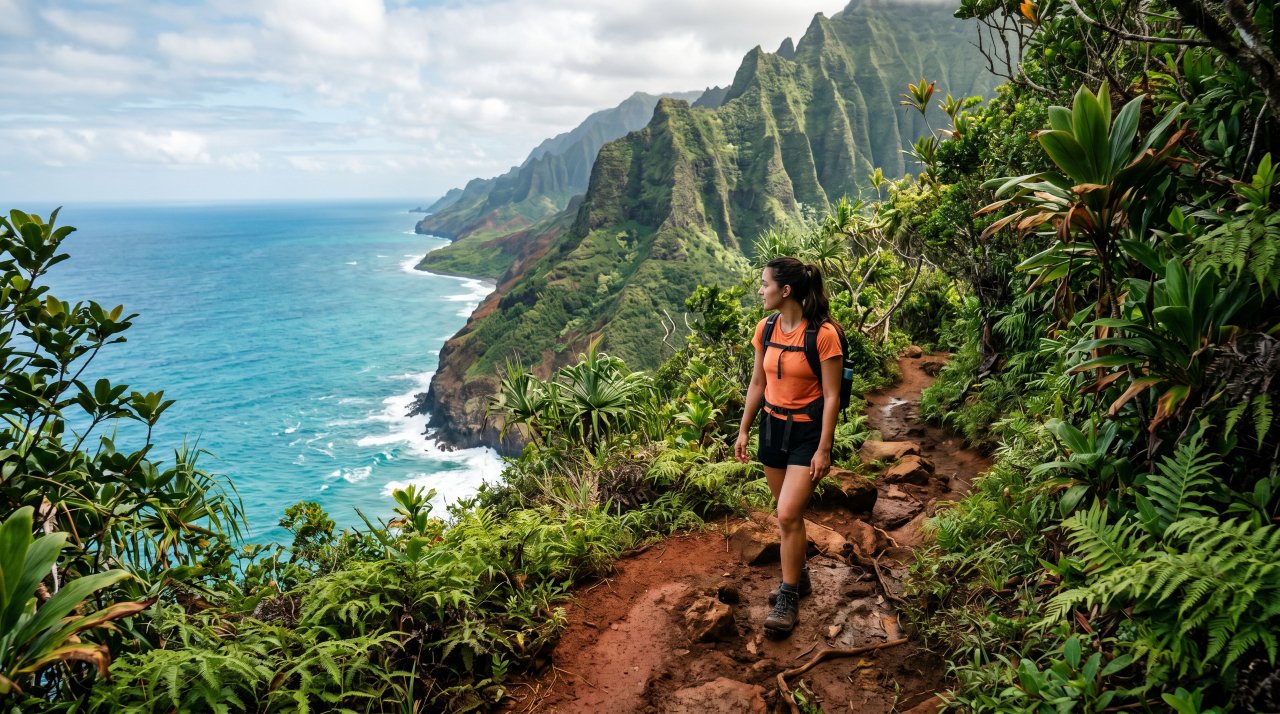
The Nā Pali Coast is the most photographed coastline in Hawaii for good reason. The fluted green cliffs rise 4,000 feet straight from the turquoise ocean, draped in waterfalls after rain. No road reaches this coast. You earn this shot by hiking the Kalalau Trail or booking a boat tour.
The 11-mile Kalalau Trail starts at Ke’e Beach. The first two miles to Hanakapi’ai Beach are doable without a permit and deliver stunning cliff views. For the full coast, a boat tour around the north shore gives you angles the trail cannot.
Best time: Sunrise for the golden cliff glow. May to September for calm seas.
Permit: Day hiking to Hanakapi’ai is free. Beyond requires a $20 state permit.
Haleakalā Crater at Sunrise, Maui

Standing at 10,023 feet, Haleakalā is one of the only places on earth where you watch the sunrise from above the clouds. The crater landscape looks like the surface of Mars. The cloud layer glows pink and orange below you while the sky shifts from deep cobalt to gold.
Book the sunrise permit well in advance – this is the most competitive reservation in Hawaii. Check recreation.gov starting 60 days before your visit. The drive up takes about 90 minutes from Kahului. Dress warm. The summit sits at 40 degrees Fahrenheit at dawn.
Best time: Sunrise. Book at recreation.gov 60 days out. Free with Hawaii state park reservation.
Lens: 16-35mm wide angle for the crater scale.
Lanikai Beach, Oahu

Lanikai is consistently ranked among the most beautiful beaches in the world. The water is a surreal shade of flat turquoise. Two tiny offshore islands called the Mokulua Islands sit perfectly placed for composition. At sunrise the sky goes deep rose and lavender.
Park on Mokulua Drive and walk through the beach access paths between the houses. The beach is narrow and faces east, making it perfect for sunrise only. By 8 AM the light becomes harsh. Come early, stay two hours, leave before the crowds.
Best time: 30 minutes before sunrise to 45 minutes after.
Parking: Free street parking on Mokulua Drive, Kailua, HI.
Waimea Canyon, Kauai
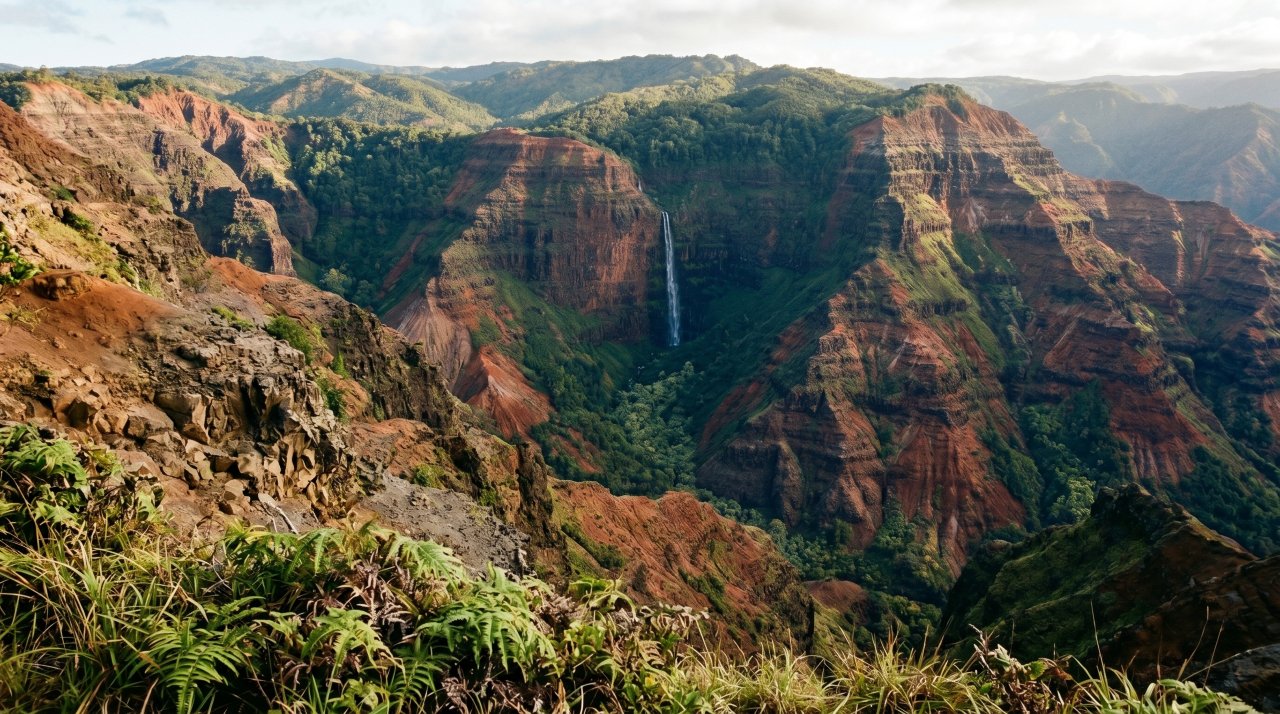
Called the Grand Canyon of the Pacific, Waimea Canyon is 10 miles long, 3,600 feet deep, and completely unexpected on a tropical island. The layered red and green canyon walls are stunning in morning light when the shadows are still deep inside the canyon.
Drive to Pu’u Hinahina Lookout at mile marker 13.5 on Waimea Canyon Drive for the widest views. Go on a day after rain if possible – waterfalls appear along the canyon walls for 24-48 hours after heavy rain. A polarizing filter cuts haze and deepens the red tones.
Best time: 8-10 AM for angled morning light inside the canyon.
Cost: $10 vehicle entry fee to Koke’e State Park.
Makapuu Point Lighthouse Trail, Oahu
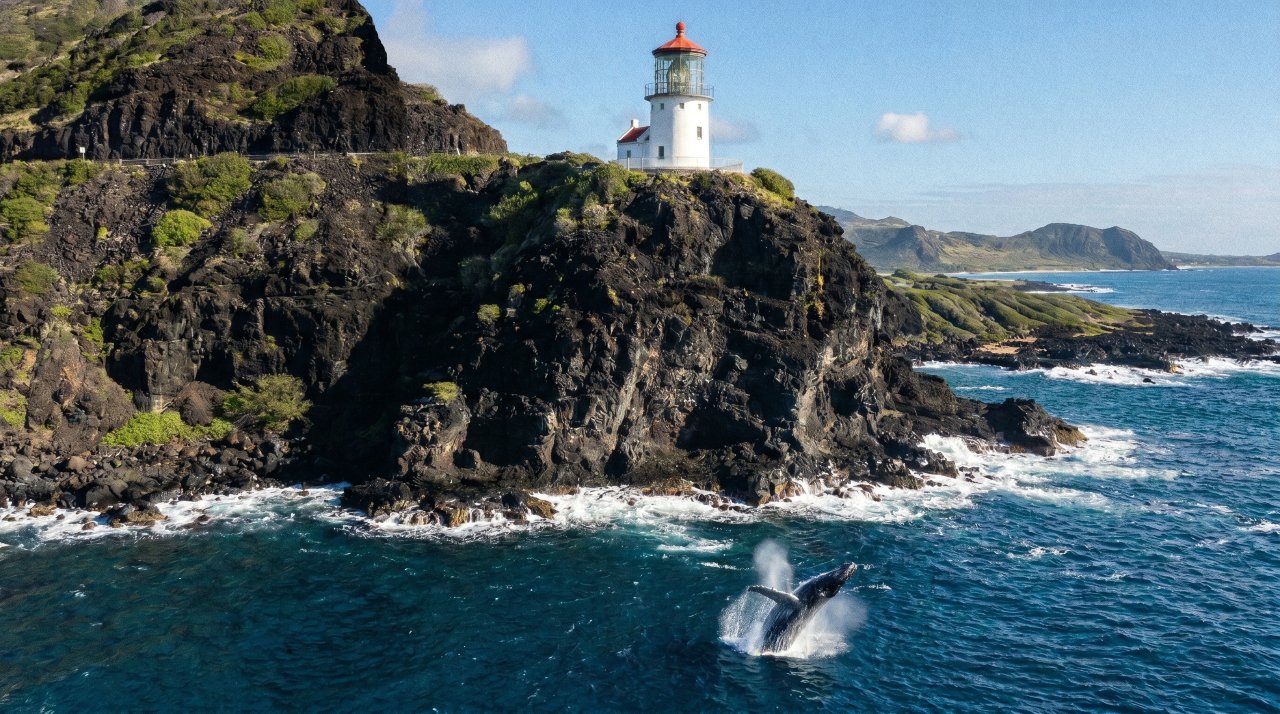
This easy 2-mile paved trail to the Makapuu Point Lighthouse delivers some of the best coastal photography on Oahu with minimal effort. The white lighthouse sits on a dramatic black lava headland above the crashing Pacific. From January to May, humpback whales pass directly below.
The trail gains about 500 feet and takes around 45 minutes one-way. No crowds early. The light on the lighthouse is best in the morning when the sun is behind you. Bring a longer lens in winter months for whale shots.
Best time: 7-9 AM. January to May for whale season.
Cost: Free. Parking at Makapuu Point Lookout, Waimanalo, HI 96795.
Road to Hana Waterfall Pools, Maui
The Road to Hana is 52 miles of switchbacks with over 600 curves and 59 bridges. Every few miles a new waterfall or hidden pool appears. The most photographed stop is Twin Falls near mile marker 2, but the best shots are further along where the crowds thin out.
Stop at Upper Waikani Falls (Three Bears) near mile marker 28 and Wailua Valley State Wayside near mile marker 18 for the best waterfall photography. Arrive before 9 AM at any stop to photograph without crowds. A circular polarizer is essential for shooting waterfalls in bright conditions.
Best time: Early morning, after rain for maximum flow.
Permit: Hana Highway parking reservations are required at some stops. Check gomaui.com.
Pololu Valley Lookout, Big Island
Pololu Valley is the quieter twin of Waipio. Fewer tourists know it and the view from the lookout is just as dramatic – a black sand beach, a taro valley, and pali cliffs covered in dense green jungle. The trail down to the beach takes 20 minutes and the beach is almost always empty.
Stand at the lookout first to compose your wide shot, then hike down for close-up beach shots. The black sand contrasts beautifully with the turquoise water and green cliffs. Come in the morning before clouds settle into the valley.
Best time: 7-10 AM before valley clouds build.
Cost: Free. Located at the end of Highway 270, North Kohala, Big Island.
Iao Valley State Monument, Maui
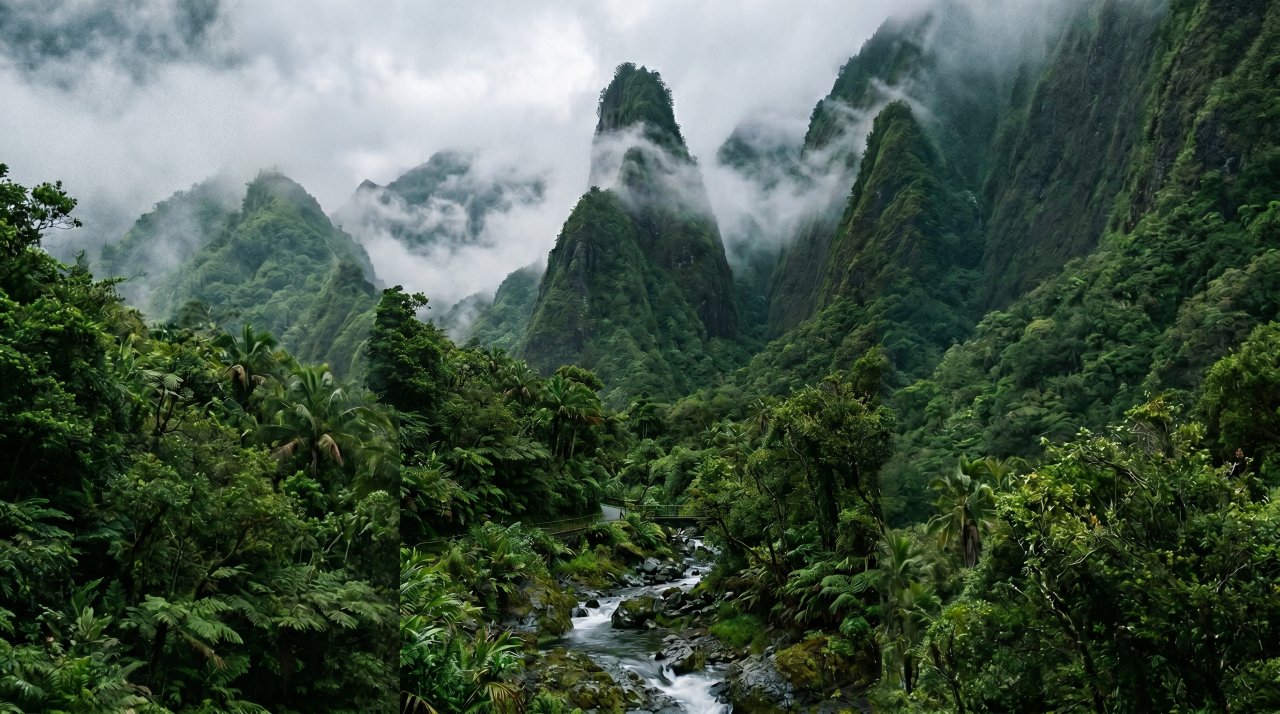
The Iao Needle rises 1,200 feet from the valley floor – a dramatic green basalt spire wrapped in tropical mist. The monument is only 3 miles from Wailuku and takes 30 minutes total. Despite being one of the best Hawaii photography spots on Maui it is often overlooked by beach-focused visitors.
Morning is best before clouds thicken. The valley faces west so afternoon light hits the needle directly but morning gives moody mist. A 50mm lens captures the needle in full while still showing the valley depth.
Best time: 8-10 AM for mist and softer light.
Cost: $5 per person entry fee. Open daily 7 AM to 6 PM.
Punalu’u Black Sand Beach, Big Island
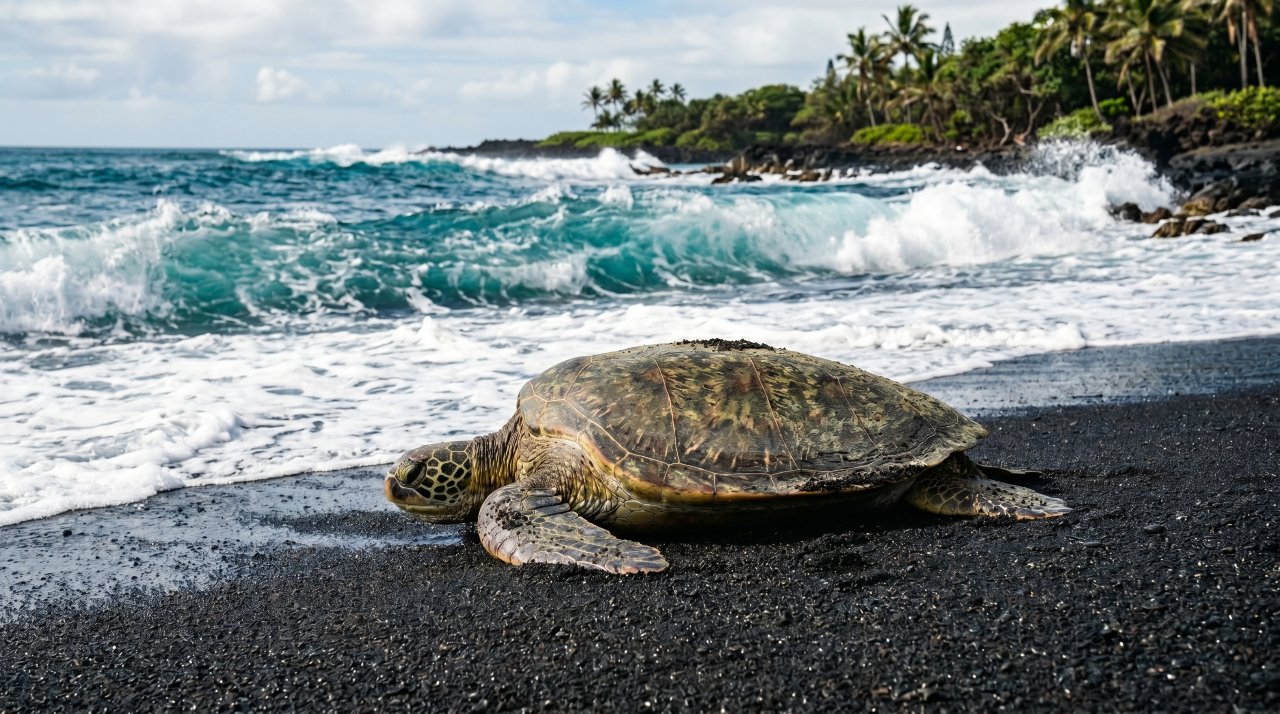
Punalu’u is one of the few places in Hawaii where green sea turtles (honu) regularly haul out onto the beach to rest. Photographing a sea turtle on jet-black volcanic sand is a shot you will not get anywhere else on your Hawaii trip.
Keep at least 10 feet from all sea turtles – this is federal law. Use a 100-400mm zoom lens to photograph from a respectful distance. The best turtle activity is late morning. The black sand itself is photogenic at any hour with the contrast of the white surf.
Best time: 9 AM to noon for turtle activity.
Cost: Free. Located off Highway 11, Ka’u District, Big Island.
Diamond Head Crater Summit, Oahu
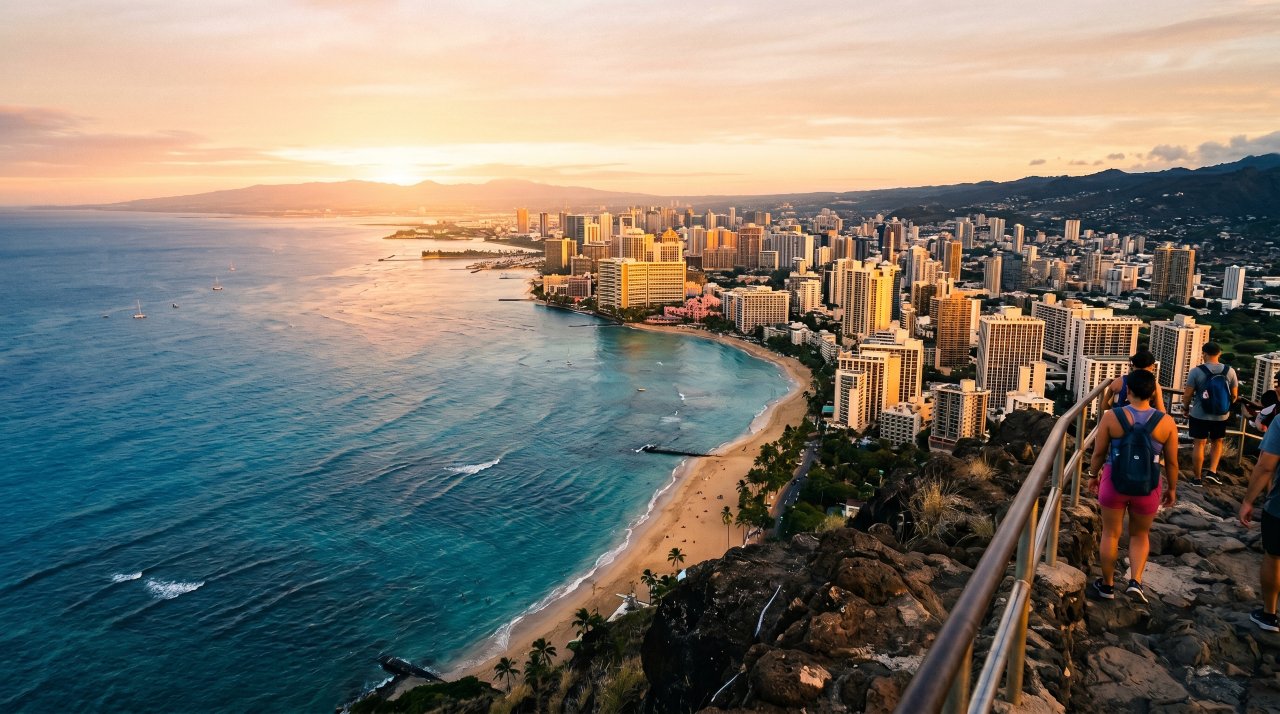
The view from Diamond Head summit at 761 feet shows the entire arc of Waikiki Beach and Honolulu’s skyline below, with the Pacific stretching to the horizon. It is the most iconic Oahu skyline shot. The 1.6-mile round-trip hike takes about 90 minutes.
Start your hike before 7 AM to beat the crowds and catch the morning light on the city. The summit gets crowded by 9 AM on weekends. Bring a wide-angle lens for the full panorama. The tunnel and bunker stairs en route to the summit are also great moody architectural shots.
Best time: 6-7:30 AM.
Cost: $5 per person. Advance reservation required at gostateparks.hawaii.gov.
Ke’e Beach and Na’Pali Reef, Kauai
Ke’e Beach marks the end of the north shore road on Kauai and sits at the foot of the Nā Pali cliffs. The snorkeling reef just offshore is excellent for underwater photography. Above water, the beach frames the cliffs perfectly at sunset.
The cliffs face west and catch warm orange sunset light directly. A 50mm or 85mm lens frames the cliffs above the beach without distortion. In winter the surf gets rough – visit May to September for calm swimming and photography conditions.
Best time: Sunset, May to September.
Cost: Free. Parking at Ke’e Beach State Park, Ha’ena, HI 96714.
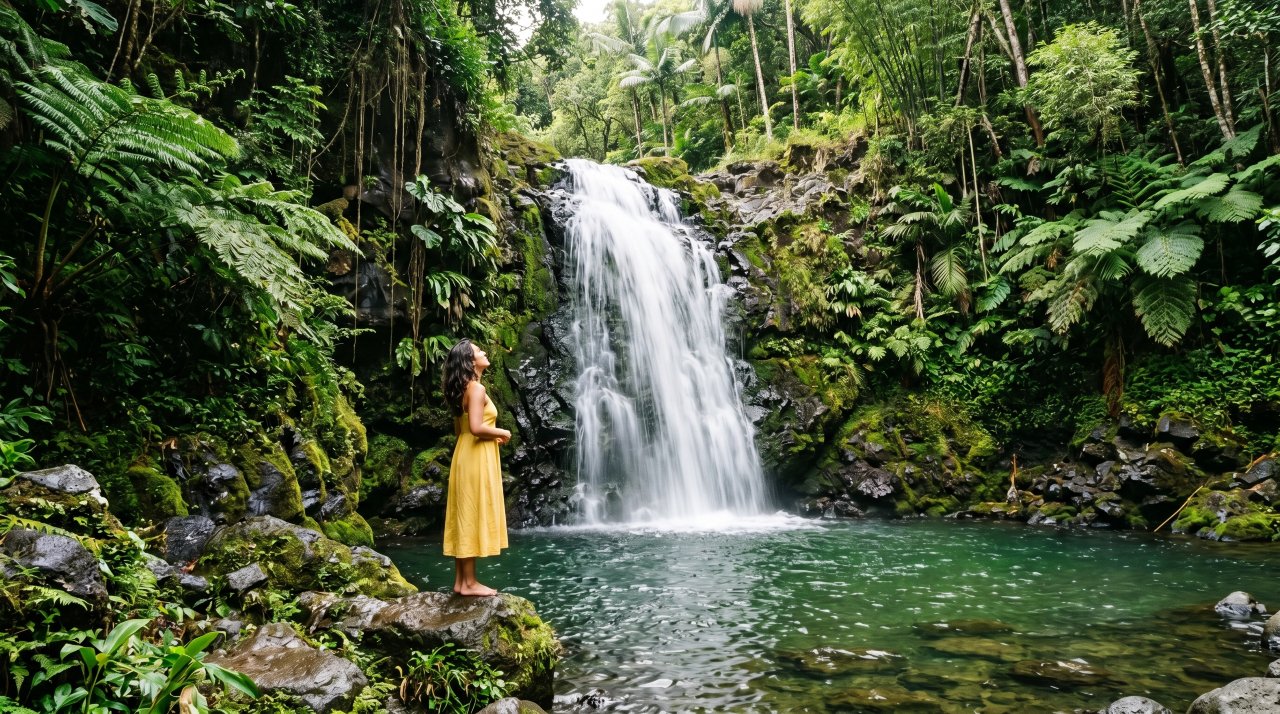
Akaka Falls, Big Island
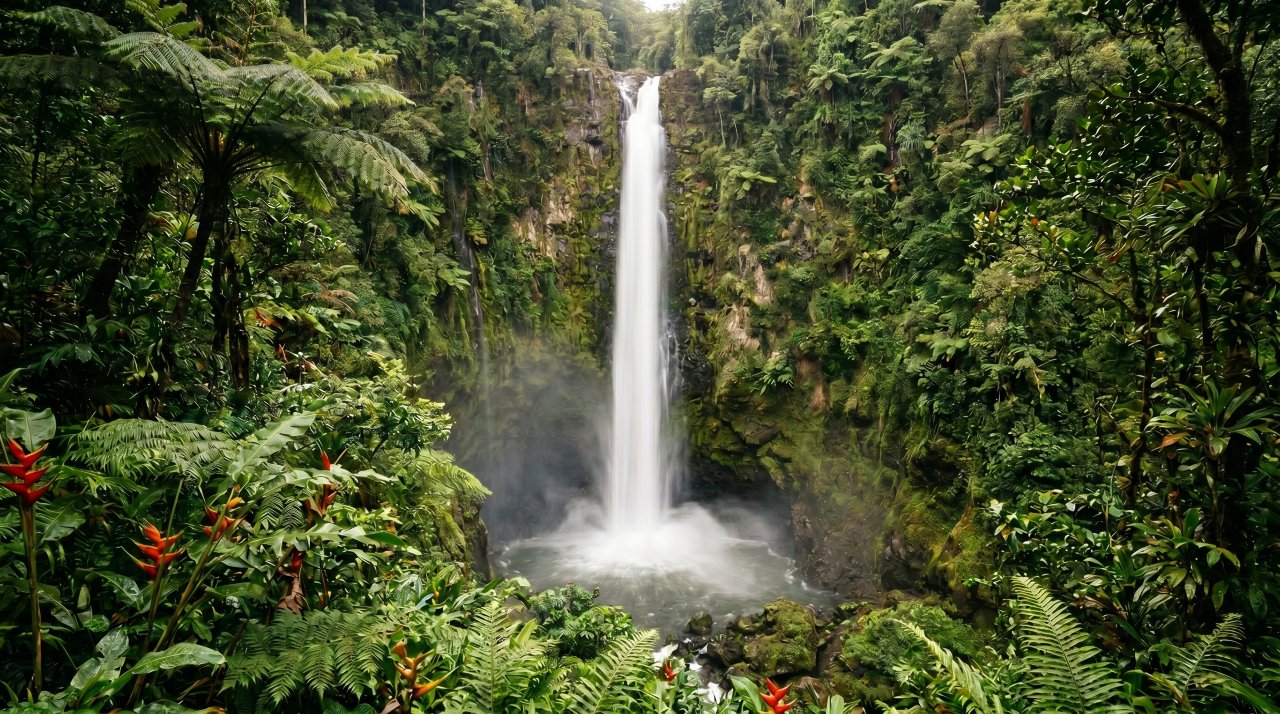
Akaka Falls drops 442 feet in a single free-falling plume into a lush gorge draped in heliconia, ginger, and giant ferns. It is the tallest easily accessible waterfall in Hawaii. The short 0.4-mile loop trail winds through a botanical garden to the main viewpoint.
A slow shutter speed (1/4 to 1 second) silks the waterfall beautifully. Arrive right at 8 AM opening to photograph before other visitors appear in frame. The jungle around the falls is as photogenic as the waterfall itself.
Best time: 8-9 AM.
Cost: $5 per person. Open daily 8 AM to 5 PM.
Maui’s Lavender Farm at Sunrise, Upcountry
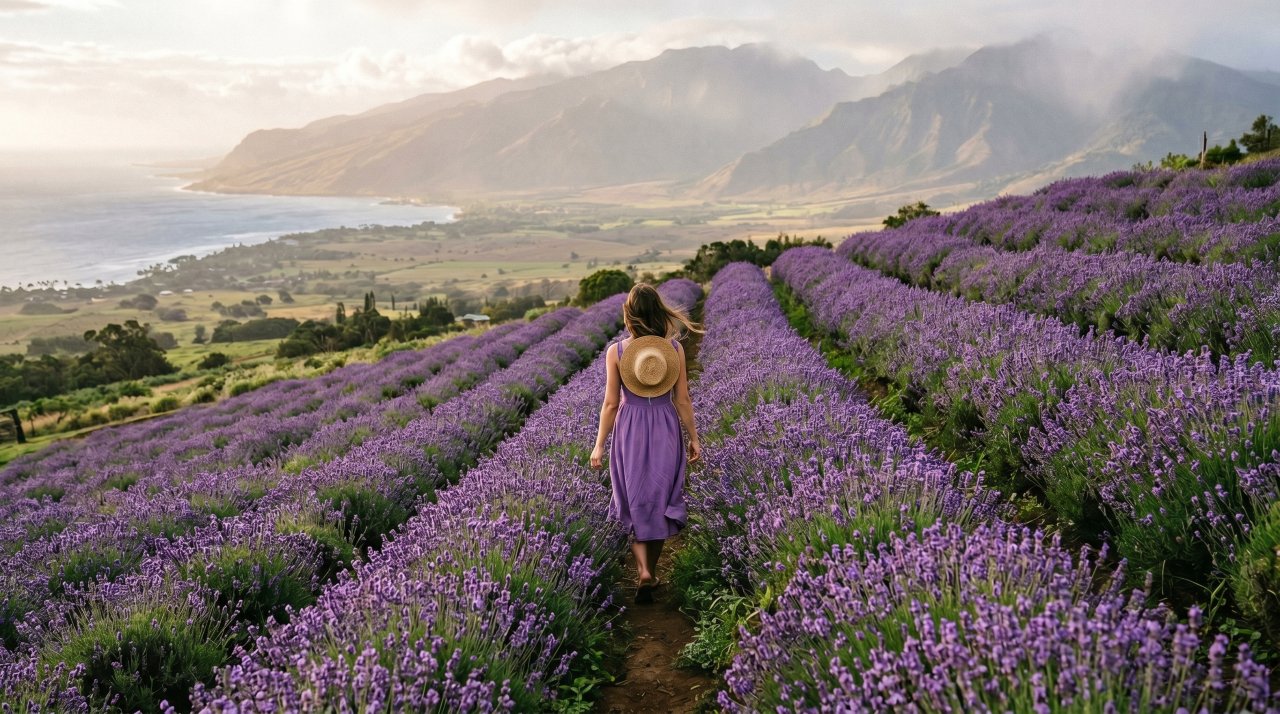
Most visitors never see this side of Maui. The Ali’i Kula Lavender Farm sits at 4,000 feet in Upcountry Maui where it is cool and misty in the morning. Rows of purple lavender stretch across the hillside with a clear view of the West Maui Mountains and ocean below.
The farm opens at 9 AM. Arrive right at opening for the best light and fewest visitors. The lavender peak season is May to June. Even outside bloom season the landscape views are exceptional and completely unlike any other Hawaii picture idea you have seen.
Best time: May to June for full bloom. Opening time for best light.
Cost: Free to walk the grounds. aliikula.com.
Kaena Point Natural Area Reserve, Oahu
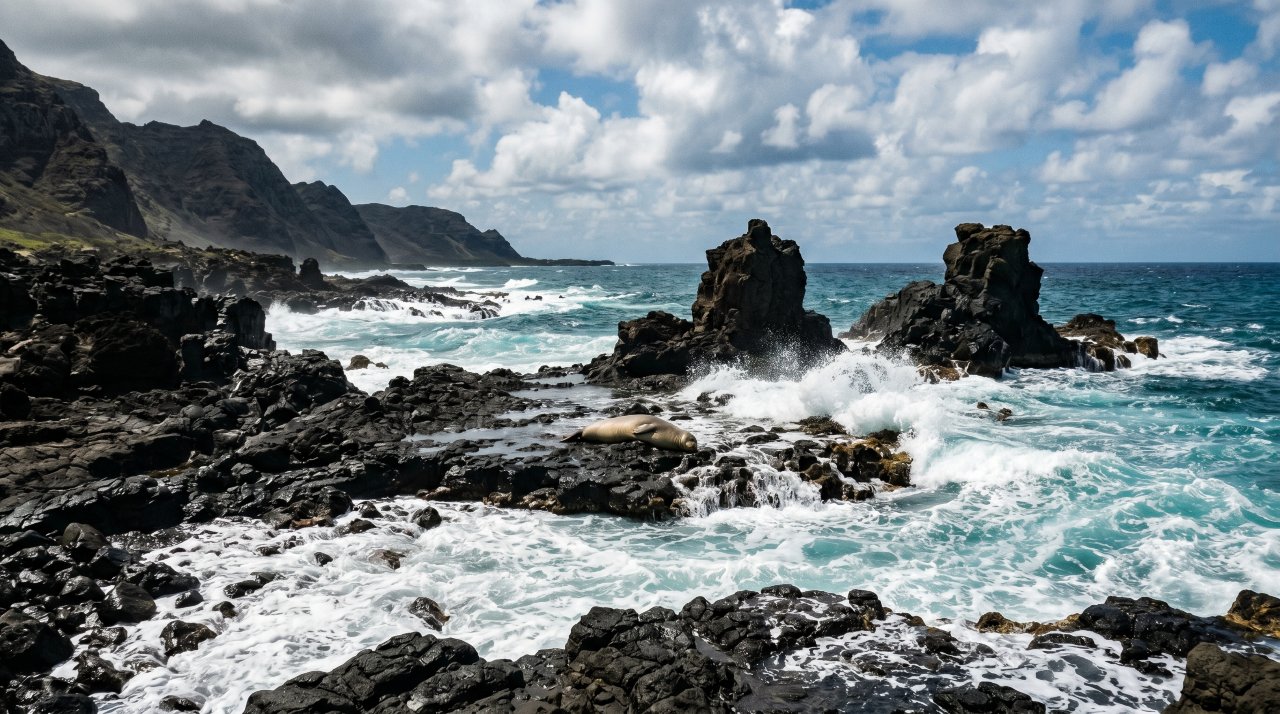
Kaena Point is the most remote accessible spot on Oahu and one of the only places to photograph Hawaiian monk seals and albatross at close range on land. The 5-mile round-trip trail along the coastline has no shade but delivers dramatic sea stacks, blowholes, and wildlife.
Access from the Waianae side is slightly shorter. Go October to February for the best monk seal sightings. The albatross nesting colony at the point is active November to July. The rugged volcanic coastline itself makes for compelling abstract photography even on days with no wildlife.
Best time: October to February for monk seals. Early morning before wind picks up.
Cost: Free. Bring water – no facilities.
Your Hawaii Photography Starts Here
These 15 Hawaii photography spots give you a roadmap from the iconic to the truly hidden. The best Hawaii picture ideas are the ones you have to work for a little – an early alarm, a short hike, or a drive to the end of the road. Every one of these locations rewards that effort with images you will not find anywhere else on Pinterest. Save this guide and share it with someone planning their Hawaii trip in 2026.
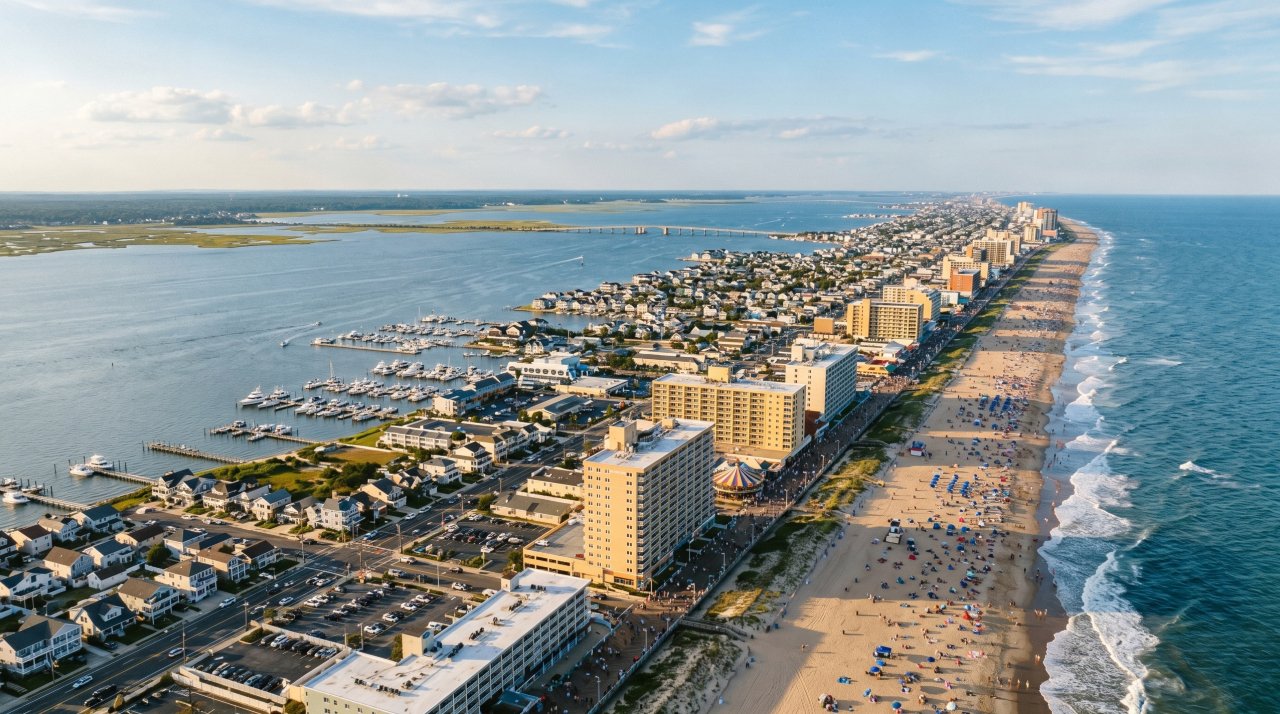
Ocean City Maryland packs more into 10 miles of barrier island than most beach towns manage in an entire coastline. This guide covers the 12 best things to do in Ocean City Maryland — not the tourist brochure version, but the activities locals actually recommend and return for every summer. You will find the specific details, costs, and timing you need to plan a trip that actually delivers.
Ocean City is one of the most visited beach destinations on the East Coast. It draws over eight million visitors a year. With this guide you will know exactly where to spend your time and money.
1. Walk the Ocean City Boardwalk at Golden Hour
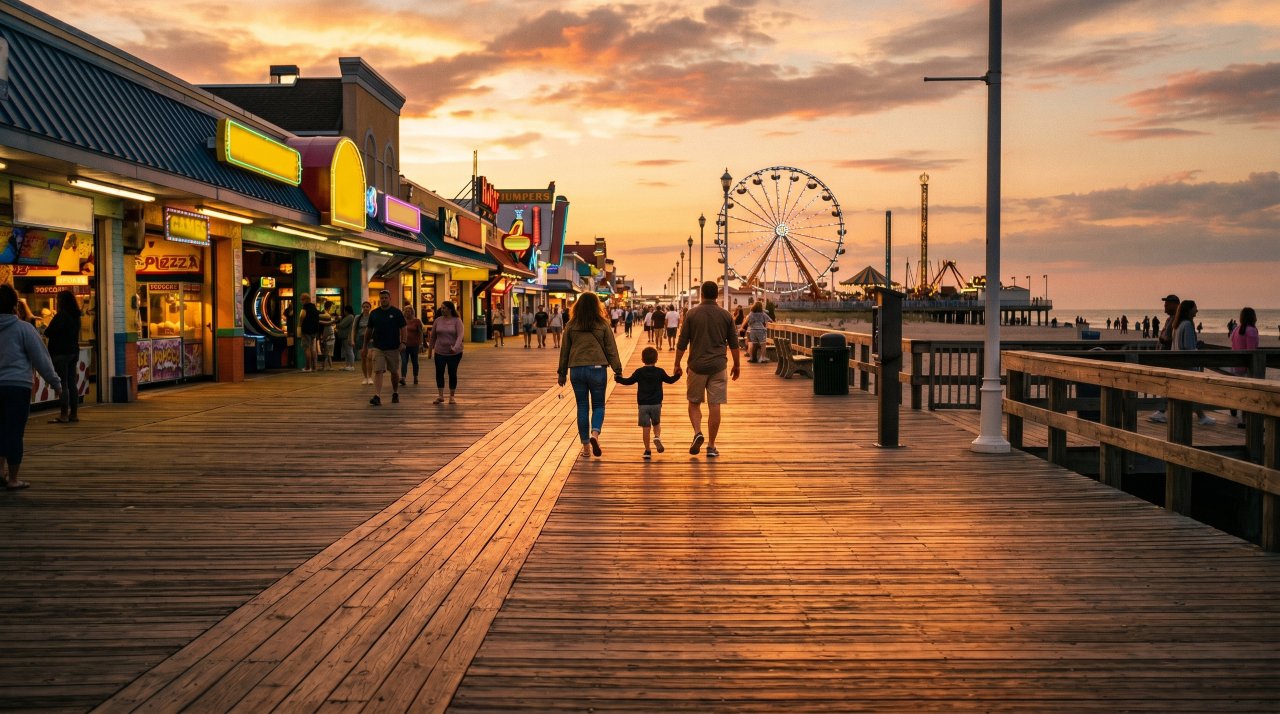
The Ocean City Boardwalk stretches three miles along the Atlantic shore and has been the heart of the resort since 1902. At golden hour the boardwalk transforms. The shops glow warm amber, the rides light up, and the crowd thins just enough to actually enjoy walking it.
Start at the Inlet at the south end and walk north toward 27th Street. The first mile has the densest concentration of food and rides. The second mile quiets down with more family-friendly shops. The third mile is local and relaxed. Give yourself two hours minimum.
Best time: 6-8 PM in summer.
Cost: Free.
2. Eat Thrasher’s French Fries
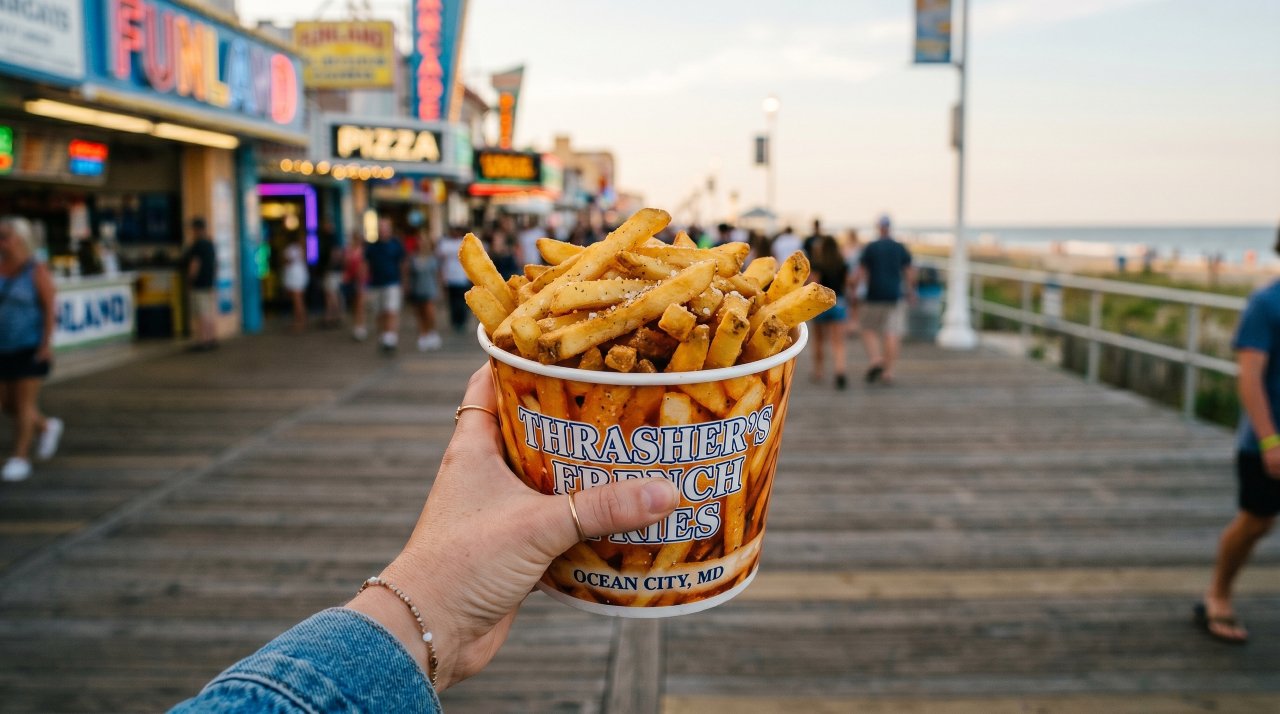
Thrasher’s French Fries has been serving fries on the Ocean City boardwalk since 1929. They are served in a paper bucket, seasoned with salt and apple cider vinegar, and absolutely nothing else. No ketchup. The line is always long and it is always worth it.
The original location at 1 North Atlantic Avenue opens in late March and closes in October. The fries are twice-fried for maximum crunch. Order the large bucket and find a spot on the boardwalk railing to eat them while you people-watch. This is the most Ocean City Maryland thing you can do.
Best time: Midday or early evening when the oil is fresh.
Cost: Small $6, Large $9. Cash only.
3. Surf at 4th Street Beach
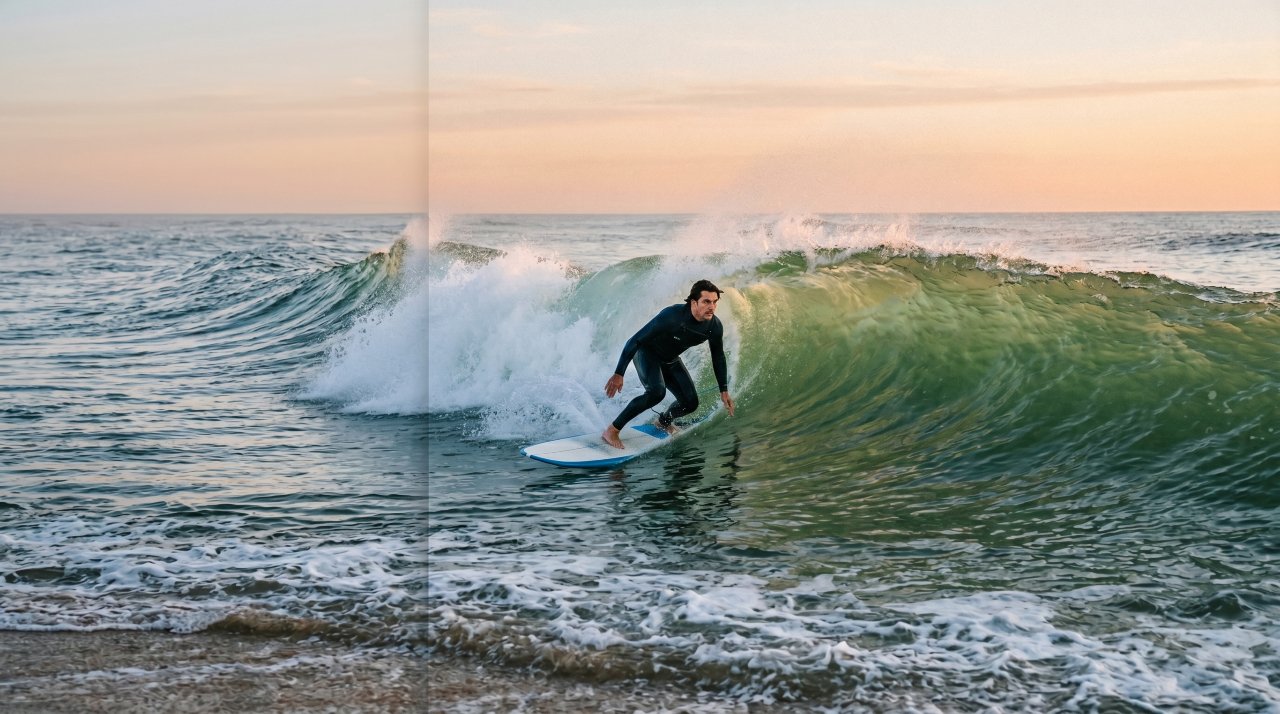
Ocean City has consistent Atlantic surf from April through October. The area around 4th Street is the traditional surf zone where boards are permitted. The waves break best on northeast swells after offshore storms — check Surfline for conditions before you go.
Rentals start at $25 per day from Eastern Surf at 5th Street. Group lessons run $45 for 90 minutes and include the board. The water temperature reaches the low 70s by July. Beginners do best at low tide when the waves close out more gently.
Best time: Early morning before the beach fills up. Northeast swell after offshore storms.
Cost: Rentals from $25. Lessons from $45.
4. Kayak the Isle of Wight Bay
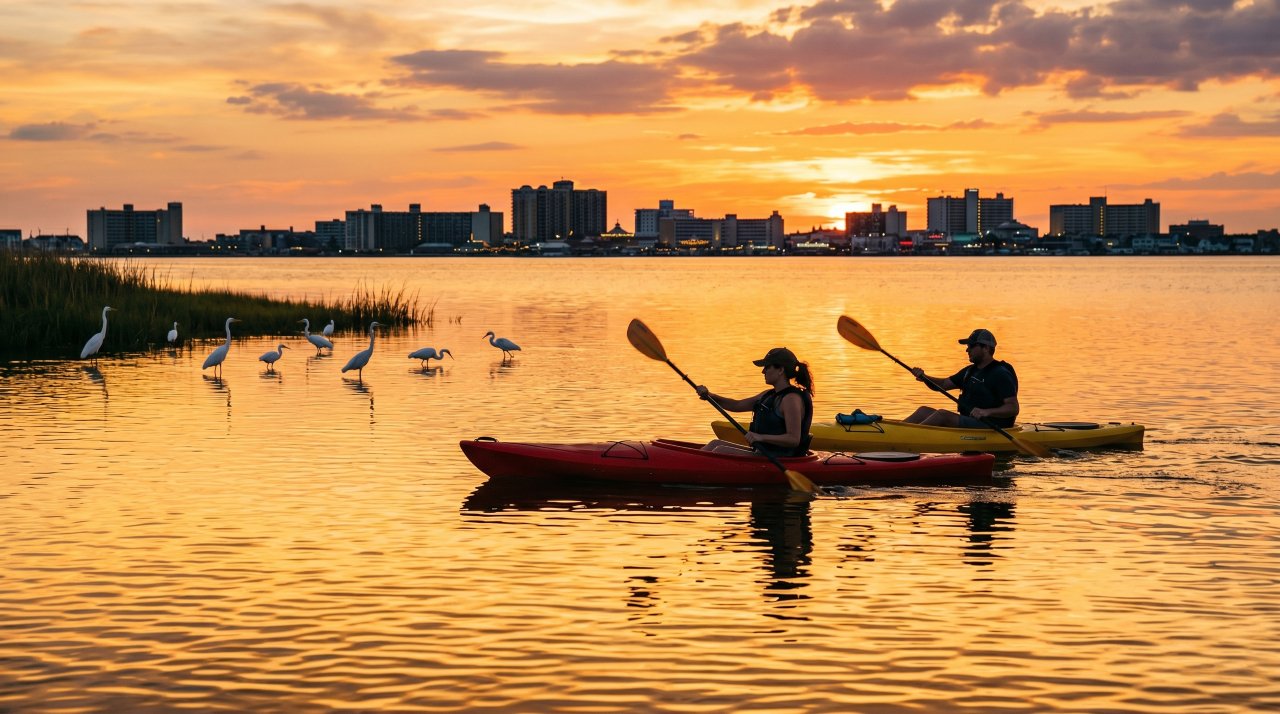
The bay side of Ocean City is a different world from the ocean. The Isle of Wight Bay has calm flat water, egrets, herons, and views back across the island toward the ocean skyline. A two-hour kayak on the bay at sunset is one of the most underrated things to do in Ocean City Maryland.
Paddle Trax at 66th Street rents single kayaks for $25 per hour and doubles for $35. No experience needed for the bay — it is completely flat and sheltered. Sunset tours leave at 6 PM on Fridays from June through August.
Best time: Sunset for golden water and bird activity.
Cost: From $25/hour. Sunset tours from $45 per person.
5. Watch the Sunrise at the Inlet
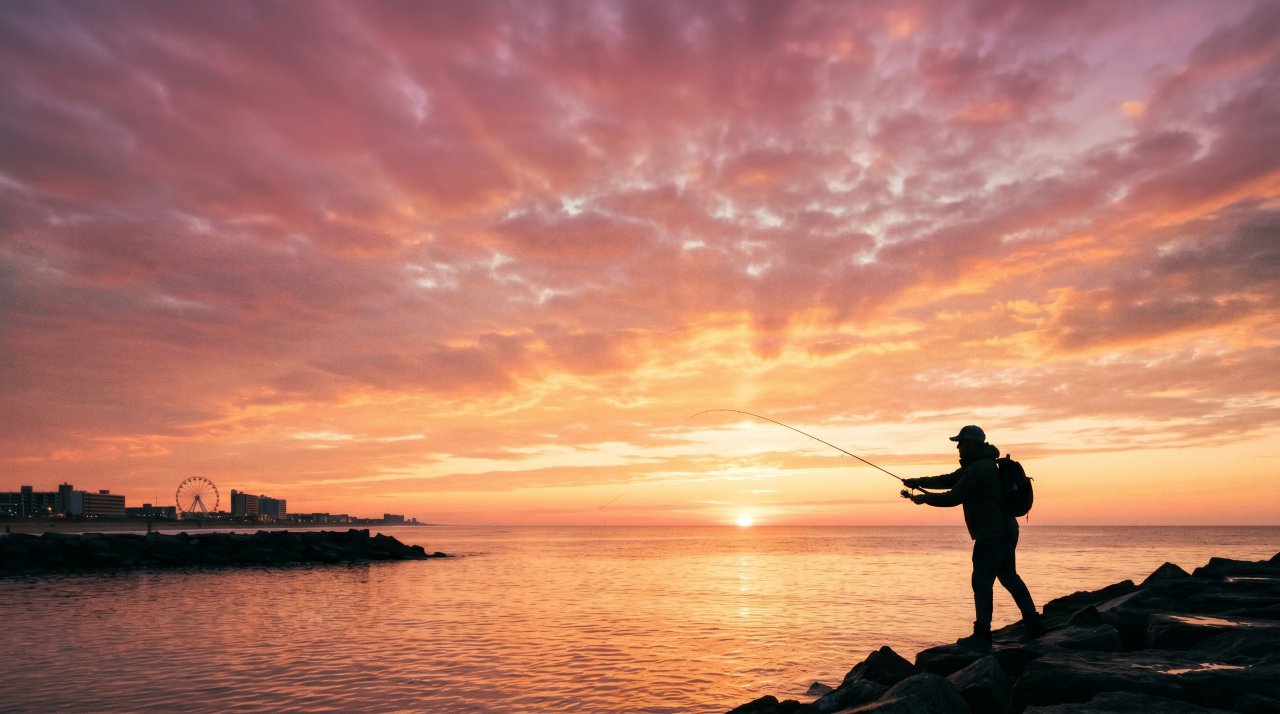
The Ocean City Inlet at the southernmost tip of the island faces east directly into the Atlantic. The sunrise here is one of the best free experiences in all of Ocean City Maryland. The sky turns deep rose and gold over the flat water and you usually have the entire inlet to yourself.
Walk to the end of the inlet jetty rocks for the widest unobstructed view. Bring coffee from Greene Turtle on 21st Street the night before and reheat it in your hotel room. The full sunrise takes about 45 minutes and no alarm earlier than 5:30 AM is needed in summer.
Best time: Sunrise. No crowds before 7 AM.
Cost: Free.
6. Mini Golf at Pirate’s Cove

Ocean City has over 30 mini golf courses. Pirate’s Cove at 2nd Street is the most famous with a dramatic pirate ship structure, cave tunnels, and waterfalls woven through the 18 holes. It has been on the boardwalk since 1967.
Plan for 45-60 minutes. The course gets crowded after 6 PM on weekends. Go at 10 AM on weekdays to walk right on with no wait. Jungle Golf at 25th Street is a great second choice if Pirate’s Cove has a long line. Both are equally well maintained.
Best time: Weekday mornings to avoid waits.
Cost: $12-14 per round. Cash and card accepted.
7. Bike the Boardwalk Before 10 AM
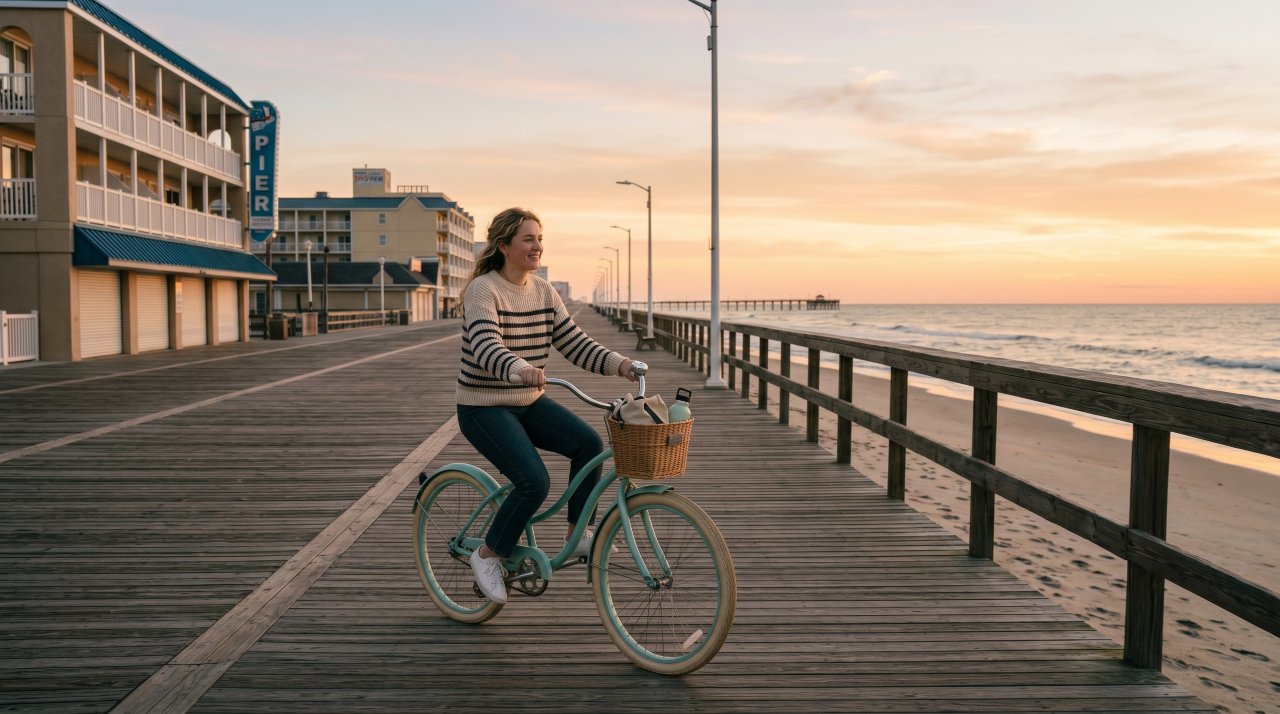
From May 15 through September 15, bikes are permitted on the Ocean City Boardwalk only between 5 AM and 10 AM. This is how locals experience the boardwalk — fast, breezy, and with no pedestrian traffic. The three-mile boardwalk takes about 20 minutes on a casual bike.
Bike rentals open at 5:30 AM from Moped City at Wicomico Street. Rent a single-speed cruiser for $10 per hour. Ride north toward the quiet residential end first, then back south to the Inlet as the morning light comes up over the ocean. This is easily one of the best things to do in Ocean City Maryland before breakfast.
Best time: 6-9 AM.
Cost: From $10/hour.
8. Deep-Sea Fishing Charter
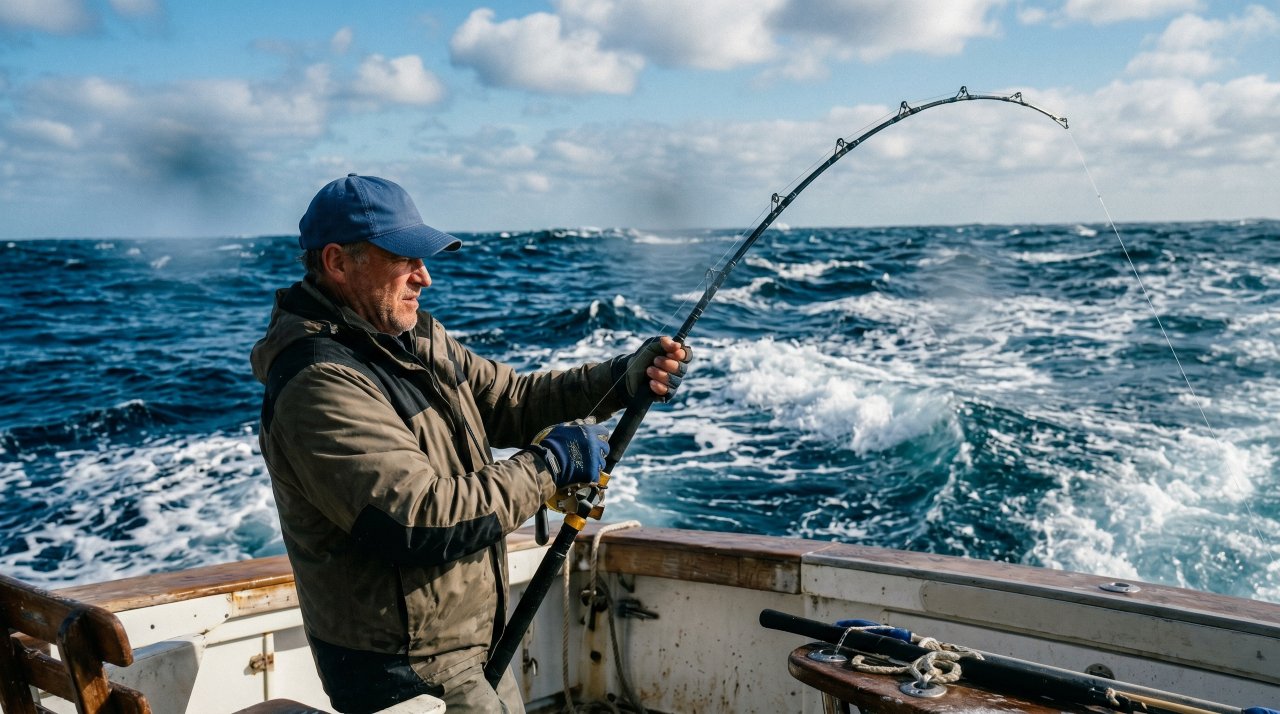
Ocean City is one of the top sportfishing destinations on the East Coast. The canyon waters 50-70 miles offshore hold marlin, tuna, mahi-mahi, and wahoo. Half-day inshore trips targeting flounder, striped bass, and bluefish leave from the Inlet Marina daily at 7 AM.
Book through Angler at the Inlet Marina at 500 South Atlantic Avenue. Half-day inshore trips cost $75-90 per person and are great for families. Full-day offshore canyon trips run $250-350 per person. All equipment is provided. Your catch is cleaned and bagged to take back to your hotel.
Best time: May to October. Mahi-mahi season peaks June to August.
Cost: From $75 inshore, from $250 offshore.
9. Visit Assateague Island
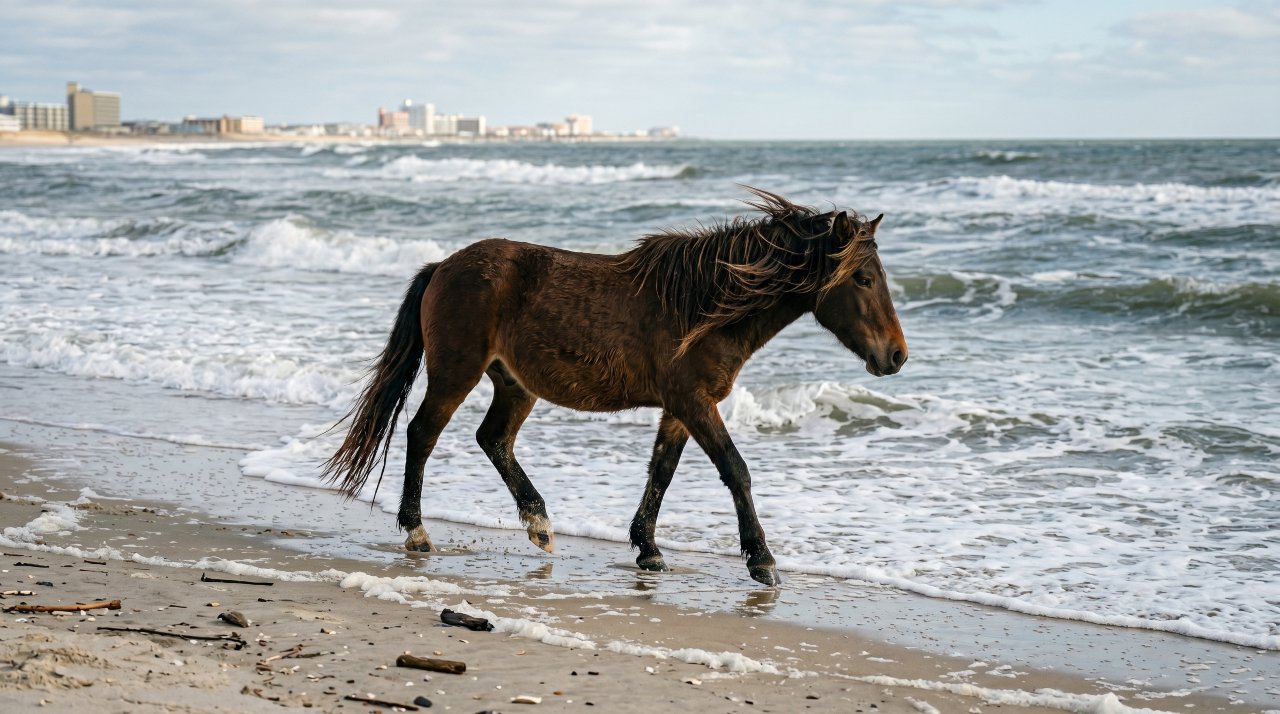
Assateague Island is 10 miles south of Ocean City and it is a completely different world. The barrier island is a national seashore with wild ponies roaming the beach. The ponies were made famous by the novel Misty of Chincoteague and they approach visitors without hesitation.
Drive south on Coastal Highway to Route 611 and cross the bridge into the national seashore. Day use entry is $25 per vehicle. The Maryland side has excellent surf fishing and the ponies congregate near the parking areas. Do not feed the ponies — fines start at $250.
Best time: Early morning or evening for pony activity.
Cost: $25 per vehicle. assateagueisland.com.
10. Sunset Happy Hour at a Bayside Restaurant
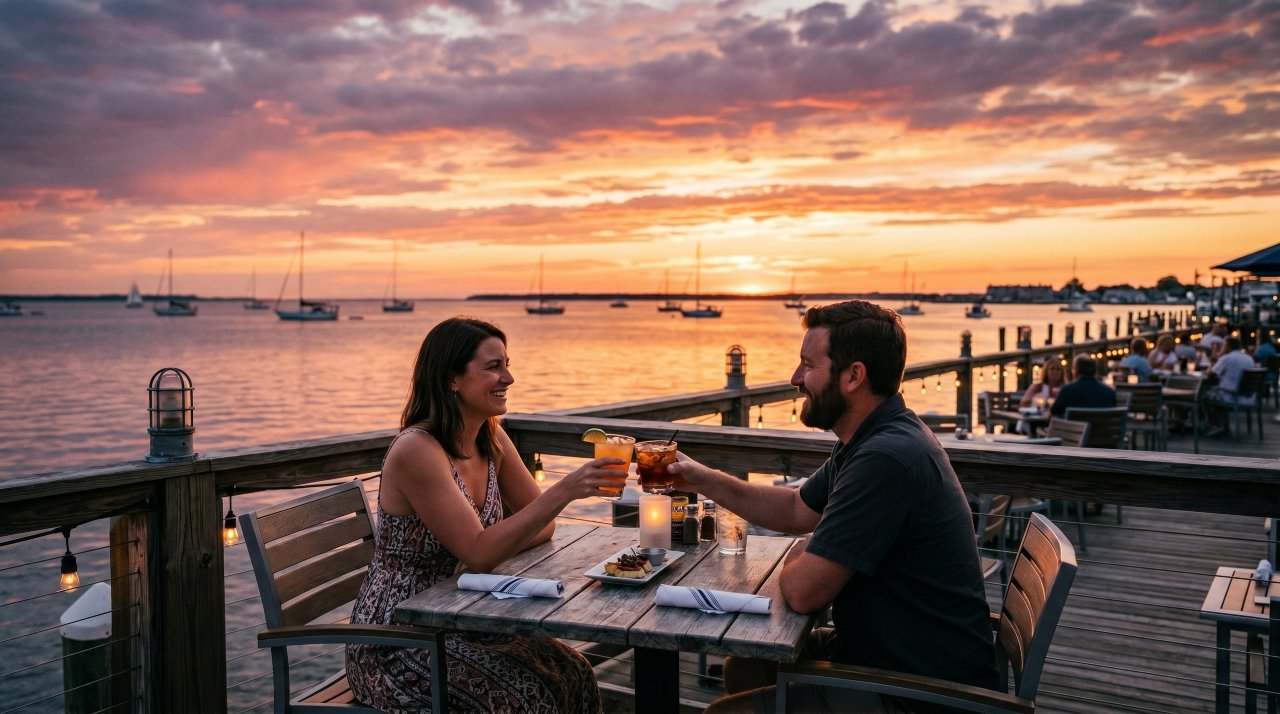
The bay side of Ocean City faces west and delivers spectacular sunsets over the water every clear evening. Seacrets Jamaica USA at 49th Street has a sprawling outdoor deck right on the bay with a Jamaican theme, steel drum bands, and a wide cocktail menu. Tables outside fill up fast.
Arrive by 6 PM to secure a waterfront spot. The Shark on the Harbor at 64th Street is a quieter alternative with excellent seafood. Both restaurants face west for direct sunset views. A frozen mango daiquiri and a crab cake at sunset over the bay is the Ocean City Maryland experience at its best.
Best time: 6-8:30 PM for sunset views.
Cost: Cocktails from $12. Dinner entrees $18-35.
11. Trimper’s Rides

Trimper’s Rides at 1st Street on the south boardwalk has been running since 1893. It is the oldest amusement park in Maryland. The carousel inside is on the National Register of Historic Places and dates to 1902. The rides are a genuine piece of Ocean City history.
The indoor carousel costs $3 per ride. The outdoor rides run on a ticket system — $20 buys enough tickets for a child to ride for about an hour. The park is open daily in summer and weekends in spring and fall. This is not a modern theme park — it is the real, slightly creaky, wonderfully nostalgic original.
Best time: Evening for the full boardwalk atmosphere.
Cost: Carousel $3. Ride tickets from $20 per bundle.
12. Crab Feast at a Local Restaurant
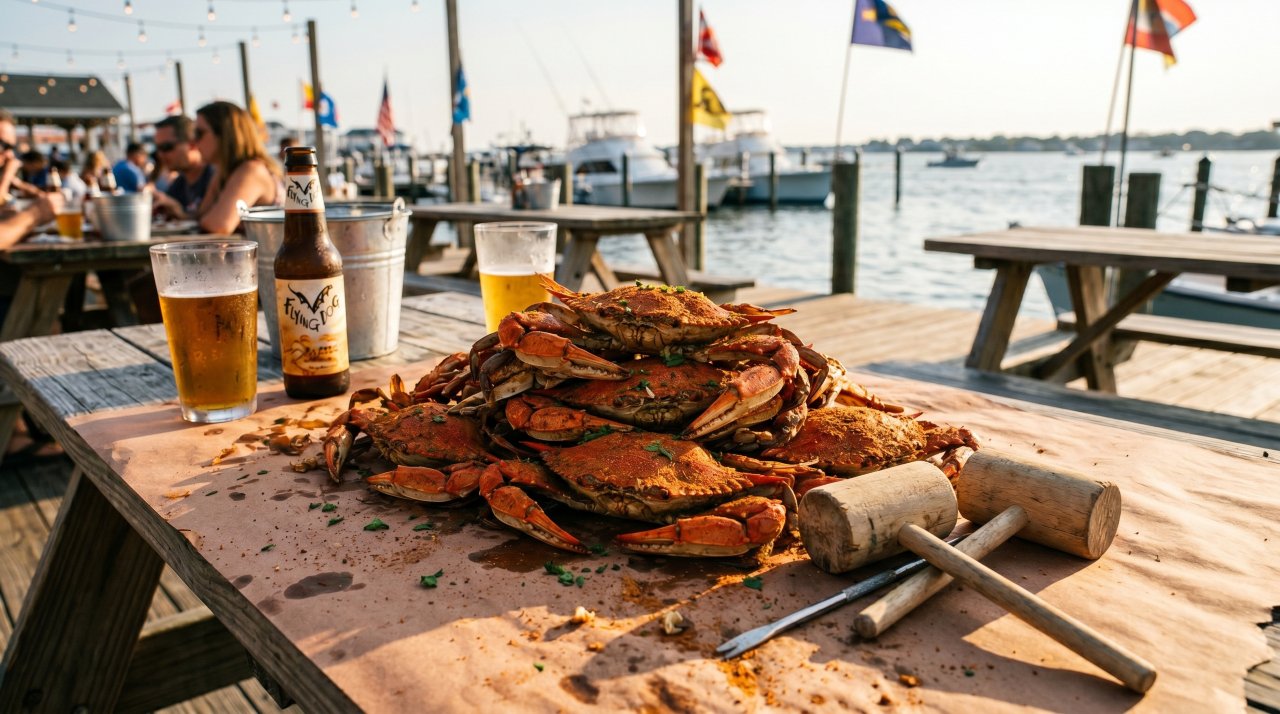
No Ocean City Maryland trip is complete without a proper blue crab feast. Maryland blue crabs are steamed with Old Bay seasoning and served on brown paper at a picnic table. It is messy, social, and unforgettable.
Waterman’s Surfside Grille at 15th Street is locals’ first choice for crabs. Order steamed crabs by the dozen — a medium dozen runs $55-75 depending on the season. They provide mallets, knives, and paper bibs. Pair with corn on the cob, coleslaw, and Natty Boh on draft. This is the best $70 you will spend in Ocean City.
Best time: June to October for peak crab season.
Cost: Crabs from $55 per dozen. All in from $35 per person.
Plan Your Ocean City Maryland Trip Now
These 12 things to do in Ocean City Maryland cover every type of visit — from family beach days to active adventures to sunset dining. Ocean City rewards the visitors who look beyond the boardwalk. Pin this guide for your summer 2026 trip planning and share it with your travel group so everyone knows what is actually worth doing.

luggage storage san francisco Travel Made Easy

18 Most Photogenic London Spots That Most Tourists Walk Right Past