Travel
The Essential Guide to Mountain Camping
There’s something profoundly restorative about escaping into the mountains. With nothing more than a backpack, a sturdy tent, and a desire to disconnect, mountain camping offers a kind of clarity you can’t find anywhere else. High altitudes, star-filled skies, and pine-scented air all come together to create a sense of peace that modern life rarely allows. No Wi-Fi. No alarms. Just the crunch of pine needles underfoot and the flicker of firelight under the trees.
Mountain camping isn’t just about where you go—it’s about how you go. And what you carry with you makes all the difference.
Simplicity is the Real Luxury
In the mountains, you quickly realize how little you truly need. Shelter, warmth, nourishment—these become more than enough. A sleeping bag, a camp stove, a reliable knife, and a few layers cof lothes are the foundation for an incredible outdoor experience. Out here, luxury isn’t measured in amenities, but in moments: watching mist rise off a quiet lake, feeling the warmth of a fire on your face, or sipping hot coffee as the sun peeks over a jagged ridgeline.
This simplicity strips away the noise of daily life and invites you to be fully present. You begin to notice the small things—how smoke curls from a campfire, the sound of boots on gravel, or how your breath clouds in the morning chill. These are the details that modern life often blurs, and out here, they become everything.
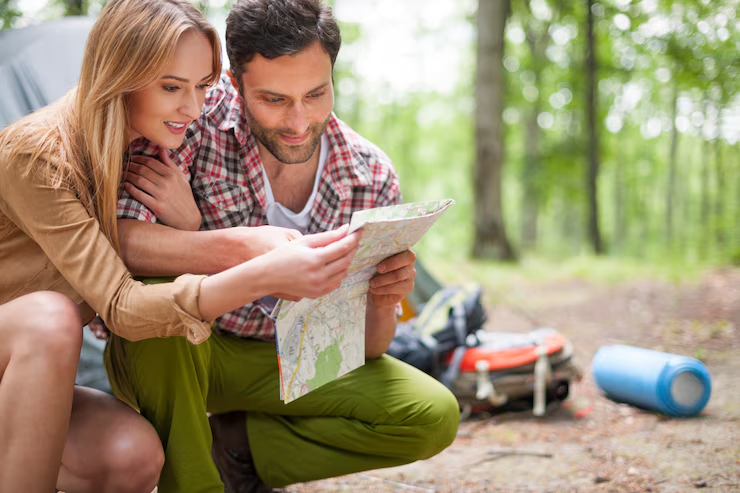
Tools That Matter in the Mountains
While mountain camping offers freedom, it also demands preparation. The gear you bring becomes your lifeline—allowing you to not only survive but thrive in remote terrain. Here are the tools that no camper should head into the mountains without:
- Multi-Use Knife or Pocket Knife
A dependable Damascus steel pocket knife is perhaps the most versatile tool you’ll carry. Whether you’re slicing food, shaving, kindling, cutting rope, or fixing gear, a quality folding blade—ideally one with a Damascus or stainless steel edge—quickly becomes essential. It’s not just a tool; it’s a companion. - Headlamp or Flashlight (with Extra Batteries)
When the sun drops behind the peaks, it gets dark—fast. A hands-free headlamp with multiple brightness settings keeps you safe and mobile after dark, whether you’re cooking or finding your way to the tent. - Portable Water Filter or Purification Tablets
Clean water is non-negotiable. A compact water filter or purification tablets allow you to drink safely from mountain streams and lakes. - Compact Cooking Gear
A lightweight stove, fuel canister, and small pot or pan allow you to prepare simple meals. Don’t underestimate the joy of hot food after a long hike. - First Aid Kit
Blisters, cuts, or unexpected stings—things happen. A first aid kit with the basics (and any personal medications) keeps minor issues from becoming major problems. - Fire Starting Kit
Fire brings warmth, light, and morale. Pack waterproof matches, a lighter, and a magnesium fire starter. Add cotton balls or waxed wood chips to help get things going even when it’s damp. - Map and Compass (or GPS Device)
In case your phone loses signal—and it will—a topographic map and compass are essential. A GPS unit with satellite communication is a smart backup in remote areas. - Rope or Paracord
From hanging food away from bears to fixing gear or building an emergency shelter, strong, lightweight rope is endlessly useful. - Emergency Shelter or Bivy Sack
In addition to your tent, a bivy sack or emergency tarp adds an extra layer of protection when weather turns or plans change. - Layered Clothing System
Conditions in the mountains can shift quickly. Use a layering system: moisture-wicking base layer, insulating mid-layer (fleece or down), and waterproof outer shell. Don’t forget gloves and a warm hat.
Moments That Matter Most
Once your tent is pitched, your fire is lit, and your belly is full, something shifts. The stillness of the mountains settles in. Time slows down. Wrapped in a flannel blanket, sitting by the fire, you feel a kind of peace that can’t be bought. These are the moments where conversations deepen, laughter flows easier, and the night sky reminds you just how big—and beautiful—the world really is.
Coming Down Changed
When the trip ends and the trail leads back to the car, you carry more than your gear. You carry perspective. You remember how little you need to feel content. The deadlines, emails, and noise of life shrink in importance. What stays with you is the clarity of a starry sky, the crackle of a campfire, and the steady comfort of tools that did their job well.
Mountain camping doesn’t need to be extreme or over-planned. With a clear sky, a well-packed bag, and a few essential tools, the wilderness welcomes you in. And if you let it, it just might send you home changed.
If you love travel, you know the feeling. The itch to pack a bag. The curiosity about people who live differently. The quiet thrill of landing somewhere new and not knowing exactly what the day will bring.
Movies can’t replace the real thing. But they can come close. A good travel film lets you see the world through someone else’s eyes. It reminds you why you fell in love with the road in the first place.
Here are six of the best movies for travel lovers. Each one captures a different side of adventure, from soul-searching road trips to wild, real-life journeys. And if you’re planning a movie night, you can always watch free movies at losmovies to explore these stories without leaving home.
The Secret Life of Walter Mitty (2013)
Directed by and starring Ben Stiller, The Secret Life of Walter Mitty is a dream for anyone who feels stuck in routine. Walter works a quiet office job at Life magazine. He spends most of his time daydreaming about bold adventures. Then one day, he has to step out of his comfort zone and travel across the world to find a missing photograph.
The movie takes you from New York to Greenland, Iceland, and the Himalayas. The landscapes are stunning. You see icy seas, dramatic mountains, and wide open skies that make you want to book a flight immediately.
But this film isn’t just about scenery. It’s about courage. It shows that travel often starts with a small decision to say yes. For anyone who’s ever hesitated before buying a ticket, Walter’s journey hits home.
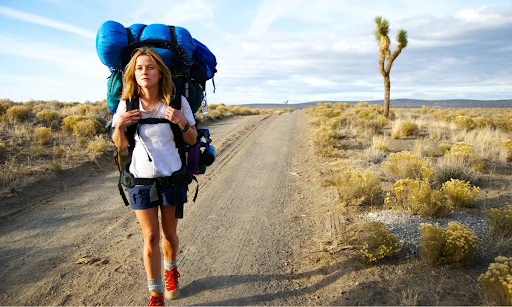
Into the Wild (2007)
Based on a true story, Into the Wild follows Christopher McCandless, a young man who gives up his possessions and savings to travel across the United States and eventually into the Alaskan wilderness.
Directed by Sean Penn and starring Emile Hirsch, this film is raw and emotional. It shows deserts, rivers, forests, and long, empty highways. You feel the freedom of sleeping under the stars. You also feel the cost of isolation and extreme choices.
This movie is perfect for travel lovers who are drawn to the idea of simplicity. It asks hard questions about society, materialism, and what it means to live fully. It also reminds you that nature is powerful and not always forgiving.
If you’re looking for something deeper than a typical adventure film, this one will stay with you long after the credits roll.
Before Sunrise (1995)
Before Sunrise, directed by Richard Linklater, is quieter but just as powerful. The story is simple. An American man and a French woman meet on a train and decide to spend one night walking around Vienna together.
There are no big action scenes or dramatic twists. Instead, you get long conversations, city streets at night, and the magic of a place seen through fresh eyes.
Vienna feels alive in this film. Cafés, parks, trams, and cobblestone streets create a romantic backdrop. It captures something many travelers know well: the intensity of short connections on the road. Sometimes you meet someone for just a few hours, yet it feels unforgettable.
For those who travel for human connection as much as for landscapes, Before Sunrise is a must-watch.
The Motorcycle Diaries (2004)
The Motorcycle Diaries tells the true story of a young Ernesto Guevara, long before he became known as Che Guevara. Played by Gael García Bernal, he sets off on a motorcycle journey across South America with his friend Alberto Granado.
They travel through Argentina, Chile, Peru, and beyond. Along the way, they meet miners, farmers, and families struggling to survive. The trip slowly changes Ernesto’s worldview.
The scenery is breathtaking. From the Andes mountains to the ruins of Machu Picchu, the film offers a sweeping look at Latin America. But what makes it special is how travel becomes a teacher. The journey shapes identity. It challenges assumptions.
If you’ve ever felt that travel opened your eyes to injustice or inspired you to think differently, this movie will resonate deeply.
Eat Pray Love (2010)
Based on the memoir by Elizabeth Gilbert, Eat Pray Love stars Julia Roberts as a woman who leaves her comfortable life behind to travel through Italy, India, and Indonesia.
This film leans into the sensory pleasures of travel. In Italy, it’s all about food and joy. You see plates of pasta, busy streets, and warm conversations. In India, the focus shifts to spirituality and discipline in an ashram. In Bali, the story moves toward balance and love.
Some critics find it idealistic, but for many travel lovers, it captures a real truth. Sometimes you need to leave everything familiar to find clarity.
It’s especially appealing if you’re drawn to solo travel. The movie shows that being alone in a foreign country can be both scary and transformative. And if you’re planning a relaxing movie night before your next trip, you can watch free movies at losmovies and dive into this journey from your couch.
The Darjeeling Limited (2007)
Directed by Wes Anderson, The Darjeeling Limited follows three brothers traveling across India by train in an attempt to reconnect after their father’s death.
The film is visually distinct. Bright colors, carefully framed shots, and detailed sets make every scene feel intentional. The train itself becomes a moving world, filled with strangers, arguments, and unexpected moments.
India is shown in fragments. Bustling markets, desert landscapes, and quiet temples pass by the train windows. The story mixes humor and grief, reminding us that travel can bring unresolved emotions to the surface.
For travel lovers, this movie feels familiar. Long train rides. Awkward conversations. The strange intimacy of sharing space with people on the move. It shows that journeys are not just about destinations. They are about what happens between stops.
Why Travel Movies Matter
Travel movies do more than show beautiful places. They reflect different reasons we leave home. Some characters travel to escape. Others go to search for meaning, connection, or adventure. Sometimes they don’t even know why at first.
Watching these films can reignite your desire to explore. They can also make you appreciate the journeys you’ve already taken. Maybe you’ll remember a late-night walk in a foreign city. Or a bus ride through mountains where you felt small and alive at the same time.
If you’re not able to travel right now, movies can fill part of that gap. You can watch free movies at losmovies and step into another country, another life, another perspective for a couple of hours.
Of course, nothing replaces real travel. The smell of street food, the sound of a new language, the feel of unfamiliar air on your skin. But until your next trip, these six films can keep your wanderlust alive.
So pick one. Make some tea. Turn off your phone. Let the story take you somewhere new.

Understanding Satiety
It is always best to select snacks that allow one to develop a state of fullness (satiety). Satiety is based on different variables like protein, fiber and healthy fats. These slow down the digestion and maintain a constant level of sugar in the blood. Studies indicate that high-protein snacks lower hormones like ghrelin more effectively in comparison to carb-rich ones. Amul Fresh Paneer is a high-protein food item that is easily available in the market, thanks to grocery delivery apps. One can easily come up with different healthy snacking recipes from this.
Swap Processed Snacks for Protein Power
One should always avoid inferior food items like chips or cookies. These increase the blood sugar and leave a person hungry after a short time, consume foods with high contents of nutrients. Amul Fresh Paneer can be regarded as an alternative in this. It offers fresh protein and healthy fat. With online grocery delivery app, it has become easier to get healthy food items delivered to your home. Amul paneer has approximately 18-20 grams of protein per 100 grams and some calcium to keep your bones strong. This paneer is the best snack to have when you need to keep your body going.
Quick Grilled Paneer Recipe
You can make customize your own recipe with amul fresh paneer. You can grill cubes of it with spices such as cumin, turmeric and black pepper to create a simple evening snack. Maillard reaction that happens during grilling provides a desirable texture without the use of oils. Serve it with cucumber slabs or cherry tomatoes as a source of fiber which further adds fullness. This combination can be ready in less than 10 minutes and provides the balanced proportion of macronutrients.
More Satiety-Boosting Snack Ideas
One can also add Greek yogurt and berries to their daily diet to bring together the protein and antioxidants or boiled eggs and avocado that contain healthy fats. But, if you want veg and pocket friendly snacking dishes, then paneer is the best item that you can go for in the current scenario.
To replace meat, roasted herbed chickpeas provide fiber and protein; a video tutorial by NutritionFacts.org shows the simple recipes of roasting chickpeas to achieve the best crunch and nutrition.
Conclusion
Now, it has become so easy to get all required ingredients for healthy snacking at your doorsteps. You can easily search for a “grocery delivery app near me” and place an order of Amul Fresh Paneer and all necessary ingredients effectively. It is important to be indulgent but in a cautious manner, even though protein is a must in our daily diets. Make a note of how much energy you gain when you consume each meal throughout the day. Also, try to select healthier versions of snacks such as grilled paneer or chickpeas which fill your tummy and boost your health levels significantly. This tweak will give you the right blend of health and taste.
Budget Travel Tips for Exploring Expensive Cities in the USA! Traveling to expensive cities in the USA might seem like a daunting task, especially if you’re on a budget. But fear not! With a little creativity and some strategic planning, you can explore iconic destinations without emptying your wallet. From bustling New York City to sunny San Francisco, there are plenty of ways to have an unforgettable experience while keeping costs down. Whether you’re dreaming of art-filled galleries or delectable food from street vendors, these budget travel tips will help you navigate expensive cities with ease. Get ready to discover how to make the most out of your adventures without breaking the bank!
Research and planning tips for saving money on accommodations
Finding affordable accommodations in pricey cities can feel daunting. However, a little research goes a long way.
Start by comparing prices on different booking websites. Often, one platform will have better deals than another. Don’t forget to check for any available discounts or promotions.
Consider staying slightly outside the city center. Neighborhoods that are just a bit further out usually offer lower rates while still giving you quick access to public transportation.
Flexible travel dates can also help you score deals. If possible, avoid traveling during peak seasons or major events when prices skyrocket.
Look into alternative lodging options like hostels or vacation rentals. These can provide unique experiences at much lower costs than traditional hotels.
Join loyalty programs offered by hotel chains and booking sites for additional savings on future stays.
Transportation hacks for getting around on a budget
Getting around expensive cities doesn’t have to drain your wallet. Start by checking public transportation options like buses and subways. Many cities offer day passes that allow unlimited rides for one low price.
Rideshare apps can also be a budget-friendly choice if you travel in groups. Splitting the fare makes it more economical, especially late at night when public transport may not be as frequent.
Consider biking or walking whenever possible. Many urban areas are bike-friendly and feature extensive paths. It’s a great way to explore hidden gems while saving money.
If you’re feeling adventurous, look into car-sharing services or even renting scooters. These options offer flexibility without the hassle of parking fees associated with traditional rentals.
Don’t forget about free shuttle services that some hotels provide to key attractions. Utilizing these can save both time and money during your travels.
Affordable food options and where to find them
When exploring expensive cities, finding affordable food options can make a big difference. Local markets are often gold mines for tasty and budget-friendly treats. Look for farmer’s markets or street vendors that showcase regional specialties.
Food trucks also offer delicious meals at lower prices than sit-down restaurants. They’re perfect for grabbing a quick bite while you roam the streets. Apps like Yelp or TripAdvisor can help pinpoint popular spots favored by locals.
Consider dining during off-peak hours to snag lunch specials or happy hour deals. Many upscale eateries offer discounted menus early in the evening.
Don’t overlook neighborhood delis and cafes; they usually have hearty portions without hefty price tags. Exploring food scenes through local recommendations will lead you to hidden gems that won’t break your budget.
Free or low-cost activities and attractions to explore
Many expensive cities offer hidden gems that won’t cost you a dime. Parks, gardens, and waterfronts provide perfect spots to unwind. Think of places like Central Park in New York or Millennium Park in Chicago.
Museums often have free admission days or discounted rates at specific times. Research ahead for local art galleries or cultural institutions with no entry fees on certain days.
Walking tours can be both educational and budget-friendly. Many cities have guided walking tours based on tips, allowing you to explore while supporting local guides.
Festivals are another great way to experience the culture without spending much. Check local calendars for free events where you can enjoy music, food, and art.
In some areas, street performances bring vibrant energy to public spaces. Grab a seat on the sidewalk and enjoy live entertainment from talented artists at no charge!
Insider tips from locals on how to save money in expensive cities
One of the best ways to save money in pricey cities is to tap into local knowledge. Residents often know hidden gems that visitors overlook. These spots typically offer better prices and unique experiences.
Ask locals for their favorite cheap eats. You might find a taco truck or diner serving delicious meals at half the cost of tourist traps. Also, check out neighborhood markets; they often have fresh produce and affordable snacks.
Public transport can be a lifesaver too. Many locals rely on buses or subways instead of rideshares, which can add up quickly. Look for day passes that allow unlimited travel within certain hours.
Don’t forget about free community events! Many cities host art walks, concerts in parks, or street fairs that are enjoyable without costing a dime. Embrace spontaneity—sometimes the best adventures come from going off the beaten path with tips from those who call it home.
Conclusion: Enjoying the best of expensive cities without breaking the bank
Exploring expensive cities in the USA doesn’t have to mean emptying your wallet. With some smart planning and a few insider tips, you can experience all that these vibrant destinations have to offer without overspending.
Focus on thorough research ahead of your trip. This way, you’ll uncover budget-friendly accommodations and transportation options that won’t compromise your comfort. Use local transit systems or consider walking—many major attractions are within easy reach.
When it comes to food, seek out hidden gems where locals dine rather than tourist traps. Street vendors or popular food markets often provide delicious meals at a fraction of restaurant prices.
Make the most of free activities available in many urban areas. Parks, museums with discounted entry on certain days, and community events can fill your itinerary with enjoyable experiences at little or no cost.
Don’t shy away from asking locals for their favorite budgeting hacks. They may lead you to surprising spots that aren’t found in guidebooks but offer great value.
By implementing these budget travel tips for exploring expensive cities in the USA, you’re setting yourself up for an enriching adventure filled with memories—not regrets about spending too much money along the way. Embrace every moment while keeping a close eye on your budget!

Why Modern Homeowners are Moving Away from Manual Pool Maintenance

6 Best Movies for Travel Lovers